Everything You Need To Know To Make A Laser Engraver From Scrap

make-a-laser-engraver-from-scrap

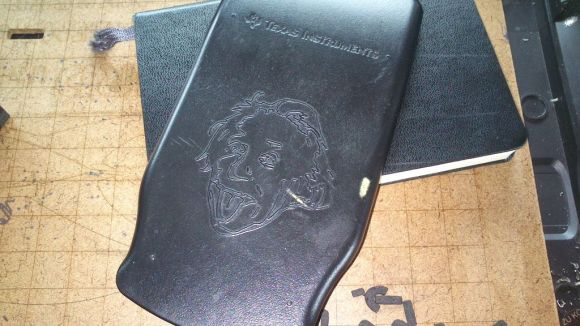
Check out the Einstein head which [Sebastian Müller] etched on the cover of his calculator using a laser engraver he made from scratch. We think he did a great job with the build, but we’re even more impressed with the work he put into sharing the techniques he used to salvage and repurpose all the components. It’s a perfect resource that should be pretty easy to adapt to different model/manufacturer source hardware.

He used an old scanner and an old printer for the bulk of the parts. These both originally included stepper-motor actuated gantries, which pull together to form the x and y axes in his Frankenstein Laser Engraver. As the parts came together he started in on the control electronics which include a couple of EasyDriver stepper motor boards and an Arduino.

At this point he took the machine for a test-run, attaching a marker to the carriage to use it as a pen plotter. After putting in a solid performance at this [Sebastian] moved on to adding in the laser diode. He covers how to drive the diode, as well as focal point alignment in great detail. It seems like his webpage post has the same content as the Instructable linked above but we wanted to leave the link just in case.

DIY Laser Cutter Built To Make Stencils

It was time for some new T-shirts so [Andreas Hölldorfer] built a laser cutter. Wait, what? That’s the excuse he’s going with, and in the end this scratch built laser cutter did come in handy by cutting stencils to use when decorating his garments.

The first thing we thought when looking at the cutter is where’s the tube? [Andreas] didn’t use a CO2 laser, so this ends up being rather low-powered. The cutting head is a 1W blue laser diode which manages to slice the three-ring binder separator pages he’s using for the stencils. The two-axis machine is mounted inside a wooden box to protect his eyes while it’s cutting. He plans to add a drawer later on so that the cutting bed will slide in and out to swap out material for the next project. He already does a lot of 3D printing work and had an old RepRap driver board on hand to use for this projects. He designed and printed the red mounting brackets which make all of the junk-bin components work together. Not bad!

If you’d like to try this out on a smaller scale try using optical drive parts for the axes.

Laser Etching An IPhone 5

Laser Etched iPhone 5

CrashBangLabs in Regina recently got their hands on a laser cutter. The Full Spectrum cutter was donated by a local company, who were upgrading to a larger machine.

With no laser cutting experience, [Brett] decided that his first project would be laser engraving his iPhone 5. This is a bit of an ambitious first project, since the power and speed would have to be set correctly to get a good contrast level, and you only have one try to get it right. Also, using too much power might have turn the phone into a laser etched brick.

[Brett] used an older aluminium iPod for testing. Once the laser speed and power was dialed in, he loaded up the artwork for the real thing. The cutter did a pretty good job at etching the art, but as the etching started it became clear that an alignment error had occurred. Fortunately [Brett] decided to not interrupt the cutter, and ended up with a good looking phone, with a slight alignment issue.

After the break, check out a time lapse of the laser cutter doing its thing.

Continue reading “Laser Etching An IPhone 5”

Acrylic Enclosures Use Integrated Clips To Do Away With Fasteners

acrylic-clip-lock-enclosures

Here’s a design that lets you make acrylic enclosures without using fasteners. The red outline in the diagram above is a bit hard to make out. But look closely and you’ll realize that there is very little material which has been removed to form the clip. This uses the rigidity/flexibility of the material to form a spring that will hold a couple of pieces tightly together.

In a links post last year we looked at [Patrick Fenner’s] fantastic analysis of the strength of using kerf-bending to form several sides of a case out of one piece of material. He’s used that same analytic expertise to take a look into this design. He even suggests that making the cut on the hook-side a bit deeper will help improve the resilience of the part. If you have a laser cutter on hand and want to give this a try he’s posted the plans on Thingiverse.

OpenSCAD Is For Use With 2D Machine, Not Just 3D Printing

openscad-for-2d-machining

Here’s an enclosure which was designed with OpenSCAD and cut out on a CNC router. [Matthew Venn] wrote about the project because he sees tons of 3D printing hacks that use the software, but almost never hears about it as a tool for laser cutting or CNC router/mill work. When we read that we thought we must have seen a lot of 2D hacks but a search of Hackaday’s previous offerings proved us wrong. Just this week we heard about the software in use with the Makerbot. Or you could go back about a year and read about creating 3D molds. But nothing on 2D work.

His post is a quick read and shows off the bare bones of the case designs he’s been working with for a few years. By referencing the code itself, and playing with how it changes the render in OpenSCAD he makes a strong case for quick and easy enclosure design. If you use this technique make sure to document your experience because we want to hear about it!

Laser Cut PCBs

19_done

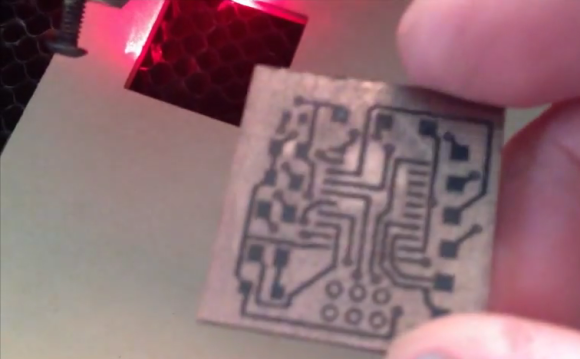
Despite what you may have heard, those 40 Watt laser cutters actually can cut out traces on your next PCB.

Since he got his laser cutter a year and a half ago, [Rich] over at Nothing Labs has been trying to cut PCBs with it. Others have tried, usually by masking off a piece of copper followed by chemical etching. [Rich] wanted a one-step process, though, and his laser cutter really isn’t up to the task of cutting metal.

All that changed when he heard of another maker cutting  .001″ thick stainless steel on a similar laser cutter. Stainless steel isn’t solderable, but mild steel is. After finding a very thin piece of mild steel, [Rich] taped it down to a sheet of acrylic, designed a simple 555 blinky LED circuit, and tried out a new technique.

It turns out it is possible to cut very thin steel into circuit traces, and with enough flux to turn them into a functional circuit. As a bonus the resulting circuit looks really cool and a board can be made in mere minutes.

It’s not the thing for very fine work – the minimum trace width [Rich] can get is about 1/16″, but it is a very fast way to prototype a few circuits.

Continue reading “Laser Cut PCBs”

One Method Of Fabricating Translucent Faceplates

laser-cut-translucent-panel-covers

Enclosures are the bane of electronics engineers (or so says [Dave Jones] of the EEVblog and The Amp Hour). But fabricating a case that looks great has been getting easier lately. [Eric Forkosh] produced this professional-looking translucent face plate with a minimum of effort. He found a way to use a laser cutter to etch icons in acrylic.

Admittedly, this is not very involved. But just look at the quality he achieved. The secret to his success (aside from having a quality laser cutter on hand) is to use high-temperature spray paint. The acrylic is coated in paint and allowed to dry before heading to the laser cutter. By using the rasterize setting under low power he kills two birds with one stone; the paint is etched away while the acrylic is left a little bit rough to act as a diffuser for LEDs behind the panel. [Eric] cautions against using regular spray paint. In his write up he shows off the unsightly results of doing so.

This makes a great addition to some of the case options out there. One that we have been keeping our eye on is the Sick of Beige initiative being spearheaded by [Ian Lesnet].