3D Printable LED Diffusors

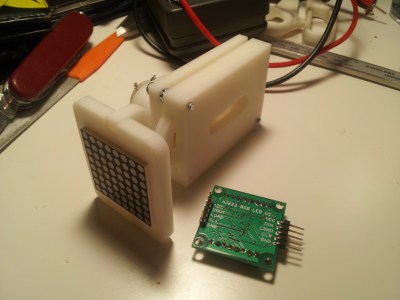
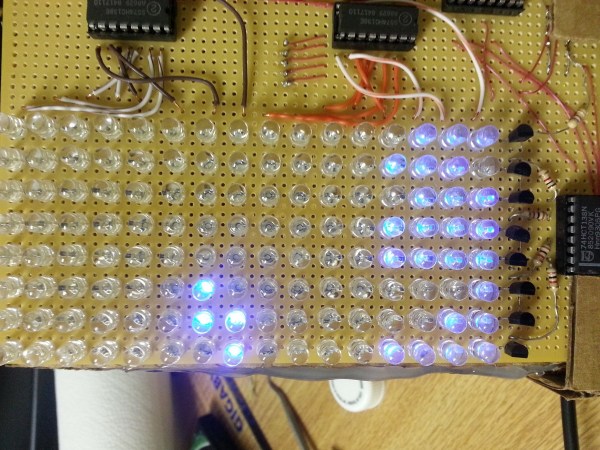
While you can get an LED matrix in any size or shape, the really cool looking ones that are perfect for low-res displays all have diffusors. When they come from a nameless Chinese factory, these diffusors are thin sheets of plastic set into an extruded plastic frame. Since [Jana] has a 3D printer, she figured a custom diffusor was just a few bits of filament and a SCAD file away.

The basis for this custom LED diffusor was a LoL Shield given to [Jana] by the creator at the recent 31C3 conference. This shield is really only just 126 LEDs, multiplexed and in an Arduino form factor, and that many LEDs were just too bright and indistinct next to each other. The plan for a 3D printed diffusor was hatched.

After taking a few measurements, a pair of OpenSCAD files were whipped up and printed out. Assembly consisted of pressing 126 tiny little white diffusors into a frame, but once everything was attached to the matrix, the results were worth it.

Check out the video below for the before and after, demonstrating what a few bits of plastic can do to a LED matrix.

Continue reading “3D Printable LED Diffusors”

Ambilight For Your Piano (Hero)

That old upright piano still sounds great, and now it can easily have its own special effects. [DangerousTim] added LED strips which change color when he tickles the ivories. The strips are applied along the perimeter of the rear side of the upright causing the light to reflect off of the wall behind the instrument. This is a familiar orientation which is often seen in ambilight clone builds and will surely give you the thrill of Guitar Hero’s brightly changing graphics while you rock the [Jerry Lee Lewis].

Key to this build is the electret microphone and opamp which feed an Arduino. This allows the sound from the piano to be processed in order to affect the color and intensity of the LED strips. These are not addressable, but use a transistor to switch power to the three colors of all pixels simultaneously.

We think there’s room for some clever derivative builds, but we’re still scratching our heads as to how we’d use addressable pixels. Does anyone know a relatively easy way to take the mic input and reliably establish which keys are being played? If so, we can’t wait to see your ambilight-piano-clone build. Don’t forget to tip us off when you finish the hack!

WiFi Lamp Challenge – 5 Hour Speedrun

“We want to get this done quick, not right.”

[CNLohr]’s favorite desk lamp broke, so he gave himself a challenge: convert the lamp to LED and control it via WiFi within 5 hours, from scratch. He video recorded and narrated the whole process and did a nice job of explaining the tricky parts and failures along the way, fast forwarding us through the slow parts.

Some bits and pieces were simple and obvious: gut the old bulb, wire some LEDs, add a few power resistors, toss in a power supply from “like a monitor or something, don’t care” for the LEDs, add in what looks like an LM2596 adjustable power supply for the logic, some kind of ATMega, that new ESP8266 (Wi07C), splice on a power cord, etc. Standard stuff.

To our readers who’s hacks tend to start with soldering irons and screwdrivers, the video shows harder parts of designing an electronics project: creating the PCB in software (he used KiCad), lithographically transferring the circuit to a PCB, bismuth solderpasting & populating the board, and writing and documenting his code on Github. Perhaps most reassuringly, he also showed the consequences of every greedy shortcut and the process of troubleshooting around them.

If you have ever tried to follow a recipe from a cooking show and noticed how easy it all seems when everything is measured and prepped beforehand – and then what a disaster it is when you try it – the same is revealed here. Overall, it is a very thorough demonstration of what it actually takes to design a project – not just perfect circuits and perfect steps to follow.

In the end he got it done in the nick of time an hour late because he cannot add. Close enough.

Thanks [gokkor] for the tip.

World’s First Smart Snowboard Changes Music According To Your Actions

Ever wanted a soundtrack to your life? For a couple of minutes at a time, Signal Snowboards creates that experience with a smart snowboard that varies your music depending on the tricks you perform on your way down the mountain.

The sign on the door says “School For Gifted Hackers”. Inside [Matt Davis] helped interface audio with an accelerometer – something he regularly does with all manner of hacked devices. At first the prototype was an iPhone mimicking the motions of a snowboarder the way fighter pilots describe dogfights with their hands. The audio engine that pulls those mostions to sound is open source and anyone is welcome to do their own tuning.

Once the audio was figured out the boys took it back to their shop and embedded the sensors into a new snowboard. The board is equipped with GPS, an accelerometer, a few rows of LEDs and a bluetooth board to connect to the phone app. It’s all powered by an on-board LiPo battery and a barrel jack out the side to charge it. Channels were cut by hand with a router then electronics sealed in place with epoxy. Not wanting to “just strap some Christmas lights onto a snowboard” the lighting is also connected to the sensors and is programmable.

See the video below of them making the board and taking it out for a test run on Bear Mountain.

Continue reading “World’s First Smart Snowboard Changes Music According To Your Actions”

FPGA Ambilight Clone Packs A Ton Of Features

[Stephen] designed a standalone Ambilight clone built around an FPGA and recently added many new features to make his design even better. His original design was based around a Spartan 3-E FPGA, but his new design uses the Papilio One board with a Spartan-6 LX9 FPGA. This gives him dedicated DSP hardware and more RAM, allowing him to add more processing-intensive features.

[Steven]’s new board can drive up to 4096 LEDs total, and each LED is colored from one of 256 segmented screen areas. The output of the LEDs is smoothed over a configurable time period which makes the result a bit more pleasant. [Steven] also added color correction matrices and gamma correction tables to make up for differences in LED coloration and so the output can be fine-tuned to the color of the wall behind the TV.

Finally, [Steven] added multiple configurations which can be stored in Flash memory. The FPGA can detect letterboxes and pillarboxes in the video stream and change to a corresponding configuration automatically, so settings rarely need to be manually adjusted. He also added an extensive serial interface to configure all of the parameters and configurations in Flash. Be sure to check out the video after the break to see his setup in action.

Continue reading “FPGA Ambilight Clone Packs A Ton Of Features”

Desk lamp

Sleek Desk Lamp Changes Colors Based On Sun Position

[Connor] was working on a project for his college manufacturing class when he came up with the idea for this sleek desk lamp. As a college student, he’s not fond of having his papers glowing brightly in front of him at night. This lamp takes care of the problem by adjusting the color temperature based on the position of the sun. It also contains a capacitive touch sensor to adjust the brightness without the need for buttons with moving parts.

The base is made from two sheets of aluminum and a bar of aluminum. These were cut and milled to the final shape. [Connor] found a nice DC barrel jack from Jameco that fits nicely with this design. The head of the lamp was made from another piece of aluminum bar stock. All of the aluminum pieces are held together with brass screws.

A slot was milled out of the bottom of the head-piece to make room for an LED strip and a piece of 1/8″ acrylic. This piece of acrylic acts as a light diffuser.  Another piece of acrylic was cut and added to the bottom of the base of the lamp. This makes for a nice glowing outline around the bottom that gives it an almost futuristic look.

The capacitive touch sensor is a pretty simple circuit. [Connor] used the Arduino capacitive touch sensor library to make his life a bit easier. The electronic circuit really only requires a single resistor between two Arduino pins. One of the pins is also attached to the aluminum body of the lamp. Now simply touching the lamp body allows [Connor] to adjust the brightness of the lamp.

[Connor] ended up using an Electric Imp to track the sun. The Imp uses the wunderground API to connect to the weather site and track the sun’s location. In the earlier parts of the day, the LED colors are cooler and have more blues. In the evening when the sun is setting or has already set, the lights turn more red and warm. This is easier on the eyes when you are hunched over your desk studying for your next exam. The end result is not only functional, but also looks like something you might find at that fancy gadget store in your local shopping mall.

The Epoch Christmas Tree

It’s that time of the year again, and the halls are being decked with trees, the trees covered in lights, and everyone working in retail is slowly going insane from Christmas songs piped over the PA. [Dan] has a tree and a bunch of programmable LEDs, but merely pumping jollity down that strip of LEDs wouldn’t be enough. The Nerd Quotient must be raised even higher with a tree that displays a Unix timestamp.

This build was inspired by an earlier, non-tree-based build that displays Unix time on a 32 LED array. That build used an ATMega328p for toggling LEDs on and off. This time around, [Dan] is using a dedicated LED controller – the AllPixel – that just wrapped up a very successful Kickstarter campaign. The AllPixel is, in turn, controlled by a Raspberry Pi running the BiblioPixel library,

The tree displays the current time stamp in binary across 32 spaces, with green representing a ‘one’ and a red representing ‘zero’. The top of the tree is the least significant bit, but in case [Dan] gets tired of the bottom of the tree staying completely still for the rest of this holiday season, he can switch the order making the base of the tree the LSB.

Video below.

Continue reading “The Epoch Christmas Tree”