Light Stage

Incredibly Simple Stage For Product Photos

If you’ve ever tried to take nice photos of small objects in your home, you might have found that it can be more difficult than it seems. One way to really boost the quality of your photos is to get proper lighting with a good background. The problem is setting up a stage for photos can be expensive and time-consuming. [Spafouxx] shows that you don’t need to sink a lot of money or energy into a setup to get some high quality photos.

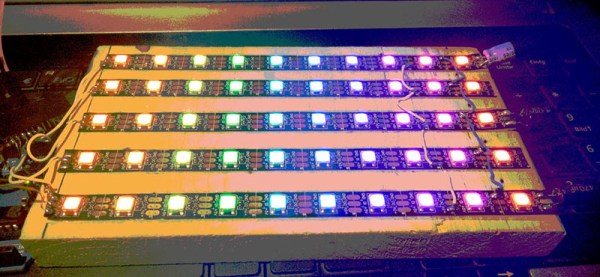
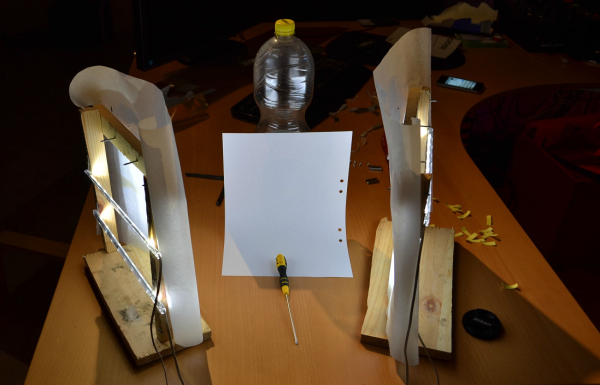
His lighting setup is very simple. Two wooden frames are built from scraps of wood. The frames stand upright and have two LED strips mounted horizontally. The LEDs face inwards toward the object of the photos. The light is diffused using ordinary parchment paper that you might use when baking.

The frames are angled to face the backdrop. In this case, the backdrop is made of a piece of A4 printer paper propped up against a plastic drink bottle. The paper is curved in such a way to prevent shadows. For being so simple, the example photo shows how clean the images look in the end.

Notification Cube

LED Notification Cube Is A Good First Project

Two years ago, [Matt] made a move away from his software hacks and into the physical world. He was part of a pilot program to provide mentorship to children as part of the Maker Education Initiative. This program gave him access to 3D printers, CNC machines, and laser cutters within the New York Hall of Science makerspace. [Matt] chose to build an illuminated notification cube for his first physical project. The idea being that smart phones have so many alerts, many of which are unimportant. His project would help him to visualize and categorize each alert to better understand its importance.

The brain of the system is a Raspberry Pi. [Matt] found a Python library that allowed him to directly control an RGB LED strip based on the LPD8806 chip. He wired the data pins directly to the Pi and used an old 5V cell phone charger to power the LEDs. The strip was cut into smaller strands. Each face of the cube would end up with three strands of two LEDs each, or six LEDs per side. [Matt] found a mount for the Pi on Thingiverse and used a 3D printer to bring it into existence. The sides were made of frosted laser cut acrylic. The frosted look helps to diffuse the light from the LEDs.

Over time [Matt] found that the cube wasn’t as useful as he originally thought it would be. He just didn’t have enough alerts to justify the need. He ended up reprogramming the Pi to pull weather information instead, making use of the exact same hardware for another, more useful purpose.

Nyan Cat

Embroidered Nyan Cat Brings A Meme To The Real World

Have you ever come across an Internet meme and just thought to yourself, “I have to bring this into the physical world!” Well [0xb3nn] and [Knit Knit] did. They decided to take the classic nyan cat meme and bring it to life.

The frame is 24″ x 36″. Many hours went into the knitting process, but the result obviously turned out very well. The stars include 24 LED sequins to add a sparkling animation effect. These were sewn onto the back of the work using conductive thread. They are bright enough to shine through to the front where needed. These connect back to an Arduino Pro Mini 5V board.

The Arduino is also connected to a capacitive touch sensor. This allows the user to simply place their hand over the nyan cat image to start the animation. No need for physical buttons or switches to take away from the visual design. An Adafruit AudioFX sound board was used to play back a saved nyan cat theme song over a couple of speakers. The source code for this project is available on github. Be sure to watch the demo video below. Continue reading “Embroidered Nyan Cat Brings A Meme To The Real World”

LEDs Strips Tell You The Trains Aren’t Running

[James] is a frequent user of the London Underground, a subway system that is not immune to breakdowns and delays. He wanted a way to easily tell if any of the trains were being disrupted, and thanks to some LEDs, he now has that information available at a glance without having to check a webpage first.

Inspired by the Blinky Tape project at FT Engineering, [James] thought he could use the same strip of addressable LEDs to display information about the tube. A Raspberry Pi B+ gathers data from the London Underground’s TfL API and does a few calculations on the data. If there is a delay, the LEDs in the corresponding section of the strip will pulse, alerting the user to a problem with just a passing glance.

The project is one of many that displays data about the conditions you’ll find when you step outside the house, without having to look at a computer or smartphone. We recently featured an artistic lamp which displays weather forecasts for 12 hours into the future, and there was an umbrella stand which did the same thing. A lot is possible with LEDs and a good API!

Continue reading “LEDs Strips Tell You The Trains Aren’t Running”

Fibonacci Clock Is Hard To Read, Looks Good

Artists have been incorporating the golden ratio in their work for many hundreds of years, and it is thought that when proportions are in line with this ratio, it tends to be more aesthetically pleasing. With that in mind, the clock that [Philippe] created must mathematically be the best looking clock we’ve ever featured, even if it is somewhat difficult to tell time from it.

The clock is made up of squares which represent the first five numbers of the Fibonacci sequence. The squares are backlit with LEDs, which will illuminate red for the hour, green for the minute, and blue representing the overlap of hours and minutes. Simply add up the red and blue squares to get the hour, and add the green and blue squares to get the minutes. The minutes are displayed in 5 minute increments since there aren’t enough blocks though, so you’ll also have to multiply. Confused yet? If not, it turns out that there are several ways to display certain times using this method, any of which can be randomly selected by the clock. [Philippe] reports that there are 16 different ways to represent 6:30, for example.

The clock is driven by an ATmega328P and is housed in a wooden case. There are schematics and code available on [Philippe]’s site if you want to build your own, there are detailed descriptions of how to tell time with this clock. You’ll probably need those. If you like getting confused by clocks, you might also like this one as well.

Continue reading “Fibonacci Clock Is Hard To Read, Looks Good”

Use A Lamp To See Into The Future

We’ve heard of magic lamps before, but this one is actually real. [Alex] has created a wall-mounted lamp that can tell you what the future will be like; at least as far as the weather is concerned. It is appropriately named “Project Aladdin” and allows you to tell a great deal about the weather at a glance as you walk out of the door.

The lamp consists of twelve LED strips arranged vertically. The bottom strip represents the current hour, and each strip above represents another hour in the future. The color of each strip indicates the temperature, and various animations of the LEDs within each strip indicate wind speed and precipitation.

The system uses a weather forecasting backend built-in Java, which is available on the project’s page. The LEDs are controlled by an application that is written in C, and the entire set of LEDs are enclosed in a translucent housing which gives it a very professional appearance. Be sure to check out the demo video after the break. Be sure to check out some other takes on weather lamps which use regular desk lamps instead of intricate scratch-made LED lamps.

Continue reading “Use A Lamp To See Into The Future”

An Introduction To Individually Addressable LED Matrices

The most fascinating project you can build is something with a bunch of blinky hypnotic LEDs, and the easiest way to build this is with a bunch of individually addressable RGB LEDs. [Ole] has a great introduction to driving RGB LED matrices using only five data pins on a microcontroller.

The one thing that is most often forgotten in a project involving gigantic matrices of RGB LEDs is how to mount them. The enclosure for these LEDs should probably be light and non-conductive. If you’re really clever, each individual LED should be in a light-proof box with a translucent cover on it. [Ole] isn’t doing that here; this matrix is just a bit of wood with some WS2812s glued down to it.

To drive the LEDs, [Ole] is using an Arduino. Even though the WS2812s are individually addressable and only one data pin is needed, [Ole] is using five individual data lines for this matrix. It works okay, and the entire setup can be changed at some point in the future. It’s still a great introduction to individually addressable LED matrices.

If you’d like to see what can be done with a whole bunch of individually addressable LEDs, here’s the FLED that will probably be at our LA meetup in two weeks. There are some crazy engineering challenges and several pounds of solder in the FLED. For the writeup on that, here you go.