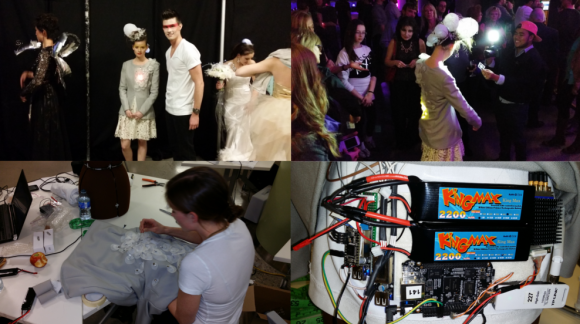
Arduino Xmas Tree Shield

christmasshield

Nothing reminds us that it’s the holiday season more than an LED Christmas Tree submission. This obviously is not the first of its kind, but [Jose] does offer up a new technique using addressable RGB LEDs.

[Jose] decided to use 20 WS2812B RGB LEDs, which if you haven’t seen before, are RGB LEDs with an integrated controller. Yep, that’s right, just power/ground and 1 data line is all that is needed to control hundreds of RGB LEDs. This LED tree’s design is simple: a custom-etched PCB cut it in to the shape of a Christmas tree. The WS2812B LEDs helped keep everything clean, so the tree lacks any ‘ugly’ ornaments, except for the required bypass cap here and there. For an added bonus, the tree’s LEDs are synchronized to music generated by an Arduino via a piezo buzzer. Why is it a shield?  Well, the whole tree plugs in nicely to a standard Arduino interface. This looks like the perfect starter project to familiarize yourself with addressable LEDs, or at least to get you warmed up before building your own infinity portal.

Continue reading “Arduino Xmas Tree Shield”

Snowden Immortalized As Bond Villain In Edge-Lit Acrylic Poster

snowfall_smaller

[Wilywyrm] needed to come up with a final project for art class that commented on a social issue. Healthcare, schmealthcare, he said, and busted out this movie poster about the NSA spying scandal instead.

The circuit uses three extended-duty astable 555 timers to control the brightness of the 5050 RGB common-anode LED strips that run up the sides of the 24″ x 12″ x 1/4″ acrylic panels. Each of the three panels was laser-engraved at 600 DPI on an Epilog laser engraver and features a different aspect of the poster. There’s one for Snowden, one for Daniel Craig, and one for the text.

[Wilywyrm] tied the color channels together in the first panel to output white light. He used red for the second panel and blue for the third. A complete list of parts with build notes is available on his Google Drive. [Wilywyrm]’s notes include improvement ideas, like making all the RGB strips color-adjustable with more 555s or a microcontroller and timers.

Perhaps [Wilywyrm] could get into the clear whiteboard business after college.

Simple 10 Watt LED Driver Is Hot Stuff

[Peter] needed to drive a high power LED for his microscope. Rather than pick up a commercial LED driver, he built a simple constant current LED driver and fan control. We’ve featured [Peter’s] pumpkin candle LED work here on Hackaday in the past. Today he’s moving on to higher power LEDs. A 10 watt LED would be a good replacement light source for an old halogen/fiber optic ring light setup. [Peter] started with his old standby – an 8 pin Microchip PIC. In this case, a PIC12F1501. A PIC alone won’t handle a 10 watt LED, so he utilized a CAT4101 constant current LED driver from ON Semi. The PIC performs three tasks in this circuit. It handles user input from two buttons, generates a PWM signal to the LED driver, and generates a PWM signal for a cooling fan.

Control is simple: Press both buttons and the LED comes on full bright. Press the “up” button, and the LED can be stepped up from 10% to 100% in 10 steps.  The “down” button drops the LED power back down. [Peter] even had a spare pin. He’s currently using it as an LED on/off confirmation, though we’d probably use it with a 1wire temperature sensor as a backup to thermal protection built into the CAT4101. It may be overkill, but we’d also move the buttons away from that 7805 linear regulator. Being that this circuit will be used with a microscope, it may eventually be operated by touch alone. It would be a bit surprising to try to press a button and end up with a burnt fingertip!

Continue reading “Simple 10 Watt LED Driver Is Hot Stuff”

Peltier Joule Thief Power Supply

[Steven] manages to power an LED for 15 minutes using hot and cold water as a battery. He does this using the thermoelectric effect also known as the Seebeck effect, Peltier effect or Thomson effect. This isn’t particularly new; in fact there are commercial products that you can use to charge a cell phone using a small campfire or internal burner that works on the same principle.

What is interesting about [Steven’s] device is that he uses a salvaged Peltier device not meant for generating electricity, coupled with a home built joule thief circuit. In the video he describes how the joule thief functions and powers the LED using the small voltage generated by the Peltier device. The energy for the thermoelectric effect is conducted from a hot water bath through aluminum plates, through the positive and negative sides of the Peltier device, through more aluminum plates and finally into a cold water bath. As the heat energy transfers through the Peltier device a small electric current is generated and flows in two small wires coming out the side of the device.  The energy generated by the Peltier device is stored in the joule thief and periodically dumped at a voltage high enough to forward bias the LED “on” for a brief moment. Technically the LED is flashing but at a frequency too high for our eyes to see. As the hot water bath cools, the LED goes from very bright, to dim, to off in about 15 minutes.

Not a very practical power supply but still quite the parlor trick. He wraps up the tutorial specifying that a TEG thermoelectric generator would be a much better choice for generating power and can handle much higher temperatures. You can watch the video after the break.

Continue reading “Peltier Joule Thief Power Supply”

LED Bulb Reviews, Evaluations And Teardowns

LED Bulb Reviews

[ElectronUpdate] has posted many great reviews of commercial LED bulbs that one can purchase to replace standard E26 incandescent light bulbs. In his reviews he evaluates the light emitting performance and does a thorough and detailed teardown, evaluating and understanding the circuit technologies used. For the light emission evaluation he uses a light meter and some homemade graph paper to plot the lumens at different angles. Flicker is easily evaluated using a solar panel from a discarded solar path light connected to his oscilloscope. Any flicker will show up quite nicely and can be measured. Of course a kill-a-watt meter makes an appearance in most reviews to read watts and power factor.

Recently [ElectronUpdate] wanted to understand the meaning of CRI which is advertised on many of these commercial LED packages. CRI stands for color rendering index and deals with how colors appear when compared to a natural light source. After doing some researching he found that a CRI over 80 is probably good for LED lighting. The next dilemma was how to measure CRI without expensive scientific equipment. He found a website that we have featured before with free software and instructions on how to build a spectrometer. The web instructions include building a meter box from paper but he found it was much more reliable if built out of wood. We’ll let you follow [ElectronUpdate’s] recommended build if you like, but you’ll need a few items which he does detail.

After a short calibration procedure the final rig will measure power spectral line densities of your light source. [ElectronUpdate] is promising more details on how the colorful measurement data can be related to CRI ratings, but you can get a jump on the details at Full Spectrum Solutions. We also recommend you browse through all of [ElectronUpdate’s] LED bulb reviews on YouTube if the progressing performance and innards of LED bulbs fascinates you as much as it does us.

Hackaday Logo Projector From A Single LED

Here’s another Trinket Contest entry that was interesting enough for its own feature. [Adam] made his own Hackaday version of the Bat signal. It’s not nearly as big, but the concept is the same. Using this single modified LED he’s able to project a 12″ image that seems quite well-defined (more pictures below).

The LED is one he pulled from an old flashlight. After sanding the dome flat he made a jig which positioned it inside of his laser cutter. From there he etched the 0.1″ logo and filled the negative space with some ink. The remaining surface was polished to help the light shine through, then positioned in front of a jeweler’s loupe to magnify the image.

There’s just a couple of hours left before the Trinket Contest draws to a close. Get your entry in for a chance to win!

Continue reading “Hackaday Logo Projector From A Single LED”

An Impressively Large LED Matrix

One of the more impressive projects a home-bound tinkerer can pull off is some sort of display. Not only does the final project result in a lot of blinky, glowey things, but driving hundreds of LEDs is an achievement in itself. [Fabien] decided he wanted to build his own LED display and ended up with something great (French, Google translation).

Instead of going off the deep end and making his own boards for this giant LED display, [Fabien] found a very cheap 16×32 LED display board on DealExtreme. Once these kits were pieced together, [Fabian] mounted them in a wooden frame and started connecting the displays together.

The original plan was to drive these with an Arduino, but with so many pixels he quickly ran out of RAM. Replacing the Arduino with a larger ATMega1284p, [Fabian] found the RAM he needed and started work on some interesting visualizations.

Of course, Conway’s Game of Life made a showing in the final build, but [Fabian] also managed to whip up a spectrograph using FFT. It’s a very nicely put together display that makes us want to buy a few of these displays ourselves.