Blinkbox: addressable LED testing tool

BlinkBox: Debugging Tool For Addressable LEDs

How often do you find yourself having to pause a project to make a test circuit or write some test code to find the source of a problem? Do enough variations of the same test and you’ll eventually make a dedicated test tool. That’s just what [Devon Bray] found himself doing.

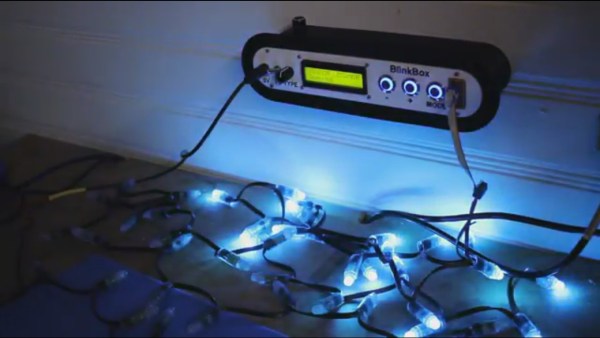
[Devon] does a lot of work with addressable LEDs of different types and after much experience, created the BlinkBox, a dedicated test tool for addressable LEDs. It supports multiple LED chipsets, you can give it a count of the LEDs you want to light up, and you can choose a test animation.  It even writes your settings to an EEPROM so you that don’t have to repeat yourself when you next turn it on.

He’s also done a very nice job packaging it all up, creating a 3D printed case, using backlit buttons for working in the dark, and even added a contrast knob for the LCD screen. Kudos to him for all the effort he’s put making this polished. Everything you need to duplicate it is available on his webpage, along with the schematic for the curious. Watch it in action, or just admire his handiwork in the video below.

Continue reading “BlinkBox: Debugging Tool For Addressable LEDs”

Watch The World Spin With The Earth Clock

With the June solstice right around the corner, it’s a perfect time to witness first hand the effects of Earth’s axial tilt on the day’s length above and beyond 60 degrees latitude. But if you can’t make it there, or otherwise prefer a more regular, less deprived sleep pattern, you can always resort to simulations to demonstrate the phenomenon. [SimonRob] for example built a clock with a real time rotating model of Earth to visualize its exposure to the sun over the year.

The daily rotating cycle, as well as Earth’s rotation within one year, are simulated with a hand painted plastic ball attached to a rotating axis and mounted on a rotating plate. The hand painting was done with a neat trick; placing printed slivers of an atlas inside the transparent orb to serve as guides. Movement for both axes are driven by a pair of stepper motors and a ring of LEDs in the same diameter as the Earth model is used to represent the Sun. You can of course wait a whole year to observe it all in real time, or then make use of a set of buttons that lets you fast forward and reverse time.

Earth’s rotation, and especially countering it, is a regular concept in astrophotography, so it’s a nice change of perspective to use it to look onto Earth itself from the outside. And who knows, if [SimonRob] ever feels like extending his clock with an aurora borealis simulation, he might find inspiration in this northern lights tracking light show.

This is a spectacular showpiece and a great project you can do with common tools already in your workshop. Once you’ve mastered earth, put on your machinists hat and give the solar system a try.

Strike A Chord With This LED Ukulele

You may laugh off the ukulele as a toy or joke instrument, and admittedly, their starting price tag and the quality that usually comes with such a price tag doesn’t help much to get a different opinion on that. But it also makes it the perfect instrument for your next project. After all, they’re easy to handle, portable, and cheap enough to use a drill and other tools on them without too much regret. Plus, a little knowledge to play can get you far, and [Elaine] can teach you the essential, “all the pop songs use it”, four chords with her Arduino powered LED Ukulele.

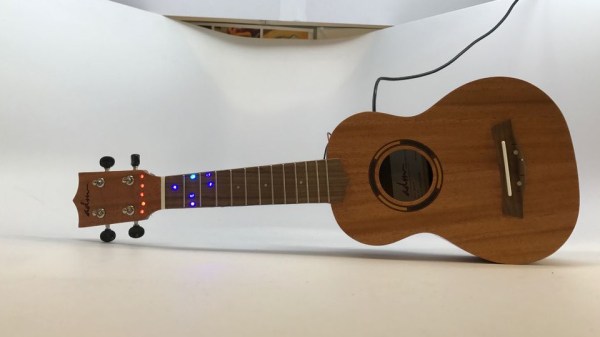
As first step, [Elaine] drilled holes in her ukulele’s fingerboard to place some LEDs at all the positions required to play the four chords C, G, Am, and F. Connected to an Arduino attached to the ukulele’s back, each chord will light up its associated LEDs to indicate the finger positions required to play the chord itself. Taking the teaching part a step further, her next step is to extend each LED with a second, light sensing one, and read back if the fingers are placed at the correct position.

[Elaine] has already plans to turn the ukulele into an interactive game next. And if four chords are eventually not enough for you anymore, have a look at another LED based project teaching to play any major, minor and major seventh chord on the ukulele.

It’s Not Morning Until Green O’clock

[JohnathonT] has a two-year-old who can’t reliably tell time just yet. Every morning, he gets up before the rooster crows and barges into his parents’ room, ready to face the day.

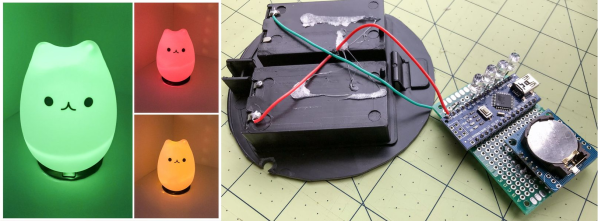
In an effort to catch a few more Zs, [JohnathonT] built a simple but sanity-saving clock that tells time in a visual, kid-friendly way. Sure, this is a simple build. But if a toddler is part of your reality, who has time to make one from logic gates? The hardware is what you’d expect to see: Arduino Nano, a DS1307 RTC, plus the LEDs and resistors. We think an RGB LED would be a nice way to mix up the standard stoplight hues a bit.

At a glance, little Mr. Rise and Shine can see if it’s time to spread cheer, or if he has to stay in his room and play a bit longer. At 6:00AM, the light powers on and glows red. At 6:50, it turns yellow for 10 minutes. At the first reasonable hour of the day, 7:00AM, it finally turns green. In reading the code, we noticed that it also goes red at 8:00PM for 45 minutes, which tells us it also functions as a go-to-sleep indicator.

When his son is a little older, maybe [JohnathonT] could build him  a clock that associates colors with activities.

Broken Screen Becomes Polarizing Art Lamp

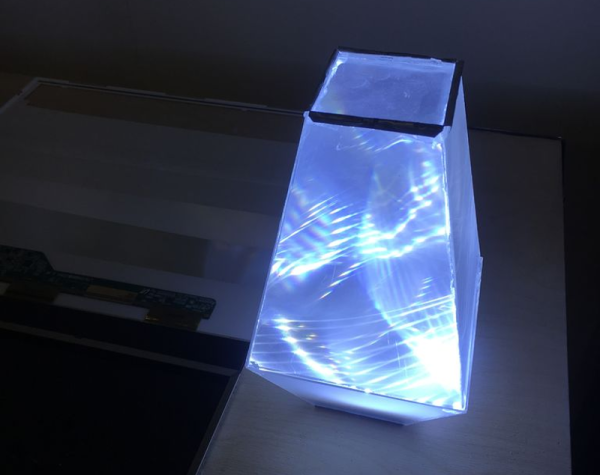
Got a broken laptop screen sitting around? If you haven’t already pilfered the LEDs and used the polarizing sheets for screen privacy filters, why not turn it into a unique table lamp? See if you can use more parts of the screen than [alexmaree-ross] did.

This is a simple idea with great-looking results, but the process is a bit fiddly. After all the layers are separated and the LEDs extracted, there’s still the matter of figuring out how they’re wired up. [alexmaree] tested them in pairs to see how they’re grouped together and ultimately powered them with a transformer from an old printer. To build the case, [alexmaree] carefully scored and snapped the pieces from the plastic layer and carefully glued pieces of the polarizing layer on top to give it that underwater infinity mirror look. The finishing touch comes from edging the shade with thin metal from the bezel.

The case could be in any shape you want, but we think the prism is quite appropriate considering the polarizing effects. And it looks really cool when you walk around it, which you can do vicariously after the break.

If the screen still works but laptop doesn’t, why not drive it with an FPGA?

Continue reading “Broken Screen Becomes Polarizing Art Lamp”

Tron Inspired LED Desk Lighting

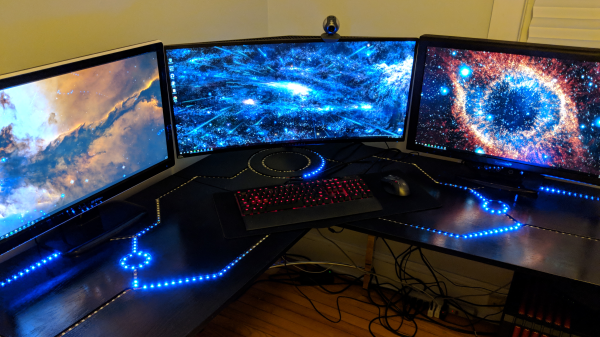
Reddit user [barbarisch] thought his computer desk was a bit boring, so he came up with a cool project to spice it up: A Tron-inspired computer desk with embedded LED strips!

[Barbarisch] took a basic desk and replaced the tops with ¾” oak plywood. The LED routes were planned out on the computer first and then marked out on the plywood. Using straightedges, [barbarisch] carefully used a router to create the straight grooves and then he created a jig for doing the circles. A bit of trimming and sanding and the three pieces of the desk match up.

After painting the desk, it was time to take a crack at the LEDs. Originally, [barbarisch] thought about 3D printing some diffusers to cover the individual WS2812B lights, but it wasn’t coming out to his liking, so diffusers have been put on the back-burner for now. Holes were drilled in the desk so that connections could be made between the different parts of the grooves and soldering was done between bits of the strips when turning corners. The whole thing’s being controlled by a Raspberry Pi and a Fadecandy USB controller for RGB strips. [Barbarisch] modified a Pi case so that the Fadecandy board would fit as well as printing out a bracket to mount the hardware under the desk.

A fun project to update that boring computer desk and to help you out, the python code which communicates with the Fadecandy server has been put up on GitHub. From the Reddit discussion, it looks like [barbarisch] might have found a solution for diffusing the LEDs! If it’s an LED desk you’re interested in, though, we’ve seen interactive LED tables and Mega LED desks before!

Continue reading “Tron Inspired LED Desk Lighting”

There’s More To MIDI Than Music – How About A Light Show?

MIDI instruments and controllers are fun devices if you want to combine your interest in music and electronics in a single project. Breaking music down into standardized, digital signals can technically turn anything with a button or a sensor into a musical instrument or effect pedal. On the other hand, the receiving end of the MIDI signal is mostly overlooked.

[FuseBerry], a music connoisseur with a background in electronics and computer science, always wanted to build a custom MIDI device, but instead of an instrument, he ended up with a MIDI controlled light show in the shape of an exploded truncated icosahedron ([FuseBerry]’s effort to look up that name shouldn’t go unnoticed). He designed and 3D-printed all the individual geometric shapes, and painstakingly equipped them with LEDs from a WS2818B strip. An Arduino Uno controls those LEDS, and receives the MIDI signals through a regular 5-pin DIN MIDI connector that is attached to the Arduino’s UART interface.

The LEDs are mapped to pre-defined MIDI notes, so whenever one of them is played, and their NoteOn message is received, the LEDs light up accordingly. [FuseBerry] uses his go-to DAW to create the light patterns, but any software / device that can send MIDI messages should do the trick. In the project’s current state, the light pattern needs to be created manually, but with some adjustments to the Arduino code, that could be more automated, something along the lines of this MIDI controlled Christmas light show.

Continue reading “There’s More To MIDI Than Music – How About A Light Show?”