Boozer Tells The Internet How Much You Drink (If You Want It To)

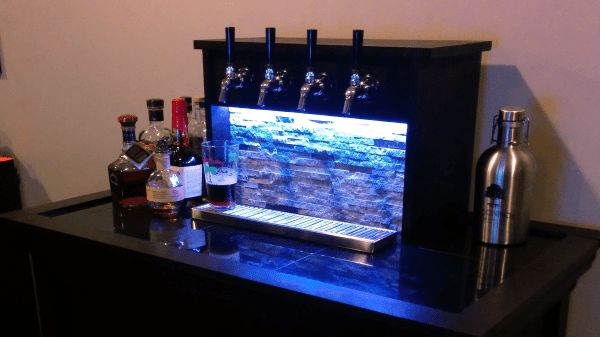
Over the past few years, Reddit user [callingyougoulet] has created Boozer, a DIY beer dispenser that keeps track of how much of your brew you have left in your kegs. Installed in a Keezer (a freezer that contains beer kegs and faucets) [callingyougoulet]’s dispenser uses a Raspberry Pi to keep track of things. A series of flow sensors determine how much liquid has passed through them and, when the drink is poured, can calculate how much you poured and how much you have left.

Starting with a chest freezer, [callingyougoulet] built a nice wooden surround as well as installed a tower on top to hold the faucets. The top of the freezer has nice granite tiles covering it, and some LED accent lighting adds to the end product. However, taking the granite off in order to get at the kegs inside takes some time (about 20 minutes.)

Inside the freezer is the Ra
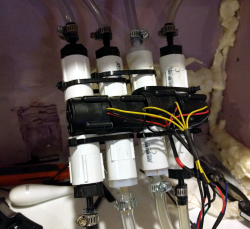
spberry Pi and four flow sensors, each one connected to a GPIO port on the Pi. After some calibration, the Python code running on the Pi can calculate a pretty close estimate of the amount of liquid poured. There’s also a temperature sensor in the freezer, so that you can tell how cool your beer is.

If the build had stopped there, it would have been a great project as-is, but [callingyougoulet] added twitter, Slack and MQTT outputs as options, so that a home automation system (or the entire internet) can tell how much and when you’ve been drinking and, more importantly, you can know how much is left in your kegs! There are some very cool keg cooling builds on the site, such as, a kegerator built from the ground up, and a very elegant kegerator built on the cheap check them out for ideas!

Via Reddit.

Ham Radio On $100 Or Less

There are a lot of reasons to get a ham radio license, and if you are one of those that think ham radio is dead you can probably skip this post. However, if you have been interested, but didn’t want to drop a lot of money on a station, [KE6MT] has got some great advice for you. He says you can have a rewarding time in ham radio for about $100 of spending.

The post is the advice he wished he had been given in 2015 when he got his license. It turns out you can get on the air very inexpensively these days, especially if you aren’t afraid to build gear from kits.

Continue reading “Ham Radio On $100 Or Less”

Testing DIY battery pack on E-bike

[GreatScott] Tests His DIY Battery Pack On His E-Bike

[GreatScott] has now joined the ranks of Electric Bike users. Or has he? We previously covered how he made his own lithium-ion battery pack to see if doing so would be cheaper than buying a commercially made one. But while it powered his E-bike conversion kit on his benchtop, turning the motor while the wheel was mounted in a vice, that’s no substitution for a real-world test with him on a bike on the road.

Since then he’s designed and 3D printed an enclosure for his DIY battery pack and mounted it on his bike along with most of the rest of his E-bike kit. He couldn’t use the kit’s brake levers since his existing brake levers and gear-shift system share an enclosure. There also weren’t enough instructions in the kit for him to mount the pedal assistance system. But he had enough to do some road testing.

Based on a GPS tracker app on his phone, his top speed was 43 km/h (27 miles per hour). His DIY 5 Ah battery pack was half full after 5 km (3.1 miles) and he was able to ride 11.75 km (7.3 miles) on a single charge. So, success! The battery pack did the job and if he needs to go further then he can build a bigger pack with some idea of how it would improve his travel distance.

Sadly though, he had to remove it all from his bike since he lives in Germany and European rules state that for it to be considered an electric bike, it must be pedal assisted and the speed must the be progressively reduced as it reaches a cut-off speed of 25 km/h (15 miles per hour). In other words, his E-bike was more like a moped or small motorcycle. But it did offer him some good opportunities for hacking, and that’s often enough. Check out his final assembly and testing in the video below.

Continue reading “[GreatScott] Tests His DIY Battery Pack On His E-Bike”

Strike A Chord With This LED Ukulele

You may laugh off the ukulele as a toy or joke instrument, and admittedly, their starting price tag and the quality that usually comes with such a price tag doesn’t help much to get a different opinion on that. But it also makes it the perfect instrument for your next project. After all, they’re easy to handle, portable, and cheap enough to use a drill and other tools on them without too much regret. Plus, a little knowledge to play can get you far, and [Elaine] can teach you the essential, “all the pop songs use it”, four chords with her Arduino powered LED Ukulele.

As first step, [Elaine] drilled holes in her ukulele’s fingerboard to place some LEDs at all the positions required to play the four chords C, G, Am, and F. Connected to an Arduino attached to the ukulele’s back, each chord will light up its associated LEDs to indicate the finger positions required to play the chord itself. Taking the teaching part a step further, her next step is to extend each LED with a second, light sensing one, and read back if the fingers are placed at the correct position.

[Elaine] has already plans to turn the ukulele into an interactive game next. And if four chords are eventually not enough for you anymore, have a look at another LED based project teaching to play any major, minor and major seventh chord on the ukulele.

Talking To Laptop Batteries With The ESP8266

It’s not something you often give a lot of thought to, but the modern consumer laptop battery is a pretty advanced piece of technology. Not only does it pack several dozen watt-hours of energy into a relatively small and lightweight package, but it features integrated diagnostic capability to make sure all those temperamental lithium cells are kept in check. Widely available and extremely cheap thanks to the economies of scale (unless you try to get them from the OEM, anyway), they’re a very compelling option for powering your projects.

Of course, it also helps if, like [teliot] you have a bunch of the things lying around. For reasons we won’t get into, he’s got a whole mess of Acer AL12x32 battery packs which he wanted to use for something other than collecting dust. He had the idea of hooking one up to a solar panel and using it as a power supply for some ESP8266 projects but wanted to be able to talk to the battery for status and diagnostic information. After studying the Smart Battery System (SBS) protocol the batteries use, he was able to come up with some code that lets him pull 37 separate fields of information from the pack’s onboard electronics using his ESP8266.

Battery consumption over time

It took some fiddling with a multimeter to figure out which pin did what on the eight pin interface of the battery. Two of the pins need to be shorted to enable the dual 12 VDC pins to kick in. Technically that’s all you really need to do if you want to utilize the battery in a low-tech sort of way. But to actually get some information from the battery, [teliot] had to identify the two pins which are for the System Management Bus (SMBus) interface where the SBS data lives.

Once he knew which pins to talk to the battery on, the rest was fairly easy. SBS is well documented, and the SMBus interface is very similar to I2C. Like all the cool kids are doing these days, his code publishes the battery info to MQTT where he can plot it and get finely grained info on the performance of his solar power system.

This isn’t the first time we’ve seen a hacker wrangle laptop batteries through SMBus, but it’s always nice to get multiple perspectives on a topic. If you plan on making this kind of thing part of your standard bag of tricks, you might even want to take the time to build a dedicated SMBus scanner.

[via /r/esp8266]

Stretching My Skills: How (and Why) I Made My Own Compression Sleeves

Have you ever noticed how “one size fits all” often means “one size poorly fits all”? This became especially clear to me when I started using a compression sleeve on my arm. Like any hacker, this seemed like something I could fix, so I gave it a shot. Boy, did I learn a lot in the process.

A little over a year ago, I started dropping things. If I was holding something in my left hand, chances were good that it would suddenly be on the ground. This phenomenon was soon accompanied by pain and numbness, particularly after banging on a keyboard all day.

At best, my pinky and ring fingers were tired all the time and felt half dead. At worst, pain radiated from my armpit all the way to my fingertips. It felt like my arm had been electrocuted. Long story short, I saw a neurologist or two, and several co-pays later I had a diagnosis: cubital tunnel syndrome.

Continue reading “Stretching My Skills: How (and Why) I Made My Own Compression Sleeves”

Muscle Your Way Into Music

Inspired by an old Old Spice commercial, [Juliodb96] decided he too wanted to make music by flexing his muscles. An Arduino and a MyoWare sensor did the trick. However, he also tells you how to make your own sensors, if you are so inclined. You can see the instrument in action in the video below.

If you use the ready-made MyoWare sensors, this is a pretty easy project. You just respond to sensor input by playing some notes. If you decide to roll your own, you’ll have some circuit building ahead of you.

In particular, the signal conditioning for the sensors involves filtering to eliminate signals not in the 20 Hz to 300 Hz passband, several amplifiers, a rectifier, and a clipper. This requires 3 IC packages and a handful of discrete components.

Unlike the original commercial (see the second video, below), there are no moving parts for actuating actual instruments. However, that wouldn’t be hard to add with some servo motors, air pumps, and the like. This may seem frivolous, but we had to wonder if it could be used to allow musical expression for people who could not otherwise play an instrument.

This isn’t the first time we’ve seen the MyoWare in action. We’ve even talked about signal processing that is useful for this kind of application.