Scrapped Motors Don’t Care About Direction

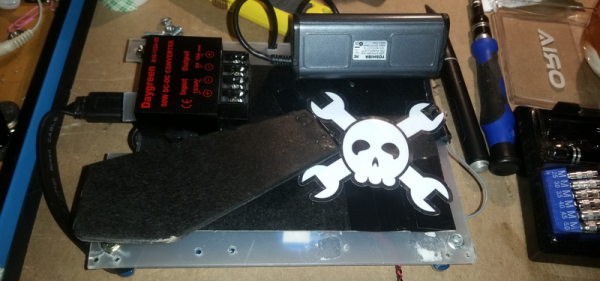
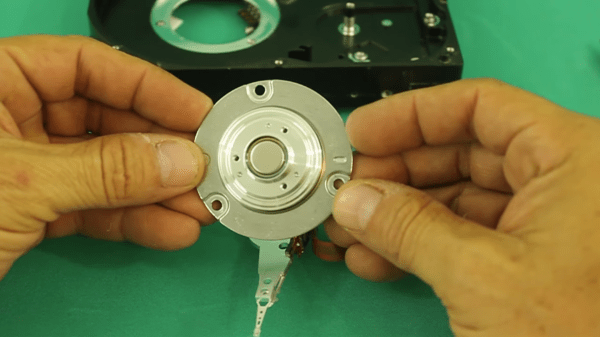
Spinners built into games of chance like roulette or tabletop board games stop on a random number after being given a good spin. There is no trick, but they eventually rest because of friction, no matter how hard your siblings wind up for a game-winning turn. What if the spinning continued forever and there was no programming because there was no controller? [Ludic Science] shows us his method of making a perpetual spinner with nothing fancier than a scrapped hard disk drive motor and a transformer. His video can also be seen below the break.

Fair warning: this involves mains power. The brushless motor inside a hard disk drive relies on three-phase current of varying frequencies, but the power coming off a single transformer is going to be single-phase AC at fifty or sixty Hz. This simplifies things considerably, but we lose the self-starting ability of the motor and direction control, but we call those features in our perpetual spinner. With two missing phases, our brushless motor limps along in whatever direction we initiate, but the circuit couldn’t be much more straightforward.

This is just the latest skill on a scrapped HDD motor’s résumé (CV). They will run with a 9V battery, or work backwards and become an encoder. If you want to use it more like the manufacturer’s intent, consider this controller.

Continue reading “Scrapped Motors Don’t Care About Direction”

Friend In Need Gets Junk Bin PC For Cramped Quarters

If you doubt the power of the Hackaday community, check this one out. Stalwart reader and tipster [starhawk] has pitched in to help a friend in need, someone he met through Hackaday.io. Seems this friend’s current living arrangements are somewhat on the cramped side, and while he’s in need of a PC, even a laptop would claim too much space.

So with a quick trip to the store and a few items from the junk bin, [starhawk] whipped up an all-in-one PC the size of a tablet for his friend. As impressed as we are by the generosity, we’re more impressed by the quality of his junk bin. The heart of the compact machine is a motherboard from a Wintel CX-W8, scarcely larger than a Raspberry Pi model A. After the addition of a larger heatsink and fan, the board was attached via a sheet of plastic to the back of a 7-inch touchscreen, also a junk bin find. A cheap picture frame serves as the back of the all-in-one, complete with Jolly Wrencher, of course. Alas, the DC-DC converter was one of the only purchased items, bringing the cost for the build to all of $22, including the $15 for a wireless keyboard/touchpad on clearance from Walmart. After some initial power troubles, the fixes for which are described in this update, the machine was ready to ship.

Does this one seem familiar? It should — [starhawk] built a similar “laptop” for himself a while back when he was low on funds. Now it seems like he’s paying it forward, which we appreciate. For more details on how he pulled this all of, check out The Anytop, [starhawk’s] portable computer anyone can build. It was his 2017 Hackaday Prize entry!

It’s Not Morning Until Green O’clock

[JohnathonT] has a two-year-old who can’t reliably tell time just yet. Every morning, he gets up before the rooster crows and barges into his parents’ room, ready to face the day.

In an effort to catch a few more Zs, [JohnathonT] built a simple but sanity-saving clock that tells time in a visual, kid-friendly way. Sure, this is a simple build. But if a toddler is part of your reality, who has time to make one from logic gates? The hardware is what you’d expect to see: Arduino Nano, a DS1307 RTC, plus the LEDs and resistors. We think an RGB LED would be a nice way to mix up the standard stoplight hues a bit.

At a glance, little Mr. Rise and Shine can see if it’s time to spread cheer, or if he has to stay in his room and play a bit longer. At 6:00AM, the light powers on and glows red. At 6:50, it turns yellow for 10 minutes. At the first reasonable hour of the day, 7:00AM, it finally turns green. In reading the code, we noticed that it also goes red at 8:00PM for 45 minutes, which tells us it also functions as a go-to-sleep indicator.

When his son is a little older, maybe [JohnathonT] could build him  a clock that associates colors with activities.

Visit Tapigami Tape City, Where Tape Is The Fabric Of Society

With so many cool things going on at Bay Area Maker Faire, it takes something special to stand out from the crowd. Covering several hundred square feet of floor and wall with creations made of tape would do the trick. Welcome to Tapigami Tape City, a traveling art exhibit by [Danny Scheible].

Many of us used construction paper, glue, and tape to express our creativity in our youth. Tapigami’s minimalism drops the paper and glue, practitioners of the art stick to tape. It is an accessible everyday material so there is no barrier to entry to start having fun. And while tape does have some obvious limitations, it is possible to get quite creatively elaborate and still use tape almost exclusively.

The Tapigami booth is very happy to accommodate those wishing to learn the way of tape. At their table, young and old alike are welcome to sit down and start building basic shapes out of masking tape. This begins with cones, cylinders, and cubes which are then combined into more complex creations — it’s kind of like OpenSCAD, but all with tape.

Attendees of Bay Area Maker Faire should not miss seeing Tape City in person, it’s quite the sight to behold in the south-east corner of Zone 2. (Not far from the Tindie/Hackaday booth, stop by and say hi!) And while it’s plenty of fun to stick to tape, we can see the Hackaday demographic taking these concepts up a few notches. If you’ve pulled off something mind blowing using tape, you know where our tip line is.

Continue reading “Visit Tapigami Tape City, Where Tape Is The Fabric Of Society”

People With Dementia Can DRESS Smarter

People with dementia have trouble with some of the things we take for granted, including dressing themselves. It can be a remarkably difficult task involving skills like balance, pattern recognition inside of other patterns, ordering, gross motor skill, and dexterity to name a few. Just because something is common, doesn’t mean it is easy. The good folks at NYU Rory Meyers College of Nursing, Arizona State University, and MGH Institute of Health Professions talked with a caregiver focus group to find a way for patients to regain their privacy and replace frustration with independence.

Although this is in the context of medical assistance, this represents one of the ways we can offload cognition or judgment to computers. The system works by detecting movement when someone approaches the dresser with five drawers. Vocal directions and green lights on the top drawer light up when it is time to open the drawer and don the clothing inside. Once the system detects the article is being worn appropriately, the next drawer’s light comes one. A camera seeks a matrix code on each piece of clothing, and if it times out, a caregiver is notified. There is no need for an internet connection, nor should one be given.

Currently, the system has a good track record with identifying the clothing, but it is not proficient at detecting when it is worn correctly, which could lead to frustrating false alarms. Matrix codes seemed like a logical choice since they could adhere to any article of clothing and get washed repeatedly but there has to be a more reliable way. Perhaps IR reflective threads could be sewn into clothing with varying stitch lengths, so the inside and outside patterns are inverted to detect when clothing is inside-out. Perhaps a combination of IR reflective and absorbing material could make large codes without being visible to the human eye. How would you make a machine-washable, machine-readable visual code?

Helping people with dementia is not easy but we are not afraid to start, like this music player. If matrix codes and barcodes get you moving, check out this hacked scrap-store barcode scanner.

Thank you, [Qes] for the tip.

Motorized Stage Finesses The Microscopic World

No matter how fine your fine motor skills may be, it’s really hard to manipulate anything on the stage of a microscope with any kind of accuracy. One jitter or caffeine-induced tremor means the feature of interest on the sample you’re looking at shoots off out of the field of view, and getting back to where you were is a tedious matter of trial and error.

Mechanical help on the microscope stage is nice, and electromechanical help is even better, but a DIY fully motorized microscope stage with complete motion control is the way to go for the serious microscopist on a budget. Granted, not too many people are in [fabiorinaldus]’ position of having a swell microscope like the Olympus IX50, and those that do probably work for an outfit that can afford all the bells and whistles. But this home-brew stage ticks off all the boxes on design and execution. The slide is moved across the stage in two dimensions with small NEMA-8 steppers and microstepping controllers connected to two linear drives that are almost completely 3D-printed. The final resolution on the drives is an insane 0.000027344 mm. An Arduino lives in the custom-built control box and a control pad with joystick, buttons, and an OLED display allow the stage to return to set positions of interest. It’s really quite a build.

We’ve featured a lot of microscope hacks before, most of them concerning the reflective inspection scopes we all seem to covet for SMD work. But that doesn’t mean we haven’t shown love for optical scopes before, and electron microscopes have popped up a time or two as well.

Continue reading “Motorized Stage Finesses The Microscopic World”

One-key Keyboard Is Exercise In Sub-millimeter Design

As [Glen] describes it, the only real goal in his decision to design his single-key USB keyboard was to see how small he could build a functional keyboard using a Cherry MX key switch, and every fraction of a millimeter counted. Making a one-key USB keyboard is one thing, but making it from scratch complete with form-fitting enclosure that’s easy to assemble required careful design, and luckily for all of us, [Glen] has documented it wonderfully. (Incidentally, Cherry MX switches come in a variety of qualities and features, the different models being identified by their color. [Glen] is using a Cherry MX Blue, common in keyboards due to its tactile bump and audible click.)

[Glen] steps though the design challenges of making a device where seemingly every detail counts, and explains problems and solutions from beginning to end. A PIC16F1459, a USB micro-B connector, and three capacitors are all that’s needed to implement USB 2.0, but a few other components including LED were added to help things along. The enclosure took some extra care, because not only is it necessary to fit the board and the mounted components, but other design considerations needed to be addressed such as the depth and angle of the countersink for the screws, seating depth and clearance around the USB connector, and taking into account the height of the overmold on the USB cable itself so that the small device actually rests on the enclosure, and not on any part of the cable’s molding. To top it off, it was also necessary to adhere to the some design rules for minimum feature size and wall thicknesses for the enclosure itself, which was SLS 3D printed in nylon.

PCB, enclosure, software, and bill of materials (for single and triple-key versions of the keyboard) are all documented and available in the project’s GitHub repository. [Glen] also highlights the possibility of using a light pipe to redirect the embedded LED to somewhere else on the enclosure; which recalls his earlier work in using 3D printing to make custom LED bar graphs.