BACAR — Balloon Carrying Amateur Radio — is just what it sounds like. A high-altitude balloon carries experiments and communicates via amateur radio. [ZR6AIC] decided to fly a payload in a local BACAR experiment. The module would send its GPS position via the APRS network and also send a Morse code beacon every seven minutes. It also sends other data such as temperature, and has an optional camera fitted.
The hardware used was the ubiquitous Raspberry Pi along with an associated daughterboard for transmitting on the 2 meter ham band. An RTL dongle took care of the receive portion and another dongle provided GPS. A DS18B20 temperature sensor provides the temperature data.
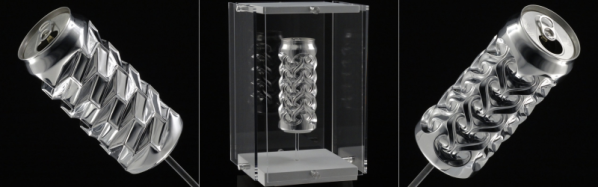
A can of soda costs about half a dollar, and once you’re done with the sugary syrup, most cans end up in the trash headed for recycling. Some folks re-use them for other purposes, but we’re guessing no one up-cycles them quite like artist [Noah Deledda] does. He turns them into pieces of Soda Can art that sell for anywhere between $2000 to $3000 a pop.
Don’t be fooled by that smashing hit in the GIF. It’s just some trick photography that [Noah] did to impress people. If you looked at the end product without the back story first, you’d think the cans were manipulated in to contorted shapes using some kind of mechanical assistance, at the very least, or probably a purpose-built machine.
But [Noah Deledda] does it with bare hands. This is the bare-metal version of Origami. While on a road trip many years ago, he was bereft of electronic devices to keep him busy. Playing with an empty can of soda, he started denting and squeezing the thin metal in to an abstract shape. That’s when the artist in him realized that he was playing with an exciting new medium. After making some abstract art pieces out of empty cans of a vermillion bovine energy drink, he figured it would look much more awesome if he could remove all the paint from the cans and give them a smooth, polished, natural finish. He made a little machine that rotates the cans so he can strip the paint and bring the cans to a high polish. The technique is simple but requires a lot of patience, practice, time and skill, not to mention that it will cause a lot of pain in the thumb.
If you’ve ever been to Japan and drank a can of Kirin Hyoketsu, you’d notice the un-opened can is smooth, but immediately changes to a pattern of indented diamonds once you open it. That design was created by Kyoro Miura, well-known for the Miura Fold that lets you fold and unfold large sheets of paper in one smooth movement. Like that discarded map in the glove box of the car you’re riding in, while playing with an empty can of soda.
If you want to hone some ambidextrous skills, this would be a good way to do it while on your next road, plane or train trip. Check out the two videos embedded below. In the second one, you can see snapshots of the design process.
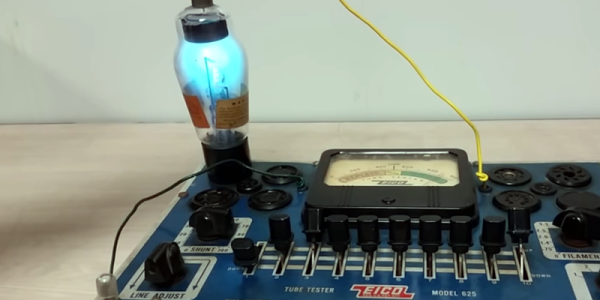
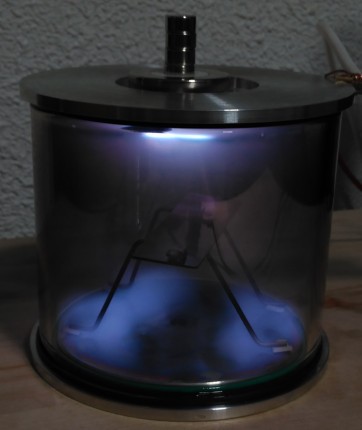
Even if you aren’t a tube aficionado, you can’t help but be mesmerized by the blue glow inside a mercury vapor rectifier when it operates. It looks less like early 20th century tech and more like something that belongs on a Star Trek set. [Uniservo] acquired an 866 rectifier that was interesting due to the markings, which he explains in detail in the video below. Most people though will probably want to skip to closer to its end to see that distinctive blue glow. The exact hue depends on the mercury vapor pressure and usually contains a fair amount of ultraviolet light.
These tubes have an interesting history dating back to 1901, the year [Peter Cooper Hewitt] developed a mercury vapor light which was much more efficient than conventional bulbs. They had two main problems, they required some special process to get the mercury inside to vaporize when you turned them on, but worse still, the light was blue-green which isn’t really appropriate for home and office lighting. In 1902 though, [Hewitt] realized the tube would act as a rectifier. Electrons could readily flow out of the mercury vapor that was the cathode, while the carbon anodes didn’t give up electrons as readily. This was important because up until then, there wasn’t an easy way to convert AC to DC. The usual method was to use an AC motor coupled to a DC generator or a similar mechanical arrangement known as a rotary converter.
In later decades the mercury vapor lamp would wind up with a phosphor coating that converted the ultraviolet light to cool white light and became the fluorescent bulb, so while the rectifier mostly gave way to more efficient methods, [Hewitt’s] bulb has been in use for many years.
Anyone who’s ever tried setting up a workbench in a tight space knows the struggle: you want to have all your test equipment and tools out and within arm’s reach, but you just don’t have enough surface area. If you fill the whole bench with your tools, there’s not going to be anywhere left to work. So you either have a bench full of tools that’s uncomfortable to use, or you’re forced to choose what stays out and what gets packed away. Neither is conducive to actually getting work done, which is why you are trying to set up a proper bench in the first place. It’s a vicious cycle.
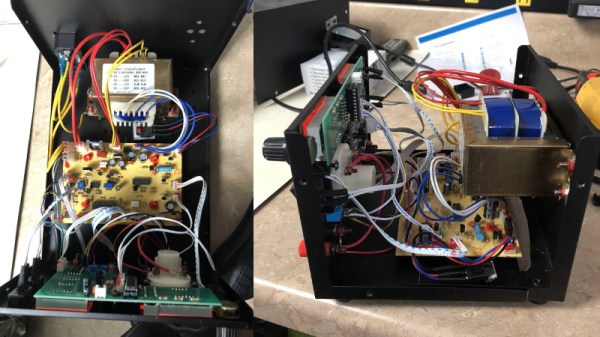
When faced with that very problem recently, [EEpromChip] decided to take the nuclear option. His Kendal 853D was already a great choice for a small-scale work area since it’s not just a hot air rework station but also offers a soldering iron and bench power supply in one unit. But it was still just a little too long for his bench. The solution? Just run the thing through the bandsaw and cut it in half. Seriously.
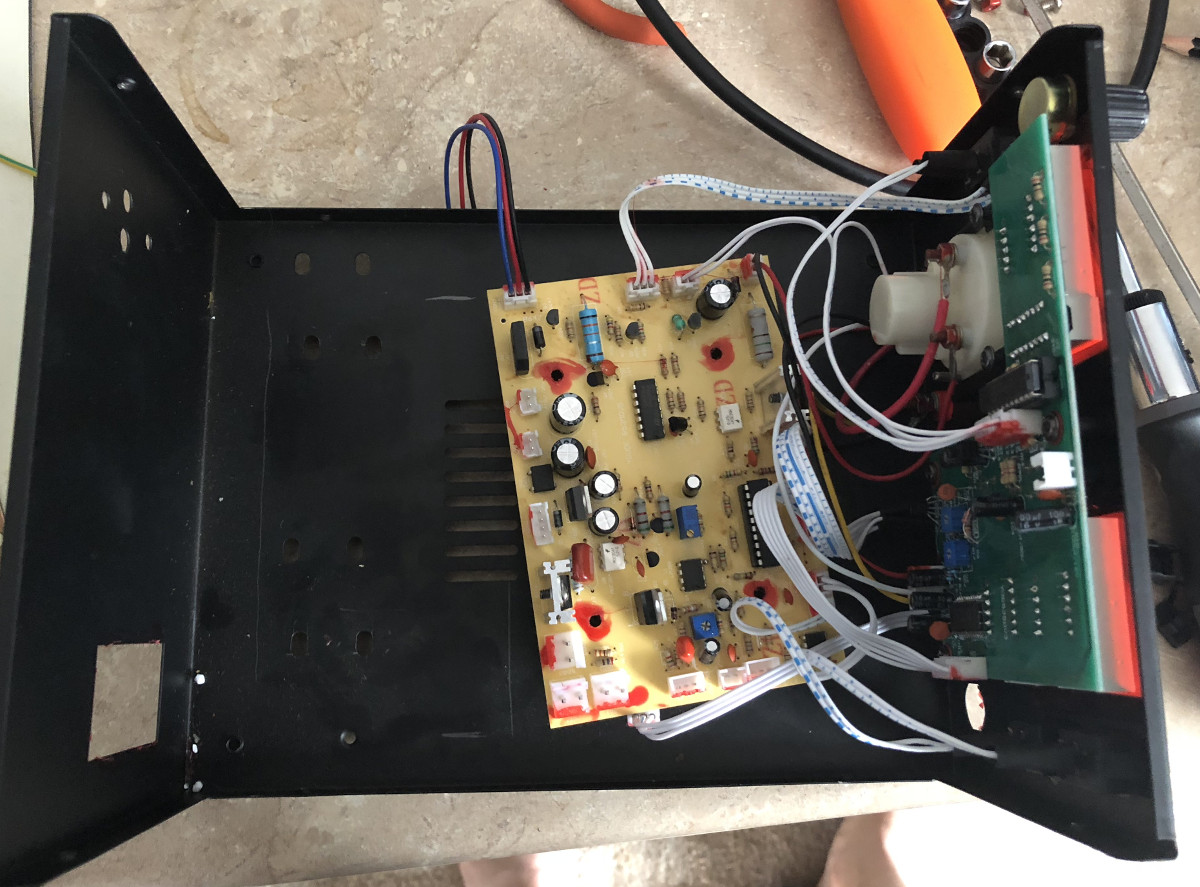
Upon opening the 853D up, [EEpromChip] realized the internal layout wasn’t terribly efficient. There was plenty of extra room inside the case to begin with, but if the transformer was removed from the bottom of the case and mounted to the rear it would really cut down the device’s footprint.
After making sure he documented where everything connected, he took all the electronics out of the sheet metal case and cut it down to size on a bandsaw. He then reinstalled circuit boards, and this time mounted the beefy transformer so it hangs over the board rather than sits next to it. The end result is a version of the Kendal 853D which is several inches shorter than before with no impact on functionality.
Right now, we’re running the greatest hardware competition on the planet. The Hackaday Prize is the Academy Awards of Open Hardware, and we’re opening the gates to thousands of hardware hackers, makers, and artist to create the next big thing.
Last week, we wrapped up the first challenge in this year’s Hackaday Prize. We’re now happy to announce twenty of those entries that have been selected to move to the final round and have been awarded a $1000 cash prize. Congratulations to the winners for the Open Hardware Design Challenge portion of the Hackaday Prize. Here are winners, in no particular order:
Open Hardware Design Challenge Hackaday Prize Finalists:
The Oasis 3D Printer repurposes HP ink cartridges to build a powder-baseed 3D printer
Just take a look at these projects. They are the best of the best, and there’s still more to come. We enjoyed seeing projects that repurpose off-the-shelf technology to vastly extend the capabilities of home manufacturing with the Oasis 3DP. This project from [Yvo de Haas] takes ink cartridges from HP printers and uses it to build a powder-based 3D printer. That’s something that really hasn’t been done in the world of homebuilt 3D printers, and the Oasis 3DP already has working hardware. It truly is one of the more interesting projects we’ve ever seen, and not just because [Yvo] is dealing with dozens of tiny micro pumps squirting binder out of microscopic nozzles.
But that’s not all. There were hundreds of projects entered in the Hackaday Prize for this round, and our only regret is that we could only pick twenty winners for the Open Hardware Design Challenge. Just check out Semiconductors @ Home, a project from [Nixie] — it’s a project trying to make sand blink. [Nixie] is building all the tools to make semiconductors at home. Being able to build a simple FET is amazing, and to do that you need a fume hood to contain the dangerous hydrofluoric acid, a vacuum chamber for sputtering deposition, and a fancy oven with a controlled atmosphere. These tools are [Nixie’s] entry in the design challenge. This isn’t your garden variety hardware hacking; this is advanced hardware hacking.
Not impressed with DIY semiconductors? You’re a terrible person, but okay. How about an easy way to read rotary encoders? [fattore.saimon] and [Atikaimu] are building an I2C Encoder, an easy way to read multiple rotary encoders with just two microcontroller pins. Reading rotary encoders is one of the deceptively difficult tasks in electrical engineering; you really need some interrupts to do it right, and a microcontroller really only has a few of those to spare. [fattore] and [atikaimu]’s project does away with that problem, and puts rotary encoders on a board that can be read with a normal I2C bus. This means anyone can add a dozen rotary encoders to any project easily. Did anyone say MIDI controllers? Yes, that is possible. Everything from musical instruments to impressive control panels is possible with the I2C encoder, and it’s all Open Hardware.
Are you still not entertained? [Carl Bugeja] built a motor out of a PCB. Over the last decade, the price of custom fabricated printed circuit boards has dropped precipitously, and that means anyone can experiment with copper foil and fiberglass. [Carl] figured that since you can put coils on a PCB, you could also make a motor. While we’re only looking at a 1 Watt motor here, this is a brushless motor made out of printed circuit boards. It’s amazing, you’ve never seen it before, and we have absolutely no idea how many uses people will find a use for this amazing technology.
These are the winners of the Open Hardware Design Challenge in the Hackaday Prize, and we have a fondness for Open tools that are capable of building even more open hardware. If you want an example of that, you need only look at the Arcus-3D-P1 from [Daren Schwenke]. This is a project to add a lightweight pick and place head to any 3D printer. Below a certain size, a pick and place machine is necessary to create electronics, and almost everyone has a 3D printer these days. The Arcus-3D-P1 is an attachment for any 3D printer to turn it from a CNC hot glue gun into a machine that builds electronics. It’s Open Hardware, and hardware that creates hardware. It’s astonishing, and it’s happening on Hackaday.io.
Congratulations to all who entered the first challenge, and the twenty excellent entries that are moving to the finals. We can’t wait to see what other projects will make it to the finals in the Hackaday Prize, the greatest hardware competition on the planet.
Who will win the 2018 Hackaday Prize?
Who will win the Hackaday Prize? These finalists in the Open Hardware design challenge are now in the running for the final round of the Hackaday Prize where they will have the chance to win the Grand Prize $50,000 USD. That doesn’t mean you still can’t get in on the action; there are four more challenges left in the Hackaday Prize.
Right now, we’re in the middle of the Robotics Module Challenge, and after that, we’ll launch into the Power Harvesting Challenge, the Human Computer Interface Challenge, and finally the Musical Instrument challenge. There’s still time to win your place among the hardware greats, so start your Hackaday Prize entry now.
But data isn’t the only thing residing in memory. All the program code is accessible through either the RAM or some other executable type of memory, giving each function a specific address inside that memory as entry point. Once again, pointers are simply memory addresses, and to fully utilize this similarity, C provides the concept of function pointers. Function pointers provide us with ways to make conditional code execution faster, implement callbacks to make code more modular, and even provide a foothold into the running machine code itself for reverse engineering or exploitation. So read on!
Function Pointers
In general, function pointers aren’t any more mysterious than data pointers: the main difference is that one references variables and the other references functions. If you recall from last time how arrays decay into pointers to their first element, a function equally decays into a pointer to the address of its entry point, with the () operator executing whatever is at that address. As a result, we can declare a function pointer variable fptr and assign a function func() to it: fptr = func;. Calling fptr(); will then resolve to the entry point of function func() and execute it.
Admittedly, the idea of turning a function into a variable may seem strange at first and might require some getting used to, but it gets easier with time and it can be a very useful idiom. The same is true for the function pointer syntax, which can be intimidating and confusing in the beginning. But let’s have a look at that ourselves.
Somewhere, in a storage closet used by every computer science or engineering program, is a robot arm. It’s there, you’ve probably never seen it, but it’s there. Originally, this hugely expensive robotic arm was intended to be a truly remarkable pedagogical tool, allowing students to learn about reverse kinematics and control systems. Now, most likely, that robotic arm is covered in dust, either because the arm itself is broken or because the only instructor that used it retired.
These days, robotic arms are within nearly everyone’s reach. Ben Gray’s MeArm is a popular robotic arm made out of laser cut acrylic and powered by hobby servos that anyone can put together. It’s the minimum viable robotic arm, and for this week’s Hack Chat, we’re going to be talking all about robot arms, what they can do, and how they can be used in education.
During this Hack Chat, we’ll be discussing the ins and outs of reverse kinematics and manufacturing robot kits with Ben. We’ll also be talking about Ben’s current efforts to get people of various backgrounds in on robotics education. Topics that will be covered include:
designing and manufacturing the MeArm
robotic arms
robotics kits
robots made for hacking
You are, of course, encouraged to add your own questions to the discussion. You can do that by leaving a comment on the Hack Chat Event Page and we’ll put that in the queue for the Hack Chat discussion.

 A can of soda costs about half a dollar, and once you’re done with the sugary syrup, most cans end up in the trash headed for recycling. Some folks re-use them for other purposes, but we’re guessing no one up-cycles them quite like artist [Noah Deledda] does. He turns them into pieces of