Audio On A Shoestring: DIY Your Own Studio-Grade Mic

When it comes to DIY projects, nothing beats the thrill of crafting something that rivals expensive commercial products. In the microphone build video below, [Electronoobs] found himself inspired by DIY Perks earlier efforts. He took on the challenge of building a $20 high-quality microphone—a budget-friendly alternative to models priced at $500. The result: an engaging and educational journey that has it’s moments of triumph, it’s challenges, and of course, opportunities for improvement.

The core of the build lies in the JLI-2555 capsule, identical to those found in premium microphones. The process involves assembling a custom PCB for the amplifier, a selection of high-quality capacitors, and designing lightweight yet shielded wiring to minimize noise. [Electronoobs] also demonstrates the importance of a well-constructed metal mesh enclosure to eliminate interference, borrowing techniques like shaping mesh over a wooden template and insulating wires with ultra-thin enamel copper. While the final build does not quite reach the studio-quality level and looks of the referenced DIY Perks’ build, it is an impressive attempt to watch and learn from.

The project’s key challenge here would be achieving consistent audio quality. The microphone struggled with noise, low volume, and single-channel audio, until [Electronoobs] made smart modifications to the shielded wiring and amplification stages. Despite the hurdles, the build stands as an affordable alternative with significant potential for refinement in future iterations.

Continue reading “Audio On A Shoestring: DIY Your Own Studio-Grade Mic”

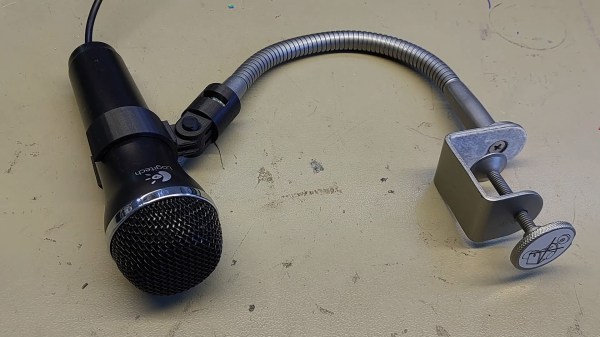
A small black microphone in a black 3d printed mount. The mount is attached to an adjustable silver neck attached to a desk clamp from an IKEA lamp.

IKEA Hack – Kvart Into Mic Stand

While audiophiles might spend gazillions of hours finely honing a microphone stand that isolates their equipment from the trials and perturbations of the world, most of us who use a microphone don’t need anything so elaborate. Hackaday contributing editor [Jenny List] hacked together some thrift store finds into a snazzy adjustable mic setup as you can see in the video below the break.

Using the flexible neck and clamp of an IKEA Kvart as a base, [Lists]’s mic stand looks like a simple, but exceedingly useful tool. She first removed the lamp, shade, and cord before designing a 3D-printed mount to attach to the lamp’s neck. Since the bolted lamp end of the connection goes straight to an action camera mounting system, we can see this being handy for mounting any number of other things besides microphones. Another 3D-printed mount attaches the Logitech gaming microphone to the action camera connector, and the whole thing can either be bolted together or use a printed pin. All the parts can be found in a GitHub repository.

Looking for more microphone hacks? Check out this DIY ribbon microphone or the Ambi-Alice ambisonic mic.

Continue reading “IKEA Hack – Kvart Into Mic Stand”

Lo-Fi Fun: Beer Can Microphones

Sometimes, you just need an easy win, right? This is one of those projects. A couple months back, I was looking at my guitars and guitar accessories and thought, it is finally time to do something with the neck I’ve had lying around for years. In trying to decide a suitable body for the slapdash guitar I was about to build, I found myself at a tractor supply store for LEGO-related reasons. (Where else are you going to get a bunch of egg cartons without eating a bunch of eggs?) I  noticed that they happened to also stock ammo boxes. Bam! It’s sturdy, it opens easily, and it’s (very) roughly guitar body shaped. I happily picked one up and started scheming on the way home.

Having never built a cigar box guitar before and being of a certain vintage, I’m inclined to turn to books instead of the Internet, so I stocked up from the library. Among my early choices was Making Poor Man’s Guitars by Shane Speal, who is widely considered to be the guru on the subject. In flipping through the book, I noticed the beer can microphone project and was immediately taken by the aesthetic of some cool old 70s beer can with a 1/4″ instrument jack on the bottom, just asking for some dirty blues to be belted into it. I had to build one. Or twelve.

Continue reading “Lo-Fi Fun: Beer Can Microphones”

A Simple High-Fidelity DIY Mic Pre Amp

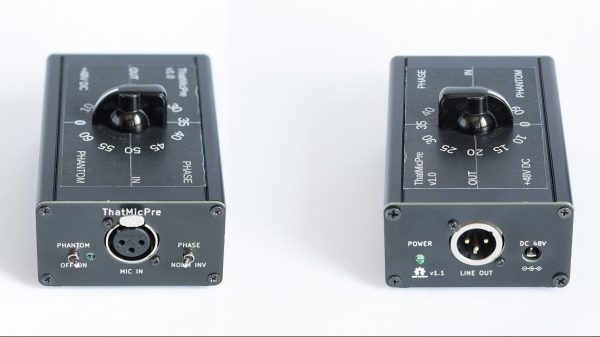
If you’re doing any serious work with microphones, you’ll typically find yourself in want of a dedicated preamp. [ojg] needed just such a thing for acoustic measurement duties, and set about working up a cheap DIY design by the name of ThatMicPre.

The design is based around the THAT1510 preamp IC, known for its good frequency response and low harmonic distortion and noise. The design is also compatible with THAT1512, SSM2019, and INA217 chips as well. [ojg] gave the design switch-controlled gain levels, providing greater accuracy than a potentiometer adjustment, and the ability to supply phantom power for mics that require it. The PCB is designed to rely on through-hole parts and common connectors for easy assembly.

The design is open source, and has already been built by others on the DIYAudio forums. Built into a simple case, it looks like a handsome and well-built piece of audio equipment. We’ve featured quite a few unique preamps over the years, and if you’ve been building your own, we’d love to see those too!

Camera-Mounted Stereo Mic Is Fluffy And Capable

Typically, the audio coming out of your camera is not of the greatest quality. An external mic is generally a great upgrade, and this build from [DJJules] aims to be just that.

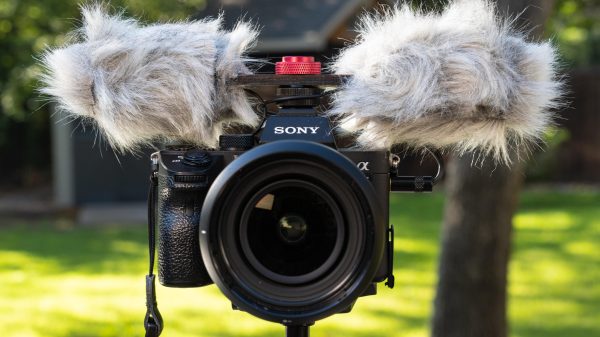
It’s a stereo mic setup based on the work of the Office de Radiodiffusion Télévision Française, or ORTF. The ORTF stereo technique defines using two cardioid mics pointing left and right at a seperation of 110 degrees and 17 cm apart, which captures a quality stereo field that also sounds good when presented as a mono mixdown.

The build uses a simple wooden frame to hold two electret mic capsules in the required orientation. They’re wired up to a 3.5mm jack so they can be plugged straight into a mic input on a DSLR or other similarly-equipped camera. Hair curlers covered in faux fur are used as a wind shield for the mics, and gives the build a properly professional look. The frame is also given a mount so it can easily sit on a camera’s cold shoe fitting. Alternatively, a screw mount can also be used.

Good audio is absolutely key to making good content, and having quality mics is definitely what you need to achieve that. We’ve featured some other great DIY mic builds over the years, too. Video after the break. Continue reading “Camera-Mounted Stereo Mic Is Fluffy And Capable”

Blue Ribbon Microphone

Edmund_Lowe_fsa_8b06653If you’ve ever seen an old movie or TV show where there was a radio announcer, you’ve probably seen a ribbon microphone. The RCA 44 (see Edmund Lowe, on right) had exceptional sound quality and are still valued today in certain applications. The name ribbon microphone is because the sound pickup is literally a thin strip of aluminum or other conductive material.

Unlike other common microphones, ribbons pick up high frequencies much better due to the high resonant frequency of the metallic ribbon. This is not only better in general, but it means the ribbon mic has a flatter frequency response even at lower frequencies. Another unique feature is that the microphone is bidirectional, hearing sounds from the front or back equally well. It is possible to build them with other directional patterns, although you rarely see that in practice.

Invention

In the early 1920s, Walter Schottky and Erwin Gerlach developed the ribbon microphone (and, coincidentally, the first ribbon loudspeaker). Harry Olson at RCA developed a ribbon mic that used coils and permanent magnets which led to the RCA Photophone Type PB-31 in 1931. Because of their superior audio response, they were instant hits and Radio City Music Hall started using the PB-31 in 1932. A newer version appeared in 1933, the 44A, which reduced reverberation.

Continue reading “Blue Ribbon Microphone”

Building A Contact Mic Using Homemade Piezo Crystals

homemade_piezo_contact_mic

[Leafcutter] is big in to making music and has put together all sorts of musical instruments and tools over the years. Recently, he was inspired to make his own piezo crystals, and wrote in to share the results of his experiments with us.

[Leafcutter] is no stranger to messing around with piezo elements, and after seeing [Collin’s] tutorial on making your own piezo crystals at home, he knew he had to give it a try. He stopped by the grocery store to fetch all of the ingredients, then followed [Collin’s] instructions to the letter…well, almost. It seems that he might have cooled the solution too quickly, so he found himself with a jar full of tiny, barely usable piezo crystals instead of larger ones like [Collin] was able to produce.

Undeterred, he decided to see if the stuff was any good, and rigged up a makeshift contact microphone using some conductive foil and a clamp. He piped the output to his amplifier, and wouldn’t you know it…it worked!

He has a small sound clip of what the mic sounded like on his site, and it worked pretty darn well despite the crystal’s tiny size. He is going to give the whole process another go, so we hope to see more experiments with bigger crystals in the near future.