Giant Spinning POV Christmas Tree

Spinning Holographic POV Christmas Tree Of Death

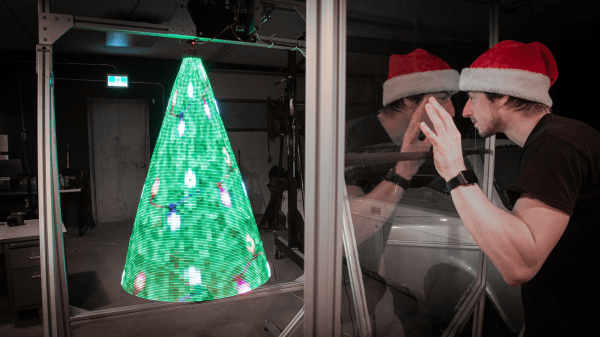
[Sean Hodgins] really harnessed the holiday spirit to create his very own Giant Spinning Holographic Christmas Tree (of Death). It’s a three-dimensional persistence-of-vision (POV) masterpiece, but as a collection of rapidly spinning metal elements, it’s potentially quite dangerous as well. As [Sean] demonstrates, the system can display other images and animations well beyond the realm of mere holiday trees.

Initial experiments focused on refining the mechanical structure, bearings, and motor. A 1/2 horsepower A.C. motor was selected and then the dimensions of the tree were “trimmed” to optimize a triangular frame that could be rotated at the necessary POV speed by the beefy motor.  A six-wire electrical slip ring allows power and control signaling to be coupled to the tree through its spinning central shaft.

The RGB elements are SK9888 LEDs also know as DotStar LEDs. DotStar LEDs are series-chainable, individually-addressable RGB LEDs similar to NeoPixels. However, with around 50 times the pulse width modulation (PWM) rate, DotStars are more suitable for POV applications than NeoPixels.  The LED chain is driven by a Raspberry Pi 4 single board computer using a clever system for storing image frames.

If deadly rotational velocity is not your cup of tea, consider this slower spinning RGB Christmas tree featuring a DIY slip ring. Or for more POV, may we suggest this minimalist persistence-of-vision display requiring only a few LEDs and an ATtiny CPU.

Continue reading “Spinning Holographic POV Christmas Tree Of Death”

DietPi Releases 8.12 With Support For The Rockchip RK3588 SoC

This month DietPi released version 8.12 of this SBC-oriented Linux distribution. Most notable is the addition of support for the NanoPi R6S and the Radxa ROCK 5B SBCs. The ROCK 5B features the new flagship Rockchip RK3588 SoC with quad Cortex-A76 and quad Cortex-A55. What makes DietPi interesting as an operating system for not just higher end SBCs but also lower-end SBCs compared to options like Debian, Raspberry Pi OS and Armbian is that it has a strong focus on being the most optimized. This translates in a smaller binary size, lower RAM usage and more optimized performance.

The DietPi setup experience is as straightforward as with the aforementioned options, except that right from the bat you get provided with many more options to tweak. While the out of the box experience and hitting okay on the provided defaults is likely to be already more than satisfactory for most users – with something like the optional graphical interface easy to add – enterprising users can tweak details about the hardware, the filesystem and more.

When we set up DietPi on a Raspberry Pi Zero, it definitely feels like a much more light-weight experience than the current Debian Bullseye-based Raspberry Pi OS. Even though DietPi is also based on Debian, it leaves a lot more RAM and storage space free, which is a definite boon when running on a limited platform like a Raspberry Pi Zero. Whether it’s polite to state in public or not, DietPi definitely rubs in that many standard SBC images are rather pudgy these days.

Flexible, Thin-Film Biosensors

We like to keep a pulse on the latest biosensor research going on around the world. One class of biosensors that have really caught our attention is the so-called thin-film sensors, pioneered by the Rogers Research Group at Northwestern University.

We’re no strangers to the flexible PCB here at Hackaday. Flexible PCBs have become increasingly accessible to small-scale developers and hobbyists, explaining why we’re seeing them incorporated into many academic research projects. The benefit of these types of sensors lies in the similarity of their mechanical properties to those of human skin. Human skin is flexible, so matching the flexibility of skin allows these thin-film sensors to adhere more comfortably and naturally to a person’s body. Continue reading “Flexible, Thin-Film Biosensors”

A Christmas-themed LEGO train engine and coal car

ESPHome Powers Festive Lego Train Set

While the basic concept of LEGO bricks might have changed little since the mid-20th century, some components such as motors and sensors are still affected by technological progress and end up obsolete and unsupported. [Travis] ran into this problem when he was building a festive train setup and realized he didn’t have the speed controller to match his train engine. Without that part, the engine would only run at full speed and derail as soon as it hit a curve. The official speed controller had been discontinued and was hard to find, so [Travis] had to resort to building his own.

The basic components needed were an H-bridge driver to operate the motor and an ESP8266 to generate PWM signals. In order to keep the bricky appearance of the train engine intact, [Travis] hollowed out a few cheap imitation LEGO bricks to house the electronics. He also cut out slots for JST connectors, which are far more convenient to work with than LEGO’s brick-style connectors.

Two imitation LEGO bricks with electronics insideThe ESP8266 runs ESPHome, which enables [Travis] to control the entire setup using Home Assistant. The train is programmed to run a few laps at the top of the hour and play choo-choo sounds from a mini MP3 player hidden in the coal car. That car also holds a standard AA battery holder to power the system, which makes it easy to swap the batteries without having to partially disassemble the train.

There are various ways to control LEGO creations using standard computer platforms: we’ve seen the ESP32 powering a LEGO tank, for instance. If you need a bit more computing power, there’s even an official LEGO Raspberry Pi HAT.

Continue reading “ESPHome Powers Festive Lego Train Set”

Picture of NanoStat in 3D-printed enclosure with LiPo battery and US quarter for scale.

An ESP32-Based Potentiostat

Ever wanted to make your own wireless chemical sensor? Researchers from the University of California, Irvine (UC Irvine) have got you covered with their ESP32-based potentiostat.

We’ve talked about potentiostats here on Hackaday before. Potentiostats are instruments that analyze the electrical properties of an electroactive chemical cell. Think oxidation and reduction reactions (redox) from your chemistry course, if you can remember that far back. Potentiostats can be used in several different modes/configurations, but the general idea is for these instruments to induce redox reactions within a given electroactive chemical cell and then measure the resulting current produced by the reaction. By measuring the current, researchers can determine the concentration of a known substance within a sample or even determine the identity of an unknown substance, to name a few potential applications.

These instruments have become mainstays in research labs around the world and have incredible utility in the consumer space. Glucometers, devices used to measure blood glucose levels, are an example of technologies that have made their way into everyday life due to the advances made in electrochemistry and potentiostat research over the last few decades. Given their incredible utility to scientific research and medical technologies, a great deal of effort has gone into democratizing potentiostats, making them more available to the general public for educational and hobbyist purposes. Of course, any medical applications must go through rigorous testing and approvals by each country’s appropriate governing bodies. So we’re talking more non-medical purposes here.

The first popular open-source, DIY potentiostat was the CheapStat, which we’ve covered here on Hackaday before. Since then, developing newer and more advanced open-source potentiostats has become a popular endeavor within the scientific community. The researchers from UC Irvine wanted to put their own special spin on the open-source potentiostat craze and they did so with their inclusion of the ESP32 as their main processor. This obviously opens up them up do a whole host (see what we did there) of wireless capabilities that others before them have not explored.

With the ESP32, they developed a nice web-based GUI that makes controlling and collecting data from the potentiostat very seamless and user-friendly. You can imagine the great possibilities here. Teacher-led classroom demonstrations where the instructor can easily access each student’s device over the cloud to help troubleshoot or explain results. Developing soil monitoring sensors that can be deployed all around a farm to remotely collect data on feed, soil composition, and plant health. The possibilities here sure are promising.

We hope you’ll dive into their paper as it’s well worth a read. Happy hacking, Hackaday.

Lo-Fi Fun: Beer Can Microphones

Sometimes, you just need an easy win, right? This is one of those projects. A couple months back, I was looking at my guitars and guitar accessories and thought, it is finally time to do something with the neck I’ve had lying around for years. In trying to decide a suitable body for the slapdash guitar I was about to build, I found myself at a tractor supply store for LEGO-related reasons. (Where else are you going to get a bunch of egg cartons without eating a bunch of eggs?) I  noticed that they happened to also stock ammo boxes. Bam! It’s sturdy, it opens easily, and it’s (very) roughly guitar body shaped. I happily picked one up and started scheming on the way home.

Having never built a cigar box guitar before and being of a certain vintage, I’m inclined to turn to books instead of the Internet, so I stocked up from the library. Among my early choices was Making Poor Man’s Guitars by Shane Speal, who is widely considered to be the guru on the subject. In flipping through the book, I noticed the beer can microphone project and was immediately taken by the aesthetic of some cool old 70s beer can with a 1/4″ instrument jack on the bottom, just asking for some dirty blues to be belted into it. I had to build one. Or twelve.

Continue reading “Lo-Fi Fun: Beer Can Microphones”

A 3D-printed case for the ZX Spectrum with a mechanical keyboard

The ZX Spectrum Finally Gets A Proper Keyboard

The Sinclair ZX Spectrum is fondly remembered by many for being their first introduction into the wonderful world of computing. Its advanced capabilities coupled with a spectacularly low price made it one of the great home computers of the 1980s, at least in the UK and nearby countries. What was less spectacular about the Spectrum was its awful keyboard: although a step up from the flat membrane keyboards of earlier Sinclair computers, the Spectrum’s tiny rubbery keys made typing anything more than a few characters a bit of a chore.

If you’re planning to do any serious programming on your Spectrum, you might therefore want to check out [Lee Smith]’s latest project in which he redesigns the Spectrum’s case to include a proper mechanical keyboard. [Lee] got this idea when he was looking for ways to fix a few Spectrums with broken or missing cases, and stumbled upon several projects that aim to recreate classic Sinclair machines using modern components. He took a keyboard PCB meant for the ZX Max 128 project, populated it with some high-quality switches, and added a modified set of keycaps from the ManuFerHi N-Go.

A new ZX Spectrum case, opened to show the keyboard connecting to the mainboard
The new keyboard plugs into the original connectors and doesn’t require any board-level modifications.

Together, those parts formed a modern, comfortable keyboard that still had the proper labelling on all keys. This is rather essential on the Spectrum, since each key is also used to generate symbols and BASIC keywords: for instance, the “K” key also functions as LIST, +, LEN and SCREEN$.

With the keyboard design settled, [Lee] set to work on the rest of the case: he designed and 3D-printed a sleek enclosure that takes the new keyboard as well as an original Spectrum mainboard. The resulting system is called the ZX Mechtrum, and looks fabulous with its matte black exterior and the obligatory four-coloured rainbow. A replaceable rear panel also allows several board-level modifications, like composite video or VGA output, to be neatly incorporated into the design.

We wrote an extensive retrospect on the Spectrum on its 40th anniversary earlier this year. If, somehow, you actually like the Spectrum’s original rubbery keyboard, then you can also modify the whole thing to work with modern computers.

Continue reading “The ZX Spectrum Finally Gets A Proper Keyboard”