NeXT Cubes And LCD Monitors

The NeXT slabs and cubes were interesting computers for their time, with new interesting applications that are commonplace today seen first in this block of black plastic. Web browsers, for example, were first seen on the NeXT.

Running one of these machines today isn’t exactly easy; there are odd video connectors but you can modify some of the parts and stick them in an LCD monitor. It’s a tradeoff between a big, classic, heavy but contemporary CRT and a modern, light, and efficient LCD, but it’s still a great way to get a cube or slab up and running if you don’t have the huge monitor handy.

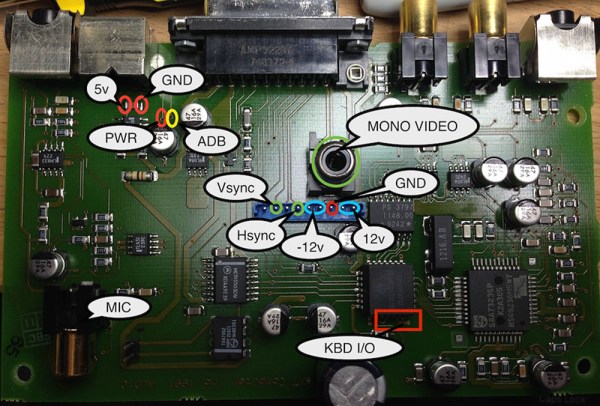
The NeXT cube doesn’t have a single wire going between the computer and the monitor; that would be far too simple. Instead, a NeXT Sound Box sits between the two, providing the user a place to plug the monitor, keyboard, mouse, and audio connectors into. [Brian] took the board from this Sound Box and put it inside an old NEC LCD monitor he had sitting around. 12V and 5V rails were wired in, the video lines were wired in, and [Brian] created a new NeXT monitor.

There are two versions of the NeXT Sound Box – one for ADB peripherals (Apple IIgs and beige Macs), and another for non-ADB peripherals. [Brian] also put together a tutorial for using non-ADB peripherals with the much more common ADB Sound Board.

Hanging Monitors Keeps Your Desk Slightly Less Messy

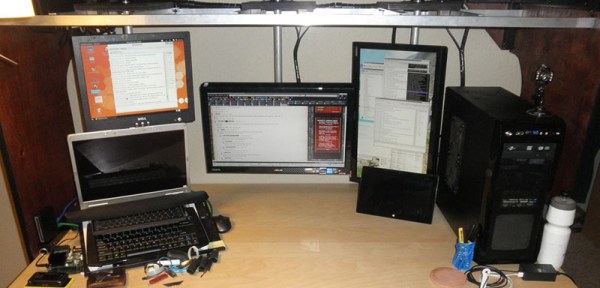
[Gertlex] – like just about everyone reading this, I’m sure – has a messy desk with monitors, keyboards, mice, several other input devices, tablets, and a laptop. He wanted a system that would reduce the wire clutter on his desk and after thinking a bit came up with a really cool solution for arranging his monitors. He’s hanging the monitors from a shelf above his desk using nothing but some aluminum and a few 3D printed brackets.

The main structure is a shelf of ‘bridge’ above his desk, made from 3/4″ ply. The inventive bit of this build is the two 1″ square aluminum tubes spanning the width of this shelf. From these, a few bits of aluminum angle pieces slide along the 1″ rails. a mount holds a 1″ round pipe to these supports, and a VESA mount is clamped to the pipe. There’s an imgur album that goes through the entire design. It’s certainly an improvement over the earlier battlestation, and the wiring loom cleans everything up nice and tidy.

[Gertlex]’s new system of hanging monitors is great, but this simple puts some even cooler builds on the table. The sliding system is great, but by putting one monitor on its own carriage, you could have an infinitely reconfigurable monitor setup. Some proper bearings, 3D printed VESA mounts, and maybe even a few stepper motors would make a build like this the coolest battlestation rig since the great ‘capacitor plague and I have a soldering iron so free monitors’ spectacular of 2005.


Turning A Tiny CRT Into A Monitor

TV

[GK] picked up a few tiny 2″ CRTs a while back and for the longest time they’ve been sitting in a box somewhere in the lab. The itch to build something with these old tubes has finally been scratched, with a beautiful circuit with Manhattan style construction.

[GK] has a bit of a fetish for old oscilloscopes, and since he’s using an old ‘scope tube, the design was rather simple for him; there aren’t any schematics here, just what he could put together off the top of his head.

Still, some of [GK]’s earlier projects helped him along the way in turning this CRT into a monitor. The high voltage came from a variable output PSU he had originally designed for photomultiplier tubes. Since this is a monochrome display, the chrominance was discarded with an old Sony Y/C module found in a part drawer.

It’s a great piece of work that, in the words of someone we highly respect is, “worth more than a gazillion lame Hackaday posts where someone connected an Arduino to something, or left a breadboard in a supposedly “finished” project.” Love ya, [Mike].


Re-purposing An Old Laptop Display

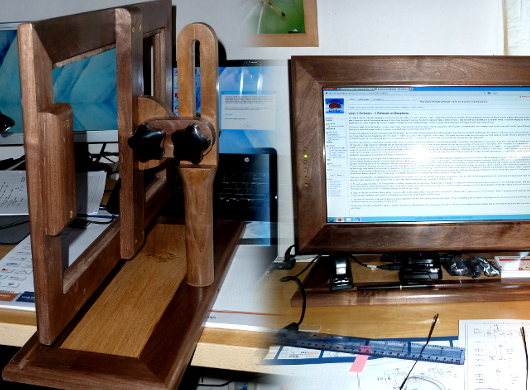
InitsEnvironment[Tim] found himself with a laptop that had a good 18.4″ screen, but otherwise didn’t run properly. It would be a shame to throw that away, so he decided to salvage the screen by turning it into a standalone monitor. This isn’t exactly new, as he did what many people have done and looked to eBay for an after-market LCD controller board. The real beauty is in the enclosure he built. [Tim] had some scrap wood available from a previous project, so he set about designing a new frame for the monitor, and a very nice adjustable stand, as can be seen in the photo above.

One nice detail is in the control panel buttons. The LCD controller comes with a separate board housing the controls, and while he made a mistake mounting it initially, he ended up with a nice set of oak buttons that match the frame perfectly. He then built a nice backing out of styrene that holds the screen in place as well as housing the electronics.

Overall, it’s a nice looking project, and it is always nice to see electronics re-purposed rather than ending up in a landfill. We can’t help but think this would be a great frame for building a picture frame or a wall-mounted PC as well.

Monitoring A Sick Bird Using The Raspberry Pi

sick-bird-monitoring-with-rpi

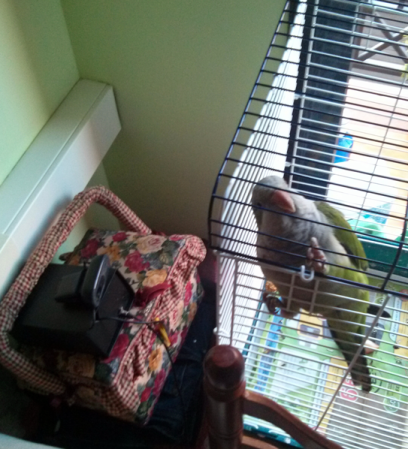
[Jorge Rancé] was nursing a sick bird back to health. He found it on the street with a broken leg, which required a mini plaster cast for it to heal correctly. But felt bad when leaving the house for long periods. He grabbed some simple hardware and put his mind at easy by building an Internet connected bird monitoring system. It’s really just an excuse to play around with his Raspberry Pi, but who can blame him?

A webcam adds video monitoring using the Linux software called “motion” to stream the video. This is the same package we use with our cats when we travel; it provides a continuous live stream but can also save recordings whenever motion is detected. He added a USB temperature sensor and attached a water level sensor to the GPIO header. These are automatically harvested — along with a still image from the webcam — and tweeted once per hour using a bash script. He just needs to work out automatic food and water dispensing and he never needs to return home! Bird seed shouldn’t be any harder to dish out than fish food, right?

LED Module Used To Display Load, Traffic, And Status Data For Your PC

cpu-monitoring-block

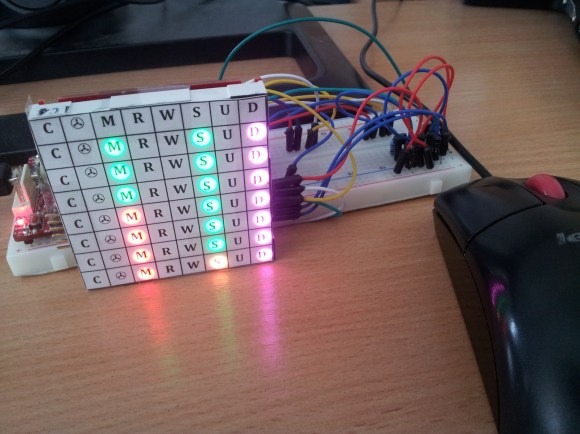
You’re going to like [Ivan’s] write-up for this LED computer status monitor. Of course he didn’t just show-and-tell the final product — if he had you’d be reading this in a Links post. But he also didn’t just detail how he put the thing together. Nope, he shared pictures and details of every iteration that got him here.

It started off with a tachometer. Yeah, that analog display you put on the dashboard of your car which reads out RPM. He wanted to make it into a USB device which would read out his CPU load. But that’s an awful lot of work when it can only display one thing at a time. So he decided to add an 8×8 LED module which would display the load for each individual core of his CPU. It looks great next to the illuminated tachometer. From there he added resolution by transitioning to an RGB module, which ended up sucking him into a coding project to extend the data pushed to his embedded hardware. In the end his ReCoMonB (Real Computer Monitoring Block) displays CPU load, RAM usage, several aspects of HDD activity, as well as the network up and down traffic.

We think he’s probably squeezed all that he can from this little display. Time to upgrade to a TFT LCD.

Continue reading “LED Module Used To Display Load, Traffic, And Status Data For Your PC”

Computer Monitor Ambilight Clone Shows Remarkable Performance

ambilight-project-discreet-led-boards

Check out this fantastic Ambilight clone for a computer monitor which [Brafilus] has been working on for a few years. It’s actually the third revision and watching the demo video below left our jaws agape.

Details are only available as comments on the YouTube page. But he’s given us just enough to be satisfied. His self-etched board hosts a PIC 18F14K50 microcontroller. It is talking to each of the 28 LED pixels which themselves live on tiny hunks of diy PCB as well. He wrote his own PC software in C# to capture the colors around the edges of the screen. He also worked hard to ensure there are plenty of tweaks available for true color matching between the monitor and what your eye sees bouncing off of the wall.

If you’re looking for something like this on your television set go back a couple of days and check out that standalone unit.

Continue reading “Computer Monitor Ambilight Clone Shows Remarkable Performance”