Remote PC Power Control Thwarts Button Pushers

Pervasive connectivity is a mixed blessing at best, especially when it creates the expectation that we’ll always have access to everything we need. When what you need is on your work or home PC, there are plenty of options for remotely accessing files using your phone. But if your roomie or the cleaning crew powers the machine down, you’ve got a problem – unless you’ve got a way to remotely power the machine back up.

[Ahmad Khattab]’s hack required getting up close and personal with his PC’s motherboard. A Particle Photon steals power from the always-on 3.3 volt line of the vacant Trusted Platform Module connector on his machine. Outputs from the Photon are connected to the motherboard’s power switch connection and a smartphone app drives the outputs and turns the machine on and off. As [Ahmad] admits, there are plenty of ways to attack this problem, including Wake-on-LAN. But there’s something to be said for the hardware approach, especially when a Photon can be had for $20.

Astute readers will note that we recently covered a very similar project using a Particle Core. Be sure to check that one out for a little more detail on using Particle’s cloud, and for some ideas on powering the module if your motherboard lacks a TPM port. In the meantime, enjoy [Ahmad]’s video.

Continue reading “Remote PC Power Control Thwarts Button Pushers”

Quadcopter Built From Recycled Motherboards

A quadcopter built from a motherboard

[Eric] has figured out a great way to build quadcopters out of recycled computer motherboards. Multicopters come in all shapes and sizes these days. As we mentioned in the last issue of Droning On, they can be bought or built-in a multitude of materials as well. Drones have been built using materials as varied as wood, PVC pipe, carbon fiber, and aluminum.

One of the more common commercial materials is G10 fiberglass sheet. It’s stiff, strong, and relatively light. Printed circuit boards are generally made of FR-4 fiberglass, G10’s flame resistant cousin. It’s no wonder [Eric] had quadcopters in his eyes when he saw a pile of motherboards being thrown out at his university.

[Eric] used a heat gun and a lot of patience to get all the components off the motherboard. With a bit of care, most of the components can be saved for future hardware hacks. This is one step that’s best performed outside. Hot melting plastics, metals, and resin fumes aren’t the greatest things to inhale.

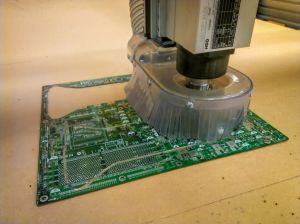
Computer motherboards being cut on a shopbotClean PCBs in hand, [Eric] headed to his local TechShop. He drew his dead cat style frame in SolidWorks and cut it out on a ShopBot. While a high-end CNC cutter is nice, it’s not absolutely necessary. The fiberglass sheets could be cut with a rotary tool or a jigsaw. No matter how you cut it, be sure to wear a mask rated for fiberglass resins and some protective clothing. Fiberglass plate is nasty stuff to cut.
Once the upper and lower frame plates were cut, [Eric] completed his quad frame with some square wooden stock for arms. The final quad is a great flier, and spare parts are easy to source. Nice work on the recycling, [Eric]!

Continue reading “Quadcopter Built From Recycled Motherboards”

Dead Motherboard Wall Hides An LED Marquee

dead-motherboard-led-marquee

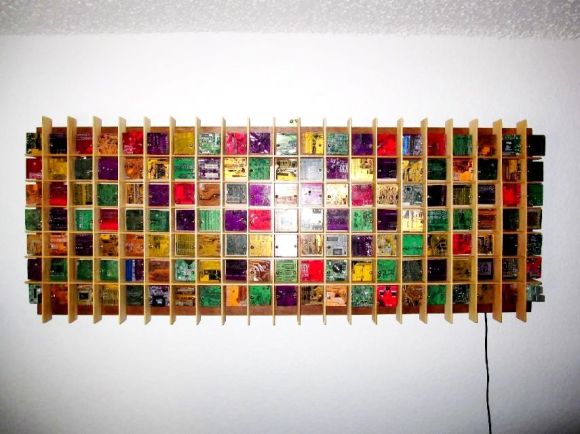
[Jared] is a computer technician so he has no problem getting his hands on broken motherboards. It looks like he tends to save the more interesting colors and has finally found a use for the waste. He built this wall art which also acts as an LED marquee.

He came up with the size and shape — 18″ by 48″ — because it meshes well with a sheet of MDF. The outline allows for a grid made up of 2″ square pixels arranged seven high and twenty-one wide. The top and bottom rows will serve as a frame for the lights, which still leaves the five pixels necessary to display characters. From there he started wiring up the LED array, which is shown in the testing phase in the clip after the break. Each pixel is cordoned off by a frame of basswood which [Jared] fabricated on the table saw. The project is finished up by cutting the motherboards down to size and mounting them with threaded rod and nuts. The board chunks are not transparent but they’re smaller than the grid so the LEDs will make the edges glow.

This reminds us of the motherboards used to mimic stained glass from several years back.

Continue reading “Dead Motherboard Wall Hides An LED Marquee”

Multi-system Nintendo Emulator Uses Stock Controllers

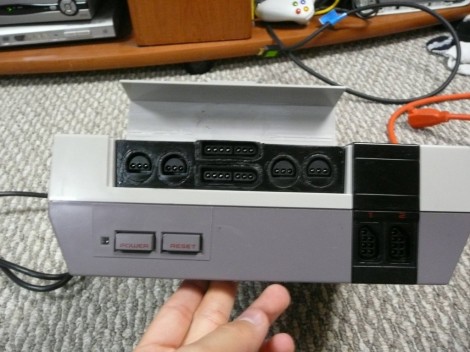
The first month of [WoolyDawg5’s] summer break went into building one Nintendo emulator to rule them all. He thinks there’s nothing like playing the games on the original controllers, and we agree with him 100%. Here you can see that the cartridge door on this NES enclosure hides the extra connectors he needs.

With that door closed this looks like a stock console, but only from the front. If you take a look at the back of it you’ll see how he pulled this off. There’s a Zotac motherboard whose I/O panel has been fitted into the back. It’s responsible for emulating games for the NES, SNES, and GameCube consoles — we’re sure it can do more but that covers the controller ports seen here. Each port is wired to a USB controller module. The cables for these modules exit the back of the case and plug into the motherboard’s I/O panel. There is WiFi for the board, and that’s what [WoolyDawg] uses for configuration, tunneling into the OS instead of connecting a keyboard or mouse.

Of course you could just shoehorn all-original console hardware into one package to accomplish something like this.

[Thanks KoldFuzion]

Grab Your Iron And Add GameCube Back To The Wii

One of the really cool things about the Nintendo Wii when it was first introduced was the ability to play GameCube games on it. This made it a no-brainer for a lot of folks to upgrade. But as the heyday of legacy systems fades into history, Nintendo decided this was no longer a selling point and stopped populating those components. The good new is, if you don’t mind a lot of PCB soldering you can add your GameCube bits to a modern Wii motherboard.

[Deadlyfoez] launched a raffle to raise enough money to buy a new version of the hardware (we guess the raffle prize is the modded console). He then proceeded to solder on four GameCube controller ports and a memory card reader. There are also a number of passive surface mount components that need to be added. But as the video after the break shows, once in place the functionality reappears on the software side.

Continue reading “Grab Your Iron And Add GameCube Back To The Wii”

Hackaday Links: Monday June 13

Tim wrote in to tell us about this simple hack where he replaced the stock button lights with some really cool Blue LEDS on an ’87 BMW. He uses some capacitors, to achieve the effect that it takes a bit for the charge to drain out so the lights stay on for a bit after being turned off.  The lights themselves look really nice, so check out the pic.

Here’s an awesome coffee Table built using a large electrical board. It definitely would look good in anyone’s den, although it most likely has a low wife approval factor (WAF). This is actually based on a “motherboard wall that HAD covered before, but the “coffee table” form probably looks even better.

Finally, after the break is a video of someone washing an interactive art exhibit. Not sure if it qualifies as a hack, but it looks pretty cool to see lights following someone around when he’s washing the screen/window.

Continue reading “Hackaday Links: Monday June 13”

SLI Anytime Anywhere

slin_b

SLI, for those who don’t know, is the process of taking two Nvidia graphics cards and allowing them to work in parallel to render to a single monitor. In theory this doubles the power, getting more FPS for video games. Great right? Except due to encryption, only a limited amount of motherboards can actually support SLI.

That is, until now. Russian hackers at xDevs discovered that the newer encryption is based around string identifiers. This can be modified within the operating system itself, so in theory any motherboard could work. Be wary, this could brick your system; but if successful, you’ll have more power without shelling out for an officially SLI supported motherboard.