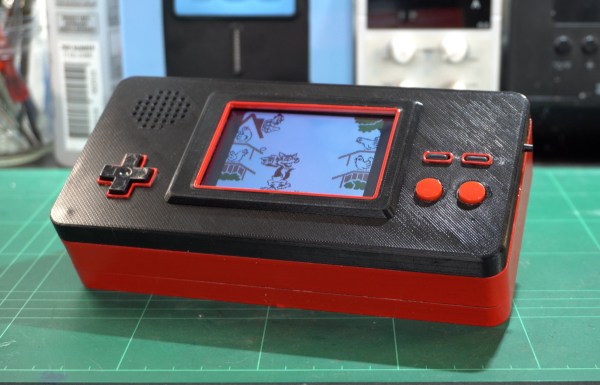
A Nintendo 64 console with modern hardware internals

N64 Mini PC Conversion Includes All The Trimmings

We’ve seen quite a few retro gaming consoles physically modded to house modern emulation hardware, but the NUC-64 by [RetroModder] stands out as one of the most impressive Nintendo 64 guttings that we’ve seen to date.

Observed from the front, the NUC-64 almost resembles a stock Nintendo console. The project’s name is printed across the vestigial cartridge slot, and two suspiciously modern wireless networking antennas can be seen poking out from the back. The console’s modifications are fully revealed when looking at it from the rear – gone is the power brick socket, which now houses the I/O for the replacement motherboard. A custom 3D printed I/O shield keeps everything looking neat and tidy.

Internally, the new hardware is no slouch. The Intel NUC is a small-form-factor PC, and this miniature battlestation sports an 1.6GHz Intel N3700 Pentium processor, 4GB of DDR3 RAM, WiFi/Bluetooth connectivity and an M.2 SSD. This hardware runs circles around the original Nintendo 64, and is more than capable of emulating games from that system.

Most total conversions would call it a day here, however [RetroModder] has taken it a step further by producing a custom PCB that neatly ties together the console’s front I/O. Most importantly, two Mayflash N64-to-USB converters means that your favorite 1990s games can be enjoyed with the original controllers. The original power LED and reset switch are present, as is the sliding power switch which retains its original purpose, thanks to a simple 555 circuit that sends the expected power-on and power-off signals to the motherboard with each slide of the power switch. Additionally, a system of 3D printed mounts and brackets keeps everything secure inside the case.

All the build details can be found here. The NUC-64 follows on from last month’s GamecubePC. The build quality and attention to detail makes this conversion rather special, and it’s clear that a lot of care and planning was taken to pull this off. Hopefully the original N64 hardware can be repurposed as well, perhaps as a new portable console?

Continue reading “N64 Mini PC Conversion Includes All The Trimmings”

Cramming A DS Inside A Gameboy

Many holiday recipes and console hacks share a common theme: cramming a thing inside another thing. Whether it’s turducken or a Nintendo DS inside a Gameboy, the result is always unexpected. The chassis for this mod is a humble Gameboy color with a Gameboy SP screen tackled on the top to serve as the secondary display. Unfortunately, this mod lost touch screen functionality, limiting some of the games you can play.

[TheRetroFuture] received the custom handheld from [GameboyCustom], which was somewhat damaged in shipping. The original screw mounts had to be removed and the case glued back together to fit the DS motherboard. So for [TheRetroFuture] to get inside to start troubleshooting involved a razor blade and patience. Testing various points and swapping components got [TheRetroFuture] closer to the root problems. The fix ended up being a few wires that came loose during shipping. Finally, after reseating a display connection and some careful soldering, it booted and started playing games.

Overall, it’s pretty impressive to see Mario Kart DS running on both screens on the tiny handheld. But you might be asking, why? Why shove one handheld inside another handheld? Sometimes it’s to gain new functionality like this Raspberry Pi inside a PSP body. Sometimes, it’s just because we can. Video after the break.

Continue reading “Cramming A DS Inside A Gameboy”

Bringing A Ruined Game Boy Cart Back To Life With Tons Of Soldering

Retro consoles and handhelds are full of nostalgia and happy memories for many. However, keeping these machines and their media going can be a difficult job at times. [Taylor] was challenged to rescue a copy of Kirby’s Dream Land for the original Game Boy, and set about the task.

The cartridge was badly corroded, with many of the traces eaten through, rendering the game inoperable. First, all the components were removed, and the board was cleaned. This allowed easy access to the traces across the whole board. Then, the job was to delicately remove some solder mask from the parts of the traces still remaining, and bridge the gaps with fine copper wire. Even worse, several vias were damaged, which [Taylor] tackled by feeding jumper wires through the board and executing a repair on each side.

It’s a simple enough repair for the experienced hand, but virtually magic to a retro gaming fan that doesn’t know how to solder. [Taylor] has given us a great example of how to deal with corroded carts properly, with enough detail to be quite educational to the beginner.

We’ve seen other great work in this vein too, like an Amiga 2000 brought back from a horrible creeping green death. If you’ve done your own retro rescue, be sure to drop us a line!

Continue reading “Bringing A Ruined Game Boy Cart Back To Life With Tons Of Soldering”

EM-Glitching For Nintendo DSi Boot ROMs

Some hacker events are muddy and dusty affairs in distant fields, others take place in darkened halls, but I went to one that can be experienced as a luxury break in a European city steeped in culture and history. Newline takes place at Hackerspace Gent, in the Belgian city of that name, and I was there last weekend to catch the atmosphere as well as the programme of talks and workshops. And of those a good start was made by [PoroCYon], whose fascinating introduction to the glitching techniques involved in recovering the boot ROMs from a Nintendo DSi taught us plenty of things we hadn’t seen before.

The talk which you’ll find below the break starts by describing the process of glitching — using power supply interference to interrupt the operation of a microprocessor and avoid certain instructions — to bypass security code. It then moves on to some of the protection mechanisms used in the various generations of Nintendo consoles and handhelds, before moving on to the work on the DSi at which point the talk moved onto a field which may be old hat in glitching circles but was new to me; that of EM glitching.

EM glitching involves using a small coil to generate precisely timed electromagnetic pulses which induce the glitch voltages in the chip. The fascinating part is that the EM probe can be made small enough to target individual areas of the chip, so using it involves a brute-force technique trying all combinations of timing and position with the probe held in a computer-controlled X-Y mount.

The DSi has two processors on board, this achieves success with the ARM7 but leaves its companion ARM9 as yet untapped. There are a promising set of attack vectors left to try, of which the ARM7 placing the ARM9 into a state from which it can be glitched seems to be the most promising. It’s fairly obvious that there’s plenty more to come from this quarter.

More details of the talk can be found in this repository, and for those interested in EM glitching you can find out more in this video and in this project using it to attack a Gecko microcontroller.

Continue reading “EM-Glitching For Nintendo DSi Boot ROMs”

GateBoy Is A Game Boy Emulated At Gate Level

Old game systems are typically the most popular targets for emulation. With huge communities of fans wanting to recreate the good times of yesteryear, most old systems have all been brought back to life in this manner. However, some simply dive into emulation for the technical challenge, and [Austin Appleby] has done just that with GateBoy.

GateBoy is a project to emulate the Game Boy logic gate by logic gate. It’s a lower level approach that builds upon earlier work [Austin] did on a project called MetroBoy, which we featured previously.

The emulator was created by painstakingly reverse-engineering the logic of the Game Boy. This was done by poring over die shots of the actual DMG-01 CPU silicon. GateBoy emulates most of the chip, though avoids the audio hardware at this stage.

Presently, GateBoy runs at roughly 6-8 frames per second on a modern 4GHz CPU. As it turns out, emulating all those gates and the various clock phases at play in the DMG-01 takes plenty of processing power. However, compilation optimizations do a lot of heavy lifting, so in some regards, GateBoy runs impressively quickly for what it is.

[Austin] still has plenty of work to do before GateBoy is completely operational, and there are some strange quirks of the Game Boy hardware that still need to be figured out. Regardless, it’s a fantastic academic exercise and a noble effort indeed. Meanwhile, you might like to check out the Game Boy emulator that runs just one single game.

Google Maps, Now On The NES

Many years ago, Google created one of its famous April Fools jokes suggesting it would make an 8-bit version of Google Maps for the original Nintendo Entertainment System. [ciciplusplus] decided it needed to become a reality, however, and set to work. (Video, embedded below.)

It’s a suitably blocky, low-resolution implementation, but it nevertheless is a mapping app running on an NES. Zooming in and out is via the A and B buttons, while the D-pad is used to scroll. Country and city labels are rendered on the map in the relevant areas in a charming old-school font.

The project uses a Raspberry Pi 3A+ and a Cypress Semiconductor FX2LP microcontroller, which fits inside a NES cartridge. It works the same way as the earlier NES Doom project which uses the Raspberry Pi to feed data to the NES’s Picture Processing Unit. It’s achieved with a simple bit of code burned on a ROM inside the cartridge, which boots up the NES and primes it to receive data from the Raspberry Pi via the FX2LP.

In current form, it’s not capable of doing much more than allowing the user to scroll around and zoom in on parts of the map. We’d love to see a fully-fledged version that could deliver driving directions or similar, however. If you end up achieving such a feat, be sure to let us know. Continue reading “Google Maps, Now On The NES”

Thrashed, Damaged NES Controller Gets Brought Back To Life

Electronics might as well be a magical black box to some people. Where some would see a broken NES controller destined for the bin, [Taylor] saw the opportunity for a repair. Thus, the damaged hardware was brought back into useful service.

The controller was bought as part of a job lot, and was heavily damaged when it entered [Taylor]’s ownership. Nintendo built its hardware tough in those days, but the controller had nevertheless been smashed apart, with the case cracked and split and the PCB itself snapped in two.

For someone with basic electronics skills, though, repair was simple. The broken PCB was glued back together with epoxy. The broken traces had solder mask scraped back so that jumper wires could bridge the damaged area and return the circuit to functionality.

From there, it was a simple matter of 3D printing a new case, and the controller was back in service. The case in question was designed by [Alexander Myrman], and has a neat little inset Mario design that’s made visible by paint-filling the inlay.

While it was an easy fix, to the uninitiated in the electronic arts, it might as well be magic. It pays to remember that there are always new people joining the electronics hobby, and projects like these are a great way to learn. It’s also important to note that bringing back old retro hardware is often of great value, as in many cases, they’re not making any more! We see some great restorations around these parts, too. Video after the break.

Continue reading “Thrashed, Damaged NES Controller Gets Brought Back To Life”