Finishing Your Projects Hack Chat With Zack Freedman

Join us on Wednesday, February 10 at noon Pacific for the Finishing Your Projects Hack Chat with Zack Freedman!

Try as we might, some of us are much better at starting projects than finishing them. Our benches — or all too often, our notebooks — are graveyards of good attempts, littered with the scraps of ideas that really sounded good at the time and clouded by a miasma of good intentions and protestations that “This time, it’ll be different.” Spoiler alert: no, it won’t.

Trying to pin the cause of this painfully common problem on something specific is probably a fool’s errand, especially when given the fact that some people mysteriously don’t suffer from it, it would appear brain chemistry plays a role. Maybe some people just really like the dopamine hit of starting something new, which gives them the rush of excitement while the idea is still fresh, only to have it wane rapidly as the project enters the churn.

Whatever it is, if you suffer from it, chances are good you’ve looked for a way out at least once. If so, you’ll want to hop into this Hack Chat, where “very serious hacker” Zack Freedman, proprietor of the Voidstar Labs channel on YouTube, will share his thoughts on project follow-through. We’ve enjoyed Zack’s projects for a while now, and covered a few, from his in-your-face (on-your-wrist?) smartwatch to his video editing keypad. He gets stuff done, perhaps in part due to his workshop organization, but however he does it, we’re eager to hear about it. Join us as we discuss the art of follow-through and getting stuff done.

join-hack-chatOur Hack Chats are live community events in the Hackaday.io Hack Chat group messaging. This week we’ll be sitting down on Wednesday, February 10 at 12:00 PM Pacific time. If time zones have you tied up, we have a handy time zone converter.

Click that speech bubble to the right, and you’ll be taken directly to the Hack Chat group on Hackaday.io. You don’t have to wait until Wednesday; join whenever you want and you can see what the community is talking about.

Continue reading “Finishing Your Projects Hack Chat With Zack Freedman”

Sorting Thousands Of Drill Bits

[Austin Adee] came into some drill bits. A lot of them actually. But when thousands of assorted sizes are delivered in one disorganized box, are they actually useful? Not unless you’re drilling holes where diameter doesn’t matter.

So two projects were at hand: finding a place to store a few hundred different sizes of bits, and tackling the actual sorting itself. In the end, he used input from a digital caliper alongside a Python script that showed him where to put them.

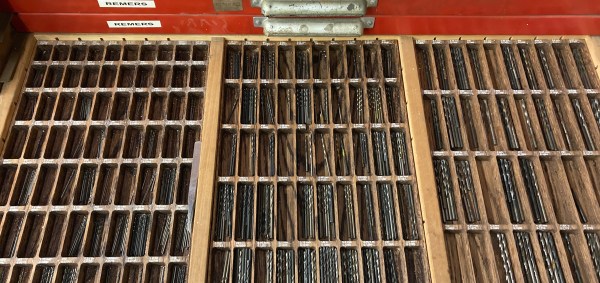
The start of the tray design process was a bit of a research project, establishing the common sizes and how many would fit into a given space. This data was used to spin up the layout for trays with 244 different pockets to hold the bits. The pockets were CNC milled, but getting labels for each to work with the laser engraver was a bit of a hack. In the end, filling in the letters with white crayon really makes them pop, despite [Austin’s] dissatisfaction with the level of contrast.

But wait, we promised you an epic sorting hack! Unfortunately there’s no hopper, vibration feed, and sorting gantry that did this for him (now if it were perler beads he’d have been all set). Still, the solution was still quite a clever one.

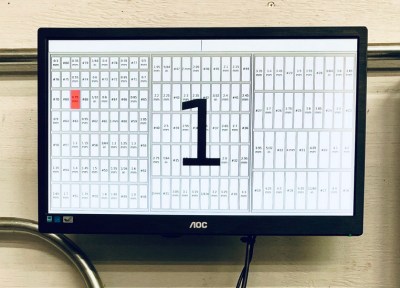
A set of digital calipers with a Bluetooth connection sends the dimension back to a python script every time you press the capture button. That script find the pocket for the nearest size and then highlights it on a map of the drill bit drawer displayed on the computer monitor. In the end the trays fit into a wide tool chest drawer, and are likely to keep things organized through exactly one project before everything is once again in disarray.

[Austin] mentions a lag of up to one second for the Bluetooth calipers to do their thing. For assembly-line style work, that adds up. We remember seeing a really snappy reaction time on these digital calipers hacked for wireless entry.

Harnessing Your Creativity Hack Chat

Join us on Wednesday, November 18th at noon Pacific for the Harnessing Your Creativity Hack Chat with Leo Fernekes!

(Note: this Hack Chat was rescheduled from 10/14/2020.)

You’re sitting at your bench, surrounded by the tools of the trade — meters and scopes, power supplies and hand tools, and a well-stocked parts bin. Your breadboard is ready, your fingers are itching to build, and you’ve got everything you need to get started, but — nothing happens. Something is missing, and if you’re like many of us, it’s the one thing you can’t get from eBay or Amazon: the creative spark that makes innovation happen.

Creativity is one of those things that’s difficult to describe, and is often noticed most when it’s absent. Hardware hacking requires great buckets of creativity, and it’s not always possible to count on it being there exactly when it’s called for. It would be great if you could somehow reduce creativity to practice and making it something as easy to source for every project as any other commodity.

While Leo Fernekes hasn’t exactly commoditized creativity, judging from the breadth of projects on his YouTube channel, he’s got a pretty good system for turning ideas into creations. We’ve featured a few of his builds on our pages, like a discrete transistor digital clock, the last continuity tester you’ll ever need, and his somewhat unconventional breadboarding techniques. Leo’s not afraid to fail and share the lessons learned, either.

His projects, though, aren’t the whole story here: it’s his process that we’re going to discuss. Leo joins us for this Hack Chat to poke at the creative process and see what can be done to remain rigorous and systematic in your approach but still make the process creative and flexible. Join us with your questions about finding the inspiration you need to turn parts and skills into finished projects that really innovate.

join-hack-chatOur Hack Chats are live community events in the Hackaday.io Hack Chat group messaging. This week we’ll be sitting down on Wednesday, November 18 at 12:00 PM Pacific time. If time zones baffle you as much as us, we have a handy time zone converter.

Click that speech bubble to the right, and you’ll be taken directly to the Hack Chat group on Hackaday.io. You don’t have to wait until Wednesday; join whenever you want and you can see what the community is talking about.

Continue reading “Harnessing Your Creativity Hack Chat”

Saving Floor Space With A Scratch Built Bike Hoist

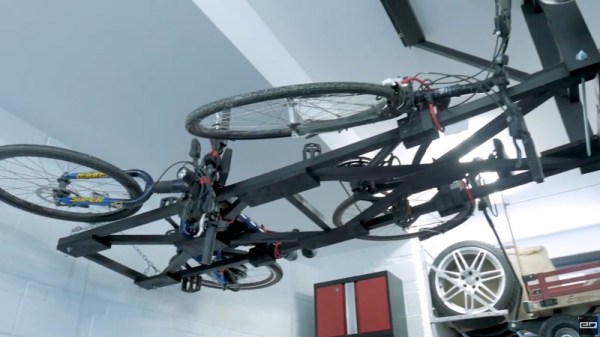
Vertical storage is often underused in the garage or workshop as it can be tricky to get bulky objects off the floor safely. So we stick a few shelves on the wall, put boxes of screws and components on them, and call it a day. Meanwhile, you end up playing a game of horizontal Tetris with all the big stuff on the ground.

Looking to free up some floor space in his garage, [Chris Chimienti] recently decided to design and build his own hoist to lift his bicycles off the floor. While his design is obviously purpose built for bikes, the core concept could potentially be adapted to lift whatever it is you’ve been kicking across the garage floor as of late; assuming it doesn’t have any strong feelings on suddenly being tipped over on its side, anyway.

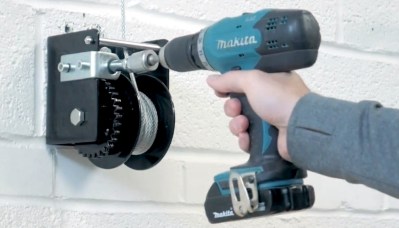
A simple modification allows for operation with a drill.

Before he started the actual build, [Chris] knocked together a rough facsimile of his garage in SolidWorks and started experimenting with the layout and mechanism that the hoist would ultimately use. While we’ve all felt the desire to run into a project full-speed, this more methodical approach can definitely save you time and money when working on a complex project. Redesigning a component in CAD to try it a different way will always be faster and easier than having to do it for real.

We’ve become accustomed to seeing projects include sensors, microcontrollers, and 3D printed components as a matter of course, but [Chris] kept this build relatively low-tech. Not that we blame him when heavy overhead loads are involved. Even still, he did have to make a few tweaks in the name of safety: his original ratcheting winch could freewheel under load, so he swapped it out for a worm gear version that he operates with an electric drill.

If you like the idea of having an overhead storage area but don’t necessarily want to look at it, you could always cover it up with a rock climbing wall.

Continue reading “Saving Floor Space With A Scratch Built Bike Hoist”

Add Creativity To Your BOM: Hack Chat

Join us on Wednesday, October 14th at noon Pacific for the Harnessing Your Creativity Hack Chat with Leo Fernekes!

You’re sitting at your bench, surrounded by the tools of the trade — meters and scopes, power supplies and hand tools, and a well-stocked parts bin. Your breadboard is ready, your fingers are itching to build, and you’ve got everything you need to get started, but — nothing happens. Something is missing, and if you’re like many of us, it’s the one thing you can’t get from eBay or Amazon: the creative spark that makes innovation happen.

Creativity is one of those things that’s difficult to describe, and is often noticed most when it’s absent. Hardware hacking requires great buckets of creativity, and it’s not always possible to count on it being there exactly when it’s called for. It would be great if you could somehow reduce creativity to practice and making it something as easy to source for every project as any other commodity.

While Leo Fernekes hasn’t exactly commoditized creativity, judging from the breadth of projects on his YouTube channel, he’s got a pretty good system for turning ideas into creations. We’ve featured a few of his builds on our pages, like a discrete transistor digital clock, the last continuity tester you’ll ever need, and his somewhat unconventional breadboarding techniques. Leo’s not afraid to fail and share the lessons learned, either.

His projects, though, aren’t the whole story here: it’s his process that we’re going to discuss. Leo joins us for this Hack Chat to poke at the creative process and see what can be done to remain rigorous and systematic in your approach but still make the process creative and flexible. Join us with your questions about finding the inspiration you need to turn parts and skills into finished projects that really innovate.

join-hack-chatOur Hack Chats are live community events in the Hackaday.io Hack Chat group messaging. This week we’ll be sitting down on Wednesday, October 14 at 12:00 PM Pacific time. If time zones baffle you as much as us, we have a handy time zone converter.

Click that speech bubble to the right, and you’ll be taken directly to the Hack Chat group on Hackaday.io. You don’t have to wait until Wednesday; join whenever you want and you can see what the community is talking about.

Continue reading “Add Creativity To Your BOM: Hack Chat”

The Amazing Technicolor Parts Organizer

It wouldn’t be much of an exaggeration to say that anyone reading these words has struggled at one time or another to keep an ever growing collection of electronic bits and bobs from descending into absolute chaos. Tossing them all into plastic bins is at least a start down the road to long-term organization, but they still needed to be sorted and inventoried if you want to avoid the wasted time and money of buying parts you forgot you already had.

For his latest project, [Zack Freedman] decided to finally tackle the personal parts collection that he’s ended up lugging around for the last several years. The first half of the battle was just figuring out what he actually had, what he was likely to need down the line, and getting it all sorted out so he didn’t have to keep rummaging through a big pile to find what he needed. But it’s not enough to get organized, you also need to stay organized.

Which is why he then turned his attention to how all these newly sorted components would actually be stored going forward. He already had a trio of Harbor Freight bin organizers, but as one expects from that fine retailer, they were only marginally suitable for the task at hand. So [Zack] designed a 3D printed faceplate that could snap onto the original plastic bin. The new fronts made them easier to grab and featured an opening to accept a laser-etched plastic label.

To give them a little visual flair, he decided to print the faceplates using rainbow gradient filament. To prevent them from being random colors, he used the relatively obscure sequential slicing option so his Prusa i3 would print each faceplate in its entirety before moving over to the next one on the bed. This took far longer than doing them in parallel (especially since he had access to multiple printers), but makes for a much nicer aesthetic as the color smoothly transitions between each bin on the wall. It also has a practical benefit, as you can tell at a glance if any of the bins have found themselves in the wrong spot.

If you really want to go off the deep end, we’ve seen hackers light individual bins with RGB LEDs tied into a searchable inventory system. But for most hobbyists, simply learning when to purge would be more practical.

Continue reading “The Amazing Technicolor Parts Organizer”

A French Cleat Twist On Electronics Bench Organization

For some of us, our workbench is where organization goes to die. Getting ready to tackle a new project means sweeping away a pile of old projects, exposing exactly as much bench space needed to plop down the new parts. On the other end of the spectrum lie those for whom organization isn’t a means to an end, but an end itself. Their benches are spotless, ready to take on a new project at a moment’s notice.

[Eric Gunnerson]’s new French-cleat electronics bench is somewhere in between those two extremes, although nowhere near as over-organized as the woodworking organizer that inspired it. If you’ve never heard of a French cleat, Google around a bit and you’ll see some amazing shops where the system of wall-mounted, mitered cleats with mating parts on everything from shelves to cabinets are put to great use. A properly built French cleat can support tremendous loads; [Eric]’s system is scaled down a bit in deference to the lighter loads typically found in the electronics shop. His cleats are 2″ x 3″ pieces of pine, attached to a sheet of plywood that was then screwed to the wall. His first pass at fixtures for the cleats used a Shaper Origin CNC router, but when that proved to be slow he turned to laser-cut plywood. The summary video below shows a few of the fixtures he’s come up with so far; we particularly like the oscilloscope caddy, and the cable hangers are a neat trick too.

What we like about this is the flexibility it offers, since you can change things around as workflows develop or new instruments get added. Chalk one up for [Eric] for organization without overcomplication.

Continue reading “A French Cleat Twist On Electronics Bench Organization”