Retro Computer Trainer Gets A Raspberry Pi Refit

We know what you’re thinking: this is yet another one of those “Gut the retro gear for its cool old case and then fill it up with IoT junk” projects. Well, rest assured that extending and enhancing this 1970s computer trainer is very much an exercise in respecting the original design, and while there’s a Pi inside,  it doesn’t come close to spoiling the retro goodness.

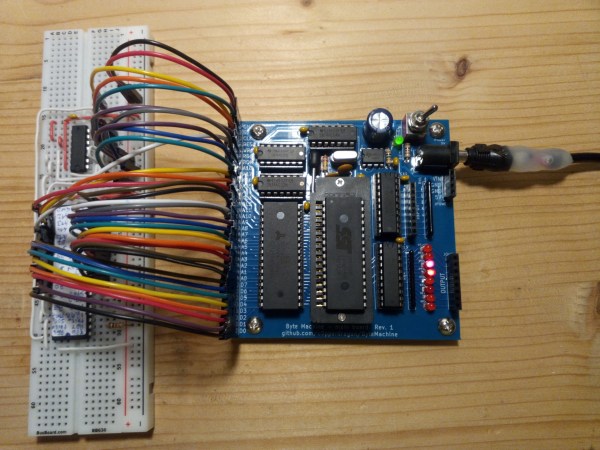
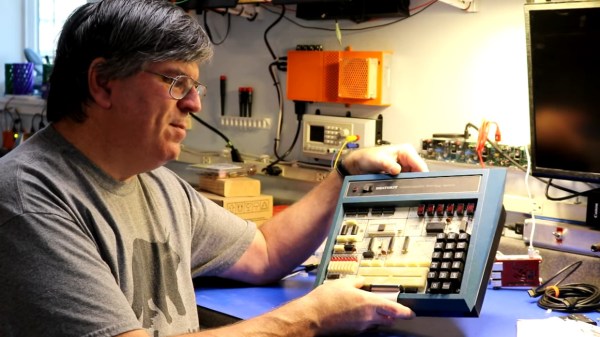
Like many of a similar vintage as [Scott M. Baker], the Heathkit catalog was perhaps only leafed through marginally less than the annual Radio Shack catalog. One particularly desirable Heathkit item was the ET-3400 microcomputer learning system, which was basically a 6800-based computer surrounded by a breadboarding area for experimentation. [Scott] got a hold of one of these, but without the optional expansion accessory that would allow it to do interesting things such as running BASIC or even supporting a serial port. So [Scott] decided to roll his own expansion board.

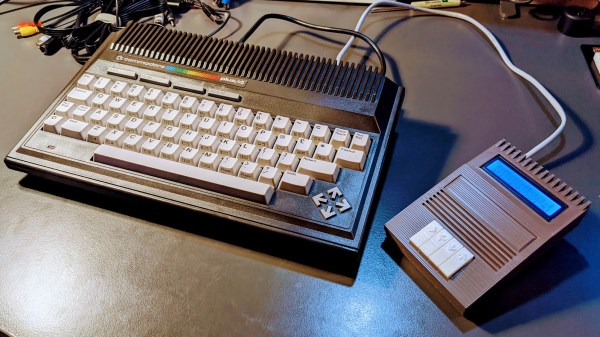
The expansion card that [Scott] designed is not strictly a faithful reproduction, at least in terms of the original BOM. He turned to more modern — and more readily available — components, but still managed to provide the serial port, cassette interface, and RAM/ROM expansion of the original unit. The Raspberry Pi is an optional add-on, which just allows him to connect wirelessly if he wants. The card fits into a 3D-printed case that sits below the ET-3400 and maintains the original trainer’s look and feel. The longish video below shows the build and gives a tour of the ET-3400, both before and after the mods.

It looks as though trainers like these and other artifacts from the early days of the PC revolution are getting quite collectible. Makes us wish we hadn’t thrown some things out.

Continue reading “Retro Computer Trainer Gets A Raspberry Pi Refit”

An Up-To-Date Datasette For Commodore TED Series

Retro computer enthusiast [Steven Combs] documents his adventure building the TEDuino, a modern replacement for the Commodore Datasette which uses an SD card instead of audio tape. He based the design on [Peter Edwards]’s Tapuino project, which was featured by Hackaday back in 2014. [Steven] took the aesthetic design to a new level, and also modified it to work with his Plus/4 and other TED series Commodores.  We are amazed that he was able to design this enclosure in SketchUp, and impressed with the results from his Creality Ender 3. He went to great lengths to match the color and style of the Plus/4, and pulled it off quite well. [Steven] also applied some interesting design features in this enclosure. The PCB modules are snap-fit, the buttons are made as a single piece – not unlike a living hinge. The 3D-printed strain relief for the cable is a nice finishing touch, and we cannot disagree with [Steven]’s sage advice – “Gorilla anything is just cool”.

This is only part 1 of the project. Stay tuned for future improvements, tweaks and embellishments.

Continue reading “An Up-To-Date Datasette For Commodore TED Series”

World’s Smallest Version Of World’s Fastest Bumper Car

A few years ago, YouTubing madman [Colin Furze] took an old bumper car and made a 600-horsepower beast of a go-kart that managed to clock 100MPH with a headwind. This isn’t that. It’s a miniaturized, remote-control homage to [Colin]’s go-kart that is equally awesome.

[Forsyth Creations] started by CAD-modeling the chassis right on top of a still from the video. The entire body is 3D-printed in four large pieces, which took several days because each piece took around 24 hours. Inside the car there’s an Arduino brain driving a motor in the back and a servo in the front. This bad boy runs on a couple of rechargeable battery packs and can be controlled with either a Wii balance board or a PS2 controller. This thing really moves, although it doesn’t quite reach 100MPH. Watch it zoom around in the video after the break.

Got a Segway lying around that just doesn’t do it for you anymore? You could always turn it into a go-kart. Never had a Segway to begin with? Just roll your own.

Continue reading “World’s Smallest Version Of World’s Fastest Bumper Car”

Fail Of The Week: Putting Guitar Strings On A Piano

The piano is a bit of an oddball within the string instrument family. Apart from rarely seeing people carry one around on the bus or use its case to discretely conceal a Tommy Gun, the way the strings are engaged in the first place — by having little hammers attached to each key knock the sound of of them — is rather unique compared to the usual finger or bow movement. Still, it is a string instrument, so it’s only natural to wonder what a piano would sound like if it was equipped with guitar strings instead of piano wire. Well, [Mattias Krantz] went on to actually find out the hard way, and shows the results in this video.

After a brief encounter with a bolt cutter, the point of no return was reached soon on. Now, the average piano has 88 keys, and depending on the note, a single key might have up to three strings involved at once. In case of [Mattias]’ piano — which, in his defense, has certainly seen better days — a total of 210 strings had to be replaced for the experiment. Guitars on the other hand have only six, so not only did he need 35 packs of guitar strings, the gauge and length variety is quite limited on top. What may sound like a futile endeavor from the beginning didn’t get much better over time, and at some point, the strings weren’t long enough anymore and he had to tie them together. Along with some inevitable breakage, he unfortunately ran out of strings and couldn’t finish the entire piano, though it seems he still managed to roughly cover a guitar’s frequency range, so that’s an appropriate result.

We’re not sure if [Mattias] ever expected this to actually work, but it kinda does — there is at least some real sound. Are the results more than questionable though? Oh absolutely, but we have to admire the audacity and perseverance he showed to actually pull through with this. It took him 28 hours just to get the guitar strings on, and another good amount of time to actually get them all in tune. Did it pay off? Well, that depends how you look at it. It definitely satisfied his and other’s curiosity, and the piano produces some really unique and interesting sounds now — but check for yourself in the video after the break. But that might not be for everyone, so luckily there are less final ways to change a piano’s sound. And worst case, you can always just turn it into a workbench.

(Thanks for the tip, [Keith])

Continue reading “Fail Of The Week: Putting Guitar Strings On A Piano”

A Breadboard Block For 8-Bit CPUs

Breadboard CPUs are a fantastic learning experience and require serious dedication and patience. Occasionally, CPU builders eschew their breadboards and fab their design onto a PCB. But this takes away the flexibility and some of the opportunity for learning that breadboard CPUs offer. [c0pperdragon] was doing the same sort of repetitive wiring from project to project as most 8-bit breadboard CPUs use memory, a bus, an IO controller, ROM, and a few other passive components.

Taking a compromise approach, [c0pperdragon] built a PCB that can be used as a building block in his custom CPUs which they have titled “ByteMachine”. A single row of 34 pins offer power, clock, reset, 19 address bus lines, 8 data bus lines, and a ROM selector. This means that the CPUs can fit on a single breadboard and can run faster as the impedance of the breadboard has less effect on the circuit. With 512 KB of RAM and 512 KB of ROM, in a ZIF socket for easy reprogramming, ByteMachine has plenty of space.

One drawback is the lack of IO. There is no dedicated address space as this would require decoding logic between the RAM and the CPU. [C0pperdragon] added a simple 8-bit output register provided by a 74-series logic IC. The data is displayed on 8 red LEDs and can be accessed via pins. Input is accomplished in a similar way with just 8 bits of digital input provided.

[C0pperdragon] has built the 65C02, 65C816Z84C00, and the i8088 with the ByteMachine. Each was documented with incredible schematics, pictures, and test programs on GitHub. Next time you’re looking to build a CPU on a breadboard, maybe start with a ByteMachine. In some ways, it might improve your learning experience as it makes the incredible mass of wires we’ve seen on other projects a tad more manageable.

Thanks [Reinhard Grafl] for sending this one in!

Inputs Of Interest: The OrbiTouch Keyless Keyboard And Mouse

I can’t remember how exactly I came across the OrbiTouch keyboard, but it’s been on my list to clack about for a long time. Launched in 2003, the OrbiTouch is a keyboard and mouse in one. It’s designed for people who can’t keyboard regularly, or simply want a different kind of experience.

The OrbiTouch was conceived of by a PhD student who started to experience carpal tunnel while writing papers. He spent fifteen years developing the OrbiTouch and found that it could assist many people who have various upper body deficiencies. So, how does it work?

It’s Like Playing Air Hockey with Both Hands

To use this keyboard, you put both hands on the sliders and move them around. They are identical eight-way joysticks or D-pads, essentially. The grips sort of resemble a mouse and have what looks like a special resting place for your pinky.

One slider points to groups of letters, numbers, and special characters, and the other chooses a color from a special OrbiTouch rainbow. Pink includes things like parentheses and their cousins along with tilde, colon and semi-colon. Black is for the modifiers like Tab, Alt, Ctrl, Shift, and Backspace. These special characters and modifiers aren’t shown on the hieroglyphs slider, you just have to keep the guide handy until you memorize the placement of everything around the circle.

You’re gonna need a decent amount of desk space for this. Image via OrbiTouch

The alphabet is divided up into groups of five letters which are color-coded in rainbow order that starts with orange, because red is reserved for the F keys. So for instance, A is orange, B is yellow, C is green, D is blue, E is purple, then it starts back over with F at orange. If you wanted to type cab, for instance, you would start by moving the hieroglyph slider to the first alphabet group and the color slider to green.

Continue reading “Inputs Of Interest: The OrbiTouch Keyless Keyboard And Mouse”

Add Creativity To Your BOM: Hack Chat

Join us on Wednesday, October 14th at noon Pacific for the Harnessing Your Creativity Hack Chat with Leo Fernekes!

You’re sitting at your bench, surrounded by the tools of the trade — meters and scopes, power supplies and hand tools, and a well-stocked parts bin. Your breadboard is ready, your fingers are itching to build, and you’ve got everything you need to get started, but — nothing happens. Something is missing, and if you’re like many of us, it’s the one thing you can’t get from eBay or Amazon: the creative spark that makes innovation happen.

Creativity is one of those things that’s difficult to describe, and is often noticed most when it’s absent. Hardware hacking requires great buckets of creativity, and it’s not always possible to count on it being there exactly when it’s called for. It would be great if you could somehow reduce creativity to practice and making it something as easy to source for every project as any other commodity.

While Leo Fernekes hasn’t exactly commoditized creativity, judging from the breadth of projects on his YouTube channel, he’s got a pretty good system for turning ideas into creations. We’ve featured a few of his builds on our pages, like a discrete transistor digital clock, the last continuity tester you’ll ever need, and his somewhat unconventional breadboarding techniques. Leo’s not afraid to fail and share the lessons learned, either.

His projects, though, aren’t the whole story here: it’s his process that we’re going to discuss. Leo joins us for this Hack Chat to poke at the creative process and see what can be done to remain rigorous and systematic in your approach but still make the process creative and flexible. Join us with your questions about finding the inspiration you need to turn parts and skills into finished projects that really innovate.

join-hack-chatOur Hack Chats are live community events in the Hackaday.io Hack Chat group messaging. This week we’ll be sitting down on Wednesday, October 14 at 12:00 PM Pacific time. If time zones baffle you as much as us, we have a handy time zone converter.

Click that speech bubble to the right, and you’ll be taken directly to the Hack Chat group on Hackaday.io. You don’t have to wait until Wednesday; join whenever you want and you can see what the community is talking about.

Continue reading “Add Creativity To Your BOM: Hack Chat”