Professional Audio On An ESP32

Audiophiles have worked diligently to alert the rest of the world to products with superior sound quality, and to warn us away from expensive gimmicks that have middling features at best. Unfortunately, the downside of most high quality audio equipment is the sticker price. But with some soldering skills and a bit of hardware, you can build your own professional-level audio equipment around an ESP32 and impress almost any dedicated audiophile.

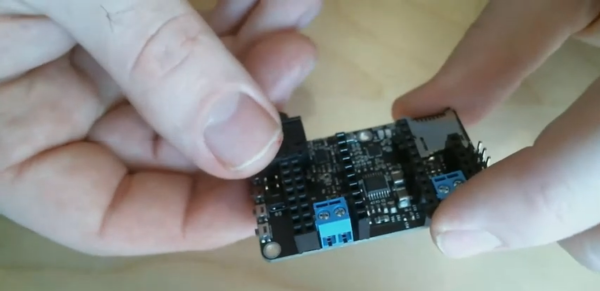
The list of features the tiny picoAUDIO board packs is impressive, starting with a 3.7 watt stereo amplifier and a second dedicated headphone amplifier. It also has all of the I/O you would expect something based on an ESP32 to have, such as I2S stereo DAC, an I2S microphone input, I2C GPIO extenders and, of course, a built-in MicroSD card reader. The audio quality is impressive too, and the project page has some MP3 files of audio recorded using this device that are worth listening to.

Whether you want the highest sound quality for your headphones while you listen to music, or you need a pocket-sized audio recording device, this might be the way to go. The project files are all available so you can build this from the ground up as well. Once you have that knocked out, you can move on to building your own speakers.

Continue reading “Professional Audio On An ESP32”

Two Pins For The Price Of One

One of the most common problems in the world of microcontrollers is running out of resources. Sometimes it’s memory, where the code must be pared down to fit into the flash on the microcontroller. Other times, as [Fabien] found out when he ran out of pins, the limitations are entirely physical. Not one to give up, he managed to solve the problem by using one pin for two tasks. (Google Translate from French)
During a recent project, [Fabien] realized he had forgotten to add a piezo buzzer to his project. All of the other pins were in use, though, so his goal was to use one of the input pins to handle button presses but to occasionally switch to output mode when the piezo buzzer was needed. After all, the button is only used at certain times, and the microcontroller pin sits unused otherwise. After a few trials, he has a working solution that manages to neither burn out itself nor the components in the circuit, and none of the components interfere with the other’s normal operation.
While it isn’t the most technically advanced thing we’ve ever seen here, it is a great example of using the tools at your disposal to elegantly solve a problem. More than that, though, it’s a thorough look into the details of pull-up and pull-down resistors, how microcontrollers see voltage as logic levels, and how other pieces of hardware interact with microcontrollers of all different types. This is definitely worth a read, especially if you are a beginner in this world.

Audio Out Over UART

There’s a reason that the bog-standard serial port will never die. It’s just so robust and simple. When you need a console that will absolutely work with minimal software and hardware, UART is the way to go. Because of this, UART hacks abound. Here’s a new one to us, and a challenge to our readers.

[Tiziano Bacocco] decided to use UART signals as a type of PWM to create audio. That’s right, he’s plugging the serial TX line straight into a speaker. This gives you eight possible PWM output voltage levels. The trick is using some Python code (using the awesome pyserial module) to down-quantize the audio data to fit these eight possible values and then push them out at the correct sampling rate. ffmpeg is used to pre-process the files.

Continue reading “Audio Out Over UART”

Experimental Music IPad Dock

You can buy nice audio breakout equipment for your iPod if you don’t mind breaking the bank. This is partly because the demand is not incredibly high so commercial breakout hardware doesn’t benefit from volume discounts. But it’s also because Apple charges licensing fees for third-party accessories (often referred to as the “Apple Tax”). [Reed Ghazala] decided to side-step the whole situation by building his own accessory which he calls the iPad Audio Desk.

It all starts with a breakout board. The PodBreakout Mini provides an easy to solder interface for the iPad, and ensures that the repetitive act of plugging and unplugging the connection doesn’t break a solder connection. From there [Reed’s] enclosure finishing skills take over. The shape and curve of the aluminum sheet give the look befitting an expensive tablet device. Along the back you can see the jacks for line-in, line-out, video, mic/guitar, and headphones that make the dock useful. It wouldn’t be hard to make one… but it might be hard to make one look this great. See for yourself after the break.

Continue reading “Experimental Music IPad Dock”

Mixed I/O Testing Module

Needing to test the display interface for a multitude of different sensors [Fileark] built himself this analog and digital input/output simulator. Along the bottom is a double row of trimpots that adjust analog voltages. Each voltage is measured by the Arduino inside and its value is displayed on the graphic LCD screen to confirm that the hardware you’re testing is making correct measurements. There’s also digital I/O in two different forms. To the upper left are momentary push buttons but the DIP switch bank below that allows the same connections to be toggled on and off. It’s not an automated test bed, but if you’ve got a lot of I/O, or a lot of hardware to test this will save you some real time.

Don’t miss the demonstration video after the break.

Continue reading “Mixed I/O Testing Module”

Parts: 8bit IO Expander (PCF8574)

pcf8574

Sometimes a project has more sensors, buttons, or LEDs than your microcontroller has pins. The PCF8574 is an easy way to add 8 low-speed input or output pins to a microcontroller. A configurable address lets multiple PCF8574s exist on the same bus, so two microcontroller pins can control dozens of IO pins. We’ll show you how to use this chip below.

Continue reading “Parts: 8bit IO Expander (PCF8574)”