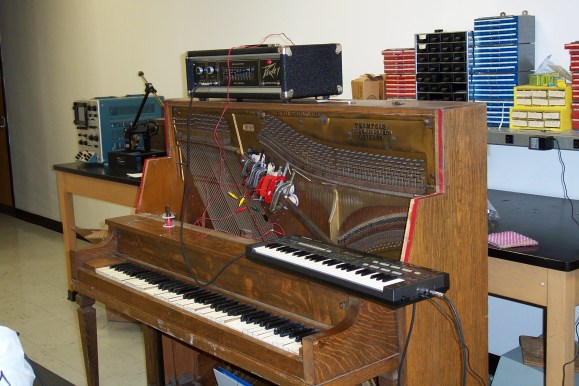
Touch Control For Every Key On The Keyboard

keys

Of all the musical instruments out there, the keyboard is among the worst for changing the pitch and timbre of individual notes. Wind and stringed instruments can do this easily in the hands of a skilled player, but outside the wheel and joystick controls of a few electronic keyboards, tickling the ivories means the only thing you can really change about how something sounds is the volume.

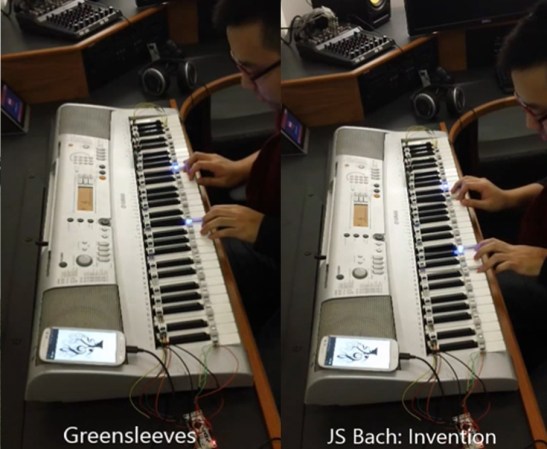
TouchKeys wants to put an end to this severe lack of dynamics available on keyboard instruments. Basically, it turns every single key on a keyboard into a multi-touch sensor, allowing any keyboardist to change the pitch, filter, timbre, or any other parameter of their instrument simply by moving their finger around on a key.

TouchKeys works by overlaying all the keys on a keyboard with circuit boards that plug into a module hidden under the hood. These boards are studded with capacitive sensing points, allowing a computer to recognize where the player is touching each key, and modifying filters or volume for each key independently.

The TouchKeys Kickstarter is offering a kit to equip a 25-key keyboard with these sensors for about $550. A hefty price tag, but hopefully we’ll see this tech in real production keyboards in the future.

Quick And Dirty Touch-sensitive Keyboard Project

quick-dirty-touch-sensitive-keyboard

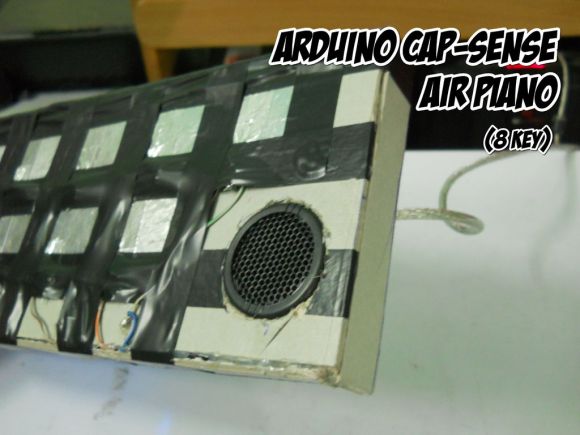
You don’t have to have high-quality parts to play around with electronics and here’s a great example. [Vishal] used junk to play around with CapSense, the touch sensitive Arduino library. What he ended up with is this touch-based piano keyboard.

We’ve featured the CapSense library in the past, but even that example uses a very meticulously crafted test rig of foil tape, protoboard, and some resistors. If you still haven’t given it a try follow this example of using aluminum foil, electrical tape, and a cardboard box.

[Vishal] just sandwiched the end of jumper wire between two pieces of foil to make each ‘key’. We believe the other end of the wire is soldered to the bias resistors where they connect to a couple of pin headers. The headers were hot-glued in place through holes in the bottom of the box, making the entire rig simple to plug into the Arduino board driving it. After adding in a small speaker and flashing the code he’s finished. It certainly makes for a short afternoon project which you won’t feel bad about taking apart later since you didn’t sink a ton of time or resources into the build.

Camera-based Touchscreen Input Via An FPGA

piano-hero-uses-camera-based-touch-input

[Chonggang Li] wrote in to share a link to the final project he and [Ran Hu] built for their embedded systems class. It’s called Piano Hero and uses an FPGA to implement a camera-based touch screen system.

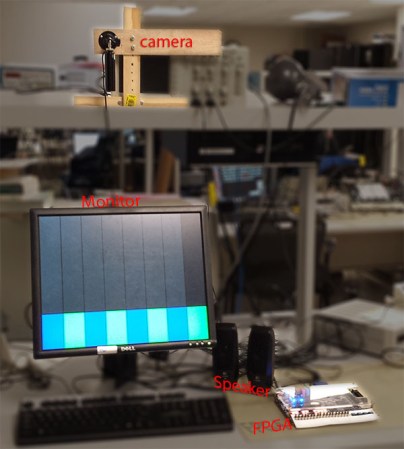
All of the hardware used in the project is shown above. The monitor acts as the keyboard, using an image produced by the FPGA board to mark the locations of each virtual key. It uses a regular VGA monitor so they needed to find some way to monitor touch inputs. The solution uses a camera mounted above the screen at an obtuse angle. That is to say, the screen is tilted back just a bit which allows the images on it to be seen by the camera. The FPGA board processes the incoming image, registering a key press when your finger passes between the monitor and the camera. This technique limits the input to just a single row of keys.

This should be much simpler than using a CCD scanner sensor, but that one can track two-dimensions of touch input.

Continue reading “Camera-based Touchscreen Input Via An FPGA”

MSP430 Touchscreen Piano

msp430-touchscreen-piano

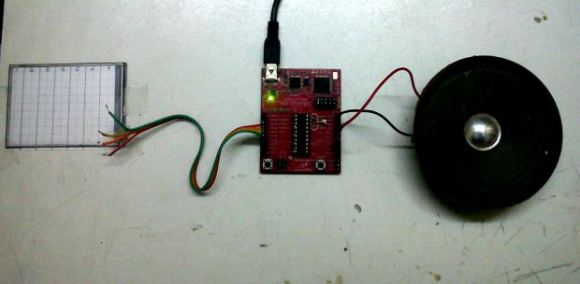
[Rohit Gupta] wrote in to share this touchscreen piano project he built around the TI Launchpad. It provided a way for him to explore using a resistive digitizer found on a lot of mobile devices. These are simply stuck to the top of LCD screens and replacements are inexpensive, but salvaging one from old hardware is an option as well.

The first thing he did was to test the four outputs of the digitizer with his multimeter. Logging the changing resistance will help make sure you’re reading the correct wires and are able to zero in the settings before you start coding. [Rohit] uses the ADC on the MSP430 chip to read from the screen. He went with the algorithm from one of TI’s app notes to convert the readings in to X and Y coordinates.

He separated the screen into seven columns, each generating a different tone. Touching higher or lower on that column will alter the pitch of the note produced. You can hear an example of this in the demo after the jump.

Continue reading “MSP430 Touchscreen Piano”

ASETNIOP Chorded Typing With A Piano Keyboard

asetniop-chorded-typing-with-a-piano

We don’t know if typing your Facebook updates from a piano keyboard counts as practicing or not. But if you want to give it a try here’s how. [Zach] wrote in to our tips line with his latest ASETNIOP hack which uses a MIDI piano keyboard to touch type on a computer.

Last July was when we first heard about ASETNIOP. It’s a chorded typing system which at the time was aimed at, but not limited to, touch screen devices. This version gives a pretty good idea of how the system actually works. Your fingers and thumbs are each assigned a key and they never move away from it. To type more than just the ten letters, combinations of keys are assigned the rest of the alphabet. You can see the piano example of the system after the break. But better yet would be hooking your own MIDI keyboard up to the computer and trying it in a browser.

Continue reading “ASETNIOP Chorded Typing With A Piano Keyboard”

Pair Of Musical Hacks Use Sensor Arrays As Keyboards

sensor-driven-musical-keyboards

This pair of musical keyboard hacks both use light to detect inputs. The pair of tips came in on the same day, which sparks talk of consipiracy theory here at Hackaday. Something in the weather must influence what types of projects people take on because we frequently see trends like this one. Video of both projects is embedded after the jump.

On the left is a light-sensitive keyboard which [Kaziem] is showing off. In this image he’s rolling a marble around on the surface. As it passes over the Cadmium Sulfide sensors (which are arranged in the pattern of white and black keys from a piano keyboard) the instrument plays pitches based on the changing light levels. [Thanks Michael via Make]

To the right is [Lex’s] proximity sensor keyboard. It uses a half-dozen Infrared proximity sensor which pick up reflected light. He calls it a ‘quantised theremin’ and after seeing it in action we understand why. The overclocked Raspberry Pi playing the tones reacts differently based on distance from the keyboard itself, and hand alignment with the different sensors.

Continue reading “Pair Of Musical Hacks Use Sensor Arrays As Keyboards”

Fruit Piano Uses A Different Circuit Than The Makey Makey

screen

[Hasbi Sevinç] is using perishable goods in his electronics project. The orange, tomato, and two apples seen above act as keys for the virtual piano. The concept is the same as the Makey Makey which is often demonstrated as a banana piano. This implementation uses an Arduino to read the sensors and to connect to the computer running the piano program.

You can see there’s a fair amount of circuitry built on the breadboard. Each piece of fruit has its own channel to make it into a touch sensor. The signal produced when your finger contacts the food is amplified by transistors connected in a Darlington pair. That circuit drives the low side of a optoisolator transmitter. The receiving side of it is connected the I/O pin of the Arduino. You can see the schematic as well as a demo clip after the break.

This use of hardware frees up a lot of your microcontroller cycles. That’s because projects like this banana piano use the timers to measure RC decay. [Hasbi’s] setup provides a digital signal that at most only needs to be debounced.

Continue reading “Fruit Piano Uses A Different Circuit Than The Makey Makey”