Halloween Hack Night At Pololu

Have some servos and an Arduino lying around? It isn’t too late to get your freaky on! Last night, tech enthusiasts of Las Vegas gathered at Pololu Robotics to show off their hacks for a Halloween flavored edition of their bi-monthly robot club. These projects created by those in the community as well as the Pololu engineers themselves are fun and have a relatively short list of materials. So, if the examples below give you some inspiration, this is permission to Macgyver something together before your big Halloween party tonight…
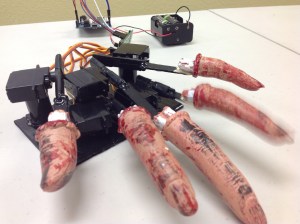
roboFingersImpatient Severed Fingers – [Amanda] came up with a cute use for some mini servos and a zombie hand prop. The five severed fingers were attached to one end of a plastic rod. The other end was mounted to each of five servos which were laid out in the appropriate hand shape and attached to a fixed base. An Arduino running a basic sweep sketch animated the motors at slightly staggered intervals, creating a nice rolling effect. Even with the moving parts exposed this prop would be awesome to have on display, or set the ambiance with its continuous tapping…

deltaSpectorAngry Spectral Delta – [Nathan Bryant] made an actual costume for his delta robot from Robot Army. By attaching a small plastic skull to the end effector and draping a tattered piece of fabric over the rest of the mechanism he effectively transformed the delta into a little ghost with a sassy personality. The head swiftly bobbed about, all while staying parallel to the table… until it intermittently came unhinged and hung limply, which was a nice added effect!


exorcismBabyRobotic Exorcism Baby – This doll could turn its half skeleton, half baby face 180 degrees and then laugh at your fear. By attaching two servo motors together, [Jeremy] was able to create a pan and tilt mechanism which acted as the baby’s contorting neck and chattering jaw. The micro controller sending commands to the motors was hidden modestly under her dress.
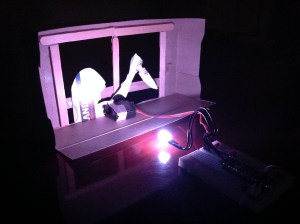
 

shadowBoxStabby Animated Cardboard Shadowbox – Among the animatronic devices seen at the event was a shadowbox made by [Brandon] hidden in a dark conference room nearby. When one happened to walk past the seemingly unoccupied space, they’d glimpse the silhouette of an arm stabbing downward with a knife through a windowsill. Being lured in for further investigation you’d find that the shadow was being cast by some colored LEDs through a charmingly simple device. A cutout made from recycled card stock was attached to a single servo. This whole mechanism itself rocked back and forth slightly as the motor moved, which wasn’t intentional but added some realism to the motion of the stabby arm.

There were many interesting projects present last night ranging from remote-controlled skeletal arms to other reactive devices ready to deliver a scare. If you’re interested in knowing more, those made by the Pololu crew are documented on their blog. Since video does these projects better justice, you can check out a compilation of clips here:

Continue reading “Halloween Hack Night At Pololu”

Defcon Side Trip: Pololu And Robots

PololuDuring our trip out to Vegas for Defcon, we were lucky enough to catch up with a few of the companies that should be of interest to Hackaday readers. One of the companies based out of the area is Pololu, makers and purveyors of fine electronics and robots. In an incredible bit of lucky scheduling, LV Bots, the Las Vegas area robot builders club, was having an event the same weekend we were there. A maze challenge, no less, where builders would compete to build the best robot and write the best code to get a pile of motors and electronics through a line-following maze in the fastest amount of time.

The Bots

The LV Bots events are held in the same building as Pololu, and unsurprisingly there were quite a few Pololu employees making a go at taking the stuff they developed and getting it to run through a maze. At least one bot was based on the Zumo kit, and a few based on the 3pi platform. Interestingly, the Raspberry Pi Model B+ was the brains of quite a few robots; not extremely surprising, but evidence that the LV Bots people take their line-following mazes seriously and are constantly improving their builds.

Each robot and builder ‘team’ was given three runs. For each team, the first run is basically dedicated to mapping the entire maze. A carefully programmed algorithm tries to send the robot around the entire maze, storing all the intersections in memory. For the second and third runs, the bot should – ideally – make it to the end in a very short amount of time. This is the ideal situation and was only representative of one team for that weekend’s event.

Continue reading “Defcon Side Trip: Pololu And Robots”

Flex Sensing For A DIY Data Glove

cyber

[Cyber] has been testing out intuitive input methods for virtual reality experiences that immerse the user further into the virtual world than archaic devices like a keyboard or mouse would allow. One of his biggest interests so far was the idea of a data glove that interacts with an Arduino Uno to interface with a PC. Since commercial products are yet to exist on a readily available level, [Cyber] decided to build his own.

He started out with a tiny inertial measurement unit called a Pololu MinIMU-9 v2 that tracks orientation of the 3-axis gyro and accelerometer. The USB interface was soldered into place connecting the wires to an Arduino Uno. From there, he hooked up a flex sensor from Spectra Symbol (which were supposedly used in the original Nintendo Power Gloves) and demoed the project by tracking the movement of one of his fingers. As the finger bent, the output printed on the serial monitor changed.

[Cyber] still needs to mount a glove on this system and construct a proper positional tracking method so that physical movement will be mirrored in a simulation.

[Cyber’s] day job has had him busy these last few months, which has forced the project into a temporary hold. Recently though, [Cyber] has been an active member and an influence in the local Orange County VR scene helping to build a nice development culture, so we’re hoping to see more updates from him soon.

To view what he has done up to this point, click the link at the top of the page, and check out the video after the break:

Continue reading “Flex Sensing For A DIY Data Glove”

The Stepper Driver Driver

KONICA MINOLTA DIGITAL CAMERA

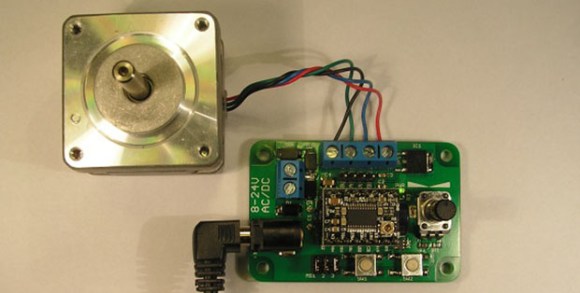
The Stepstick and Pololu motor drivers are the heart of just about every Reprap electronics board, but they can go bad. The usual way of testing these things is to rig up a microcontroller on a breadboard, grab some cables, and wire something up. [Ken]’s Easy Stepper Motor Controller is a much simpler solution to the problem of testing these drivers and could, with a bit of practice, be constructed on a single-sided homebrew PCB.

The Easy Stepper Motor Controller is a very simple board with connections to a motor, a power supply, and headers for a single Pololu or Stepstick motor driver. Two buttons and a pot control the rotation of the motor with the help of an ATtiny10, and jumpers for up to 16x microstepping are right there on the board.

There’s a video after the break showing what this stepper motor driver driver can do. It’s not much, but if you’re just testing a driver, it’s all you need.
Continue reading “The Stepper Driver Driver”

GRBL Compatible Arduino CNC Shield

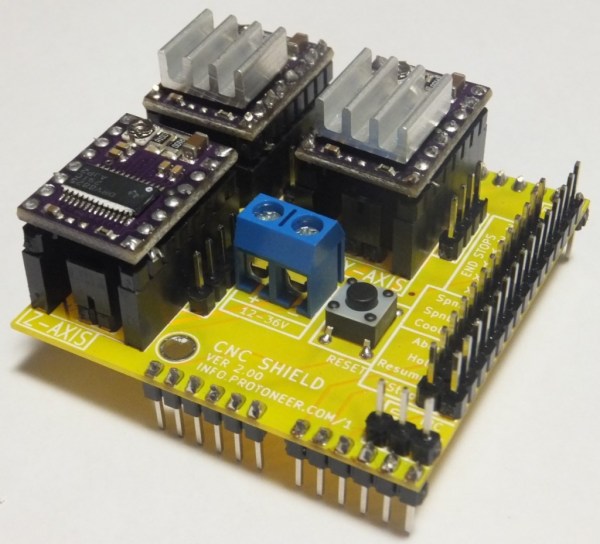
By the time you get to the point in a home CNC build where you’re adding control electronics you may be ready for the simplest means to an end possible. In that case, grab your Arduino and heat up that etching solution to make your own GRBL compatible shield.

This familiar footprint manages to contain everything you need for a three-axis machine. The purple boards slotted into the pairs of SIL headers are Pololu Stepper motor drivers. Going this route makes replacing a burnt out chip as easy as plugging in a new module. The terminal block in the center feeds the higher voltage rail necessary for driving the motors. The DIL header on the right breaks out all of the connections to the limiting switches (two for each axis), spindle and coolant control, as well as three buttons for pause, resume, and abort. There’s even a header for SPI making it easier to add  custom hardware if necessary.

This is a dual-layer board which may not be ideal for your own fabrication process. [Bert Kruger] posted his Gerber files for download if you want to put in a small run with OSH Park or a similar service.


Robot Can Barely Move With So Much Hardware Strapped To It

web-server-robot

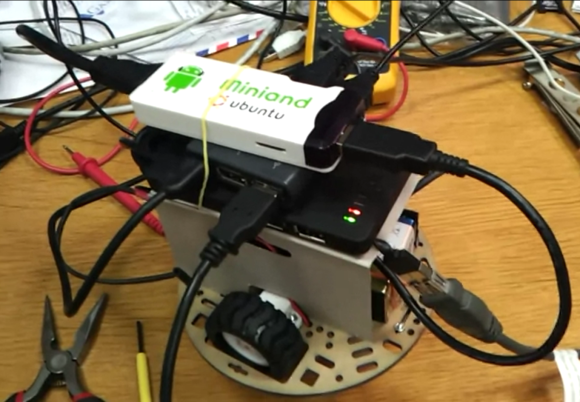
We think that [Andrej Škraba] needs to start looking for a beefier motor platform. This little robot has so much hardware strapped to it the motors can barely keep up. But with a little help it can make its way around the house, and it takes a whole lot of connectivity and computing power along for the ride.

The white stick on the top is a single-board computer. The MK802 Mini sports an A10 processor and up to a gig of ram. Just below that is a USB hub which is sitting on top of a USB battery pack. This powers the computer and gives him the ability to plug in more than one USB device. The robot chassis is from Pololu. It uses an Arduino and a motor shield for locomotion, with commands pushed to it via USB.

This setup makes programming very easy. Here [Andrej] has a keyboard and HDMI monitor plugged in to do a little work. When not coding it can be disconnected and driven over the network. He makes this happen using an Apache server on the MK802 and node.js. See a demo of the system in the clip after the break.

Continue reading “Robot Can Barely Move With So Much Hardware Strapped To It”

Bang-banging Your Way To A Perfect Cake

bang-bang-oven-control

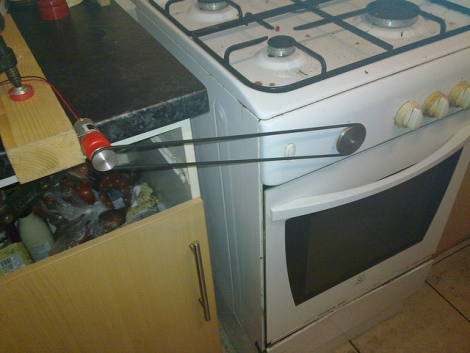
[Rob Spanton’s] house is equipped with a rather cheap oven, which was discovered while his roommate tried using it to bake part of a wedding cake. If someone took a shower during the baking process, a large portion of unit’s gas pressure was diverted to the boiler, causing the oven to shut off completely. This is obviously not a good situation for baking cakes, so the housemates decided to construct a makeshift controller to keep temperatures in line.

They started by installing a pulley on the oven’s knob, which is connected to a small motor via a long rubber belt. The other end of the belt connects to a small motor, which is controlled by a Pololu 18v7 motor controller. A K-type thermocouple monitors the oven’s temp, feeding the data through a MAX6675 converter to (presumably) [Rob’s] computer.

Since they were in a bit of a time crunch, [Rob] and his roommate [Johannes] decided the best way to keep the oven at a steady temperature was via bang-bang control. While you might imagine that cranking the gas knob between its minimum and maximum settings repeatedly wouldn’t be the ideal way to go about things, their solution worked pretty well. The cake came out perfectly, and the maximum temperature swing throughout the entire baking process was only 11.5°C – which is pretty reasonable considering the setup.