Raspberry Pis Sweeten A Library’s Bottom Line

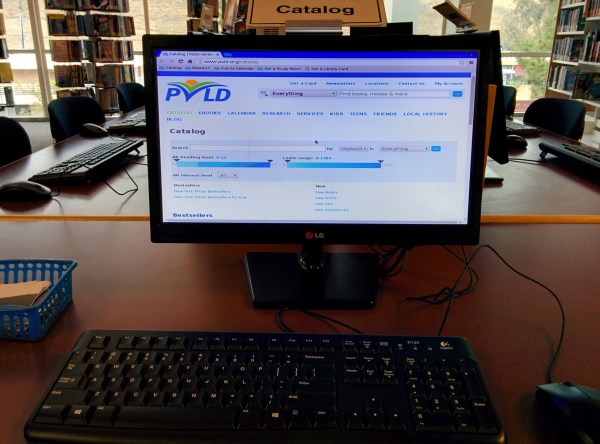
Here’s a great real-world use case for the Pi—a small job for a small computer. [viking–] works in a public library. Like many public libraries, this one has catalog-only terminals that are separate from the computers you reserve to get your fix of cat videos and Bejeweled Blitz. The catalog computers needed to be upgraded, and [viking–] replaced them all with Raspis.

They’re all running Raspbian and boot directly into Chromium with a clean profile every time. The Pis are otherwise completely locked down and accessible only through SSH. A dedicated WiFi network and whitelisted web access help keep them secure. The Pis reboot after five minutes of inactivity which erases all login credentials and bookmarks.

These terminals are scattered throughout the library. Those closest to the front desk have their Pi in a VESA mount on the back of the monitor. The others are locked up in cabinets so they don’t get pinched by the patrons. Library budgets are lean enough already. [viking–] was able to get management sign-off for the project by building a single prototype to show the simplicity of the system and the projected cost savings. Thanks to a couple of cron jobs, the Pis shut the monitors down every night, saving hundreds of dollars per year.

Connect All Your IoT Through Your Pi 3

If you’re playing Hackaday Buzzword Bingo, today is your lucky day! Because not only does this article contain “Pi 3” and “IoT”, but we’re just about to type “ESP8266” and “home automation”. Check to see if you haven’t filled a row or something…

Seriously, though. If you’re running a home device network, and like us you’re running it totally insecurely, you might want to firewall that stuff off from the greater Interwebs at least, and probably any computers that you care about as well. The simplest way to do so is to keep your devices on their own WiFi network. That shiny Pi 3 you just bought has WiFi, and doesn’t use so much power that you’d mind leaving it on all the time.

Even if you’re not a Linux networking guru, [Phil Martin]’s tutorial on setting up the Raspberry Pi 3 as a WiFi access point should make it easy for you to use your Pi 3 as the hub of your IoT system’s WiFi. He even shows you how to configure it to forward your IoT network’s packets out to the real world over wired Ethernet, but if you can also use the Pi 3 as your central server, this may not even be necessary. Most of the IoT services that you’d want are available for the Pi.

Those who do want to open up to the world, you can easily set up a very strict firewall on the Pi that won’t interfere with your home’s normal WiFi. Here’s a quick guide to setting up iptables on the Pi, but using even friendlier software like Shorewall should also get the job done.

Still haven’t filled up your bingo card yet? “Arduino!”

Retro Rotary Raspi Phone Rings Alexa

[MisterM] is a man after our own heart. He loves to combine the aesthetic of vintage equipment with the utility of new technologies. His latest venture is AlexaPhone, which marries the nearly instantaneous retrieval and computation power of Amazon’s Alexa voice service with the look and feel of a 1970s rotary phone. Best of all, there’s no need to spin the dial and wait for it to go whirring back around. AlexaPhone is ready to take questions as soon as the handset is lifted.

Questions are transmitted through a salvaged USB VOIP phone plugged into the Pi. The user must hang up the receiver in order to trigger the search. Once Alexa has an answer, the audio comes back through a small external amplified speaker with a USB-rechargeable battery. Since the hardware is a bit atypical for Alexa, [MisterM] had a bit of trouble at first trying to query the service with a physical button until he came across this AlexaPi code.

This phone is actually a reproduction of a classic BT Trimphone, which explains the asterisk and octothorpe on the dial.  The modern internals meant that [MisterM] could take advantage of the ribbon cable coming off of the receiver hook to trigger the Pi to send the query. Watch [MisterM]’s kids put Alexa through her paces after the break.

If this has you feeling nostalgic, check out this vintage Chromecast TV we covered recently or this old Russian radio reborn as a Bluetooth speaker.

Continue reading “Retro Rotary Raspi Phone Rings Alexa”

The Raspberry Pi 3 does Eddystone!

Turn Your RPi 3 Into A BLE Beacon

With the launch of the Raspberry Pi 3, Bluetooth Low Energy (BLE) is now at our disposal. With BLE, there are a few technologies for implementing one-way beacons that broadcast data. Apple has been pushing iBeacon since 2013, and Google just launched their Eddystone solution last year.

If you’re looking to target Google’s Eddystone on your RPi 3, [Yamir] has you covered. He’s put together a guide on setting up an Eddystone-URL beacon within Raspbian. This type of beacon just broadcasts a URL. Users within range will get a notification that the URL is available, and can navigate through to it. Eddystone-URL works on both iOS and Android.

The process for setting this up is pretty simple. The hciconfig and hcitool commands do all the work. [Yamir] was even nice enough to make a calculator tool that generates the hcitool command for your own URL. While is hack is a simple one, it’s a nice five-minute project. It’s also handy for broadcasting the URL of your Raspberry Pi if it’s running a web server as part of a more intricate hack.

Hacking The Raspberry Pi WiFi Antenna For More DB

I’ve been testing out the Raspberry Pi 3, and one thing I have found is that the WiFi antenna that was added in this new model is not especially good: the Pi has trouble connecting to my WiFi network in places that other devices have no issues. That’s not surprising, because the antenna on the Pi 3 is tiny: mounted right next to the display connector, it is just a few millimeters wide. [Ward] at DorkbotPDX agrees, so he decided to look into adding a better antenna by adding an external connector.

He tried two approaches: replacing the antenna with a tail connector, and adding a U.FL connector to the unused solder pads on the board. Both require some delicate soldering work, so they aren’t approached lightly. Replacing the antenna with an external connector produced a significant increase in signal output, which should equate with more range for the WiFi connection.

It is also interesting to note that the Pi 3 has solder pads on the board to add an external antenna connector, but that they are not used. Plus, one of the solder pads is covered by solder mask. Using these is the second approach that [Ward] used, soldering on a U.FL connector and connecting that to a small rubber duckie antenna. Again, this proved more efficient, increasing the power output of the antenna significantly.

NOTE: This hack definitely falls into “Don’t try this at home” territory. Messing with antennas voids the warranty and FCC certification for the Pi, and can cause all sorts of signal-related unpleasantness if you aren’t careful.

Hands On With The Odroid C2; The Raspberry Pi 3 Challenger

A couple of weeks ago we covered the launch of the Odroid C2, a single board computer from the Korean company Hardkernel in the same form factor and price segment as the Raspberry Pi 3. With four ARM Cortex A53 cores at 2GHz and 2Gb of DDR3 on board it has a paper spec that comfortably exceeds that of the Pi 3’s 1.2GHz take on the same cores and 1Gb of DDR2. This could be a board of great interest to our readers, so we ordered one for review.

The parcel from Korea arrived in due course, the C2 in its box inside it well protected by a sturdy cardboard outer packaging. We had ordered a couple of extras: a micro-SD card preloaded with Ubuntu and a USB power lead (more on that later), both were present and correct.

When unpacking the board it is immediately obvious how closely they’ve followed the Raspberry Pi form factor. There are a few differences, no camera or DSI connectors, the SD card in a different place, a power jack where the Pi has its audio jack, and oddly the network port is the other way up. Otherwise it looks as though it should fit most Pi cases. Of course the only case we had to hand was a PiBow which are cut for specific Pi models, so sadly we couldn’t test that assertion.

Continue reading “Hands On With The Odroid C2; The Raspberry Pi 3 Challenger”

Overclocking The Raspberry Pi 3 For Tasty Speed Increases

Some people are never happy. [Jackenhack] got hold of a couple of shiny new Raspberry Pi 3s, and the first thing he did is to start overclocking them. Fortunately, he knows what he is doing, so none of the magic smoke escaped, but it seems not all Pis are happy with the process.

For one of the three seemingly identical Pi 3, adding heat sinks let him push the CPU from the native 1.2GHz up to 1.45GHz. That did involve a bit of overvolting (increasing the voltage to the CPU), but that can be easily done in software. He also experimented with adding heat sinks to the memory, then bumping up the speed of the memory to increase throughput. Again, he was able to make some impressive gains, bumping the speed up from the native 400 Mhz to 500 Mhz. Both of those are stable overclocks: he was able to run the system at 100% CPU load for an extended time, and has incorporated the overclocked Pi into his system that contributes to the NTP pool project.

However, when he tried the same overclock with the second of the Pi 3 victims test subjects, it failed due to the CPU overheating. So, it seems that there is a lot of variation in the individual bits of silicon on the Pi 3. Perhaps some liquid nitrogen would help? It did for an Arduino…