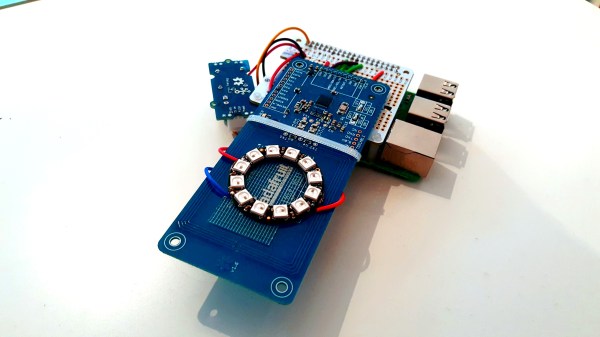
There’s A Pi In Mike’s Fridge

How often have you stood in the supermarket wondering about the inventory level in the fridge at home? [Mike] asked himself this question one time too often and so he decided to install a webcam in his fridge along with a Raspberry Pi and a light sensor to take a picture every time the fridge is opened — uploading it to a webserver for easy remote access.

Continue reading “There’s A Pi In Mike’s Fridge”

Hackaday Links: June 12, 2016

The Navy is doing some crazy stuff out in China Lake. They were planning to test something out that could potentially make GPS unusable from San Diego to Las Vegas to San Francisco. Those plans were cancelled for ‘internal’ reasons. They will be testing something in Indiana shortly, though. What are they doing? Who knows. That’s what idle speculation in the comments section is for.

3D Hubs, the distributed ‘3D printing service’ thing, now has 30,000 machines distributed around the globe. They also put together the definitive guide to 3D printing recently. For just about everyone reading this, a ‘introduction to 3D printing’ is old news, but this is a very good guide for telling your weird aunt what you’re building in the basement. Forward this one to your family on Facebook.

This one is amazing. Over on Hackaday.io, [Arsenijs] is working on a Raspberry Pi project. It uses a Raspberry Pi, and several accessories and components to make this Raspberry Pi project work. This Raspberry Pi project is already getting far more than the usual number of likes and follows, making this one of the most interesting Raspberry Pi projects in recent memory.

Moog is re-releasing the Minimoog, the original Moog synth from 1970. That’s cool, but what about a DIY Minimoog? That’s what [Scott Rider] is doing with the Crowminius Analog Music Synthesizer on Kickstarter. It’s an analog synth that’s more or less a Minimoog with MIDI, and one of the Kickstarter rewards is a bare PCB.

The future is dancing robots, so here’s a servo-driven Stewart platform that is sure to bring on the robot apocalypse.

What do you do when you need to get your Hackaday fix, but all you have is a laptop from 1995 and a dial-up modem? The Hackaday Retro Edition, of course. That’s a bunch of retro Hackaday posts, posted five at a time, with all the CSS and JavaScript cruft stripped. We’re always interested to see the old machines that are pulling the retro edition down, and [djnikochan] has the latest entry. He found a Thinkpad 380ED from 1997 at the Goodwill store for $15. The RAM was upgraded with a 64MB SIMM, giving this machine a total of 80MB. The Hackaday Retro Edition is viewable with IE 5.5 over a trusty PCMICA WiFi card. Awesome job, and we love to see old iron rendering the retro edition. Send some pics in if you get your old battlestation to load it.

540 LEDs On A Geodesic Sphere

[burgerga] loves attending Music Festivals. He’s also a MechE who loves his LED’s. He figured he needed to put it all together and do something insane, so he build a huge, 15″ geodesic sphere containing 540 WS2812B addressable LED’s. He calls it the SOL CRUSHER. It sips 150W when all LED’s are at full intensity, making it very, very, bright.

As with most WS2812B based projects, this one too is fairly straightforward, electrically. It’s controlled by four Teensy 3.2 boards mounted on Octo WS2811 adapter boards. Four 10,000 mAh 22.2V LiPo batteries provide power, which is routed through a 5V, 30Amp heatsinked DC-DC converter. To protect his LiPo batteries from over discharge, he built four voltage monitoring modules. Each had a TC54 voltage detector and an N-channel MOSFET which switches off the LiPo before its voltage dips below 3V. He bundled in a fuse and an indicator, and put each one in a neat 3D printed enclosure.

The mechanical design is pretty polished. Each of the 180 basic modules is a triangular PCB with three WS2812B’s, filter capacitors, and heavy copper pours for power connections. The PCB’s are assembled in panels of six and five units each, which are then put together in two hemispheres to form the whole sphere. His first round of six prototypes set him back as he made a mistake in the LED footprint. But it still let him check out the assembly and power connections. For mechanical support, he designed an internal skeleton that could be 3D printed. There’s a mounting frame for each of the PCB panels and a two piece central sphere. Fibreglass rods connect the central sphere to each of the PCB panels. This lets the whole assembly be split in to two halves easily.

It took him over six months and lots of cash to complete the project. But the assembly is all done now and electrically tested. Next up, he’s working on software to add animations. He’s received suggestions to add sensors such as microphones and accelerometers via comments on Reddit. If you’d like to help him by contributing animation suggestions, he’s setup a Readme document on Dropbox, and a Submission form. Checkout the SolCrusher website for more information.

Thanks [Vinny Cordeiro], for letting us know about this build.

Continue reading “540 LEDs On A Geodesic Sphere”

The Raspberry Pi Infinity+ Is A Fully Functional Huge Raspberry Pi

It wasn’t an easy weekend for the rest of the world’s hackers and makers, that of the Bay Area Maker Faire. Open your social media accounts, and most of your acquaintances seemed to be there and having a great time, while the rest were doing the same at the Dayton Hamvention. Dreary televised sports just didn’t make up for it.

MCM Electronics had the Maker Faire booth next to that of the Raspberry Pi Foundation, and since they needed both a project to show off and a statement item to draw in the crowds, they came up with the idea of a 10x scale reproduction of a Raspberry Pi above the booth. And since it was Maker Faire this was no mere model; instead it was a fully functional Raspberry Pi with working LEDs and GPIO pins.

The project started with a nearly faithful (We see no Wi-Fi antenna!) reproduction of a Raspberry Pi 3 in Adobe Illustrator. The circuit board was a piece of MDF with a layer of foam board on top of it with paths milled out for wiring and the real Pi which would power the model, hidden under the fake processor. The LEDs were wired into place, then the Illustrator graphics were printed into vinyl which was wrapped onto the board, leaving a very two-dimensional Pi.

The integrated circuits and connectors except for the GPIO pins were made using clever joinery with more foam board, then wrapped in more printed vinyl and attached to the PCB. A Pi camera was concealed above the Broadcom logo on the processor model, to take timelapse pictures of the event. This left one more component to complete, the GPIO pins which had to be functional and connected to the pins on the real Pi concealed in the model. These were made from aluminium rods, which were connected to a bundle of wires with some soldering trickery, before being wired to the Pi via the screw terminals on a Pi EZ-Connect HAT from Alchemy Power.

Is the challenge now on for a range of compatible super-HATs to mate with this new GPIO connector standard?

We previously covered the 2012 Maker Faire exhibit that inspired this huge Pi. The Arduino Grande was as you might well guess, a huge (6x scale) fully functional Arduino. In fact, the world seems rather short of working huge-scale models of single board computers, though we have featured one or two working small-scale computer models.

Thanks [Michael K Castor] and [Christian Moist] for sharing their project with us.

Hackaday Prize Entry: The Green Machine

For Hackers, rapid prototyping is made easier using basic building blocks such as the Raspberry Pi, Arduino and the huge variety of add on shields for home brew projects. But we don’t see too many real world Industrial applications or machines built using these off-the-shelf electronics. [SlyScience] built The Green Machine – an industrial grade, automated spray painting device to help coat polycarbonate tubes consistently.

The Green Machine is essentially a linear drive that can move a spray gun across a spinning clear tube and coat it evenly with the desired color. These tubes are used as color filters – they slide over standard T5, T8 or T12 fluorescent lamps – and are used in advertising, special effects, films and similar applications. For almost 10 years prior to this machine, the task was done manually. The HPLV (high pressure, low volume) spray gun used for this process needed skilled hands to get consistent results. It was easy to ruin a tube and cleaning them was not possible. [SlyScience] figured things out on the go – teaching himself and figuring out all of the software and hardware pieces of the puzzle. The welded steel frame is about the only “custom” part in this build. Everything else is COTS. Check out the video of The Green Machine in action below, and if you have any tips to help improve the build, chime in with your comments.

Continue reading “Hackaday Prize Entry: The Green Machine”

FPGA-and-Pi Colossus Smashes Your Codes!

If it were sixty years ago, and you were trying to keep a secret, you’d be justifiably glad that [Ben North] hadn’t traveled back in time with his Raspberry-Pi-and-FPGA code-breaking machine.

We’ve seen a lot of Enigma builds here at Hackaday — the World War II era encryption machine captured our readers’ imaginations. But perhaps the more important machines to come out of cryptanalysis during that era were Turing’s electromechanical Bombe, because it cracked Enigma, and the vacuum-tube-based Colossus, because it is one of the first programmable electronic digital computers.

[Ben]’s build combines his explorations into old-school cryptanalysis with a practical learning project for FPGAs. If you’re interested in either of the above, give it a look. You can start out with his Python implementations of Colossus to get your foot in the door, and then move on to his GitHub repository for the FPGA nitty-gritty.

It’s also a cool example of a use for the XuLA2 FPGA board and its companion StickIt board that plug straight into a Raspberry Pi for programming and support. We haven’t seen many projects using these since we first heard about them in 2012. This VirtualBoy hack jumped out at us, however. It looks like a nice platform. Anyone else out there using one?

Hexapod Tank From Ghost In The Shell Brought To Life

Every now and then someone gets seriously inspired, and that urge just doesn’t go away until something gets created. For [Paulius Liekis], it led to creating a roughly 1:20 scale version of the T08A2 Hexapod “Spider” Tank from the movie Ghost in the Shell. As the he puts it, “[T]his was something that I wanted to build for a long time and I just had to get it out of my system.” It uses two Raspberry Pi computers, 28 servo motors, and required over 250 hours of 3D printing for all the meticulously modeled pieces – and even more than that for polishing, filing, painting, and other finishing work on the pieces after they were printed. The paint job is spectacular, with great-looking wear and tear. It’s even better seeing it in motion — see the video embedded below.

Continue reading “Hexapod Tank From Ghost In The Shell Brought To Life”