2023 Cyberdeck Challenge: YAHRC Takes Its Power Seriously

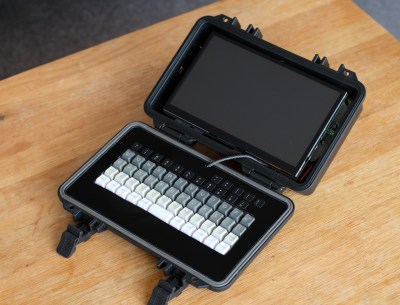
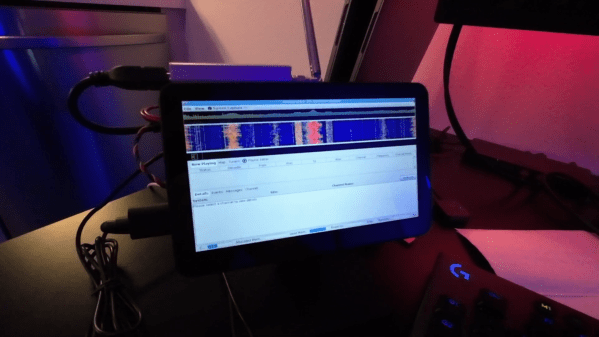
Cyberdecks are all about custom builds, and [f4drj]’s YAHRC (Yet Another Ham Radio Cyberdeck) takes its ruggedization and power seriously. There are some great power management features, and the enclosure even has a layer of RF shielding.

YAHRC is a Raspberry Pi-based build with a generously-sized screen that tucks a small Bluetooth keyboard into a storage area for input in a pinch. Everything is secured behind custom panels, and behind those panels are some really great build details. There’s active cooling via fans, an SSD for data, and [f4drj] even made a custom riser for the GPIO header by soldering together a couple of headers to act as an extender. This exposes the GPIO header right beside a clear area for prototyping, with easy access to USB ports next to the screen in the top panel. Continue reading “2023 Cyberdeck Challenge: YAHRC Takes Its Power Seriously”

2023 Cyberdeck Challenge: Reviving The First Notebook Computer

At first sight upon seeing [Don]’s HX2023 cyberdeck project one might be sad at the destruction of a retrocomputer, but in fact its classic Epson shell comes from a pile of spare parts left after restoring many other of the classic HX20 notebook computers to working order. The result stays true to the original but gives us so much more in the shape of a Raspberry Pi, and it’s worth cracking it open to see what components make this happen.

The first impression from the pictures is how tidy it all is, with the various USB-based boards contained on a large piece of perfboard spanning the whole case. As well as a USB hub and UPS board there’s an M.2 SSD interface and an audio board, and a DSI color TFT screen neatly fitted in place of the original monochrome item. Finally, there’s an Adafruit keyboard matrix interface board, allowing the use of the Epson’s original keys.

We like this conversion, because it manages to preserve a lot of what the original Epson had that made it great. We’re reminded of a cyberdeck inspired by the other great 8-bit notebook, the TRS-80 model 100.

An All Sky Camera To Watch The Night Sky

If you have any astronomer friends you’ll soon discover that theirs is a world of specialist high-quality optical equipment far ahead of the everyday tinkerer, and for mere mortals the dream of those amazing deep space images remains out of reach. It’s not completely impossible for the night sky to deliver impressive imagery on a budget though, as [David Schneider] shows us with a Raspberry Pi powered whole sky camera.

The project was born of seeing a meteor and idly wondering whether meteorite landing sites could be triangulated from a network of cameras, something he quickly discovered had already been done with some success. Along the way though he found the allsky camera project, and decided to build his own. This took the form of a Raspberry Pi 3 and a Pi HQ camera with a wide-angle lens mounted pointing skywards under an acrylic dome. It’s not the Hubble Space Telescope by any means, but the results are nevertheless impressive particularly in a timelapse. We wish there were less light pollution where we live so we could try it for ourselves.

Long-term readers may remember that this isn’t the first Pi sky camera we’ve brought you, for example this one is from 2020.

Continue reading “An All Sky Camera To Watch The Night Sky”

A wooden robot with a large fresnel lens in a sunny garden

Gardening Robot Uses Sunlight To Incinerate Weeds

Removing weeds is a chore few gardeners enjoy, as it typically involves long sessions of kneeling in the dirt and digging around for anything you don’t remember planting. Herbicides also work, but spraying poison all over your garden comes with its own problems. Luckily, there’s now a third option: [NathanBuildsDIY] designed and built a robot to help him get rid of unwanted plants without getting his hands dirty.

Constructed mostly from scrap pieces of wood and riding on a pair of old bicycle wheels, the robot has a pretty low-tech look to it. But it is in fact a very advanced piece of engineering that uses multiple sensors and actuators while running on a sophisticated software platform. The heart of the system is a Raspberry Pi, which drives a pair of DC motors to move the whole system along [Nathan]’s garden while scanning the ground below through a camera.

Machine vision software identifying a weed in a picture of garden soilThe Pi runs the camera’s pictures through a TensorFlow Lite model that can identify weeds. [Nathan] built this model himself by taking hundreds of pictures of his garden and manually sorting them into categories like “soil”, “plant” and “weed”. Once a weed has been detected, the robot proceeds to destroy it by concentrating sunlight onto it through a large Fresnel lens. The lens is mounted in a frame that can be moved in three dimensions through a set of servos. A movable lens cover turns the incinerator beam on or off.

Sunlight is focused onto the weed through a simple but clever two-step procedure. First, the rough position of the lens relative to the sun is adjusted with the help of a sun tracker made from four light sensors arranged around a cross-shaped cardboard structure. Then, the shadow cast by the lens cover onto the ground is observed by the Pi’s camera and the lens is focused by adjusting its position in such a way that the image formed by four holes in the lens cover ends up right on top of the target.

Once the focus is correct, the lens cover is removed and the weed is burned to a crisp by the concentrated sunlight. It’s pretty neat to see how well this works, although [Nathan] recommends you keep an eye on the robot while it’s working and don’t let it near any flammable materials. He describes the build process in full detail in his video (embedded below), hopefully enabling other gardeners to make their own, improved weed burner robots. Agricultural engineers have long been working on automatic weed removal, often using similar machine vision systems with various extermination methods like lasers or flamethrowers.

Continue reading “Gardening Robot Uses Sunlight To Incinerate Weeds”

A BASIC Interpreter For The Raspberry Pi Pico

It’s pretty easy to program the Raspberry Pi Pico in Python, or you can use C or C++ if you so desire. However, if you fancy the easy language of yesteryear, you might like PiccoloBASIC from [Gary Sims].

Putting it simply, piccoloBASIC is a BASIC interpreter that runs on the Raspberry Pi Pico. It features all the good bits of BASIC such as GOTO and GOSUB commands, that fancier languages kind of look down upon. It’s also got enough built-in routines to handle regular programming life, like sleeps, delays, a basic pseudorandom number source, trigonometric functions, and the ability to deal with floating point numbers. As far as microcontroller tasks go, it’s got rudimentary support for talking to GPIOs right now via the pinon and pinoff commands. However, it’s probably not the way to go if you want to bit-bang an SD card to within an inch of its speed rating.

Down the road, [Gary] hopes to add support for features like the Pico’s I2C, SPI, and PIO hardware, along with networking protocols and Bluetooth. PEEK and POKE are also hopefully on the way for those that like to fiddle with memory directly.

Meanwhile, if you’re looking for a different yet similar take, explore the port of MMBasic to the Pico platform. Video after the break.

Continue reading “A BASIC Interpreter For The Raspberry Pi Pico”

Networking With Balloons

Starlink has been making tremendous progress towards providing world-wide access to broadband Internet access, but there are a number of downsides to satellite-based internet such as the cluttering of low-Earth orbit, high expense, and moodiness of CEO. There are some alternatives if standard Internet access isn’t available, and one of the more ambitious is providing Internet access by balloon. Project Loon is perhaps the most famous of these (although now defunct), but it’s also possible to skip the middleman and build your own high-altitude balloon capable of connection speeds of 500 Kbps.

[Stephen] has been working on this project for a few months and while it doesn’t support a full Internet connection, the downlink on the high altitude balloon is fast enough to send high-resolution images in near-real-time. This is thanks to a Raspberry Pi Zero on board the balloon that is paired with an STM32 board which handles the radio communication on a RF4463 transceiver module. The STM32 acts as an intermediary or buffer to ensure reliable information is sent out on the radio, rather than using the Pi directly. [Stephen] also wrote a large chunk of the software responsible for handling all of these interactions, optimized for balloon flight specifically.

The blog post for this project was written a few weeks ago with a reported first launch date for the system already passed, so we will eagerly anticipate the results and the images he was able to gather using this system. Eventually [Stephen] hopes the downlink will be fast enough for video as well.Balloons are an underappreciated tool as well, and this isn’t the only way that they can be used to help send radio signals from place to place.

Modular Keyboard And Custom Game Controller

Most video games, whether on console or PC, have standardized around either a keyboard and mouse or an analog controller of some sort, with very little differences between various offerings from the likes of Sony, Microsoft, Nintendo, or even Valve. This will get most of us through almost all video games, but for those looking to take their gameplay up a notch or who are playing much more complex games, certain specialized controllers are available, but they might not meet everyone’s specific needs. Thanks to this custom, modular keyboard anyone should be able to make exactly the controller they need.

The device features a grid of 15 interfaces where modules like buttons, potentiometers, encoders, and joysticks can be placed. Each module can be customized to a significant extent on their own, and they can be placed anywhere on the grid. The modules themselves can be assigned to trigger keyboard presses or gamepad motions depending on the needs of the user. A Raspberry Pi handles the inputs and translates them to the computer, so in that regard it functions no differently than a standard keyboard or gamepad would. Programming is done by sending commands via a USB serial port, with the ability to save various configurations as well.

The modular controller is open-source in terms of hardware and software, with easy assembly using through-hole components and a customizable 3D printed cover for anyone looking to make their own. The project’s creator [Daniel] had flight simulators in mind when designing the device, which often benefit from having more specialized controllers, but any game with lots of specific inputs from Starcraft to League of Legends could benefit from a custom controller or keyboard like this. Flight simulators are more often the targets of specialized and unique controls, though, like this custom yoke or this physical control panel.