A Robotic Wheatley Replica created by Evie Bee

Robotic Wheatley From Portal 2

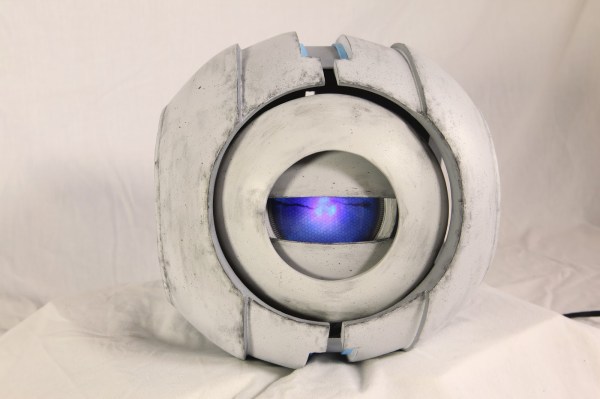
It’s been over 4 years since Portal 2 launched, but Wheatley, the AI character with a British accent, remains a captivating character. [Evie Bee] built a Wheatley replica complete with sound, movement, and one glowing eye.

The body of Wheatley is made out of blue insulation foam, also called XPS foam, laminated together with UHU Polyurethane glue. This formed a sphere, which was then cut into a detailed body. Papier mache clay was used to strengthen the thin foam.

The electronics for this build provide light, motion, and sound. The eye is moved by a total of 3 Arduino controlled servos: two for the movement of the eye, and one to allow it to open and close. Movement is controlled by two joysticks. Sound is provided by the Adafruit Sound Board, which connects to a speaker and a Velleman Sound to Light Kit. This kit controls the LEDs that light the eye, making it react to the voice of Wheatley.

You can watch this Wheatley rant at you after the break. Of course if you’re going to have a Wheatley you need a GLaDOS potato as well.

Continue reading “Robotic Wheatley From Portal 2”

Development Tools Of The Prop-Making World

We’ve seen them before. The pixel-perfect Portal 2 replica, the Iron Man Arc Reactor, the Jedi Lightsaber. With the rise of shared knowledge via the internet, we can finally take a peek into a world hidden behind garage doors, basements, and commandeered coffee tables strewn with nuts, bolts, and other scraps. That world is prop-making. As fab equipment like 3D printers and laser cutters start to spill into the hands of more people, fellow DIY enthusiasts have developed effective workflows and corresponding software tools to lighten their loads. I figured I’d take a brief look at a few software tools that can open the possibilities for folks at home to don the respirator and goggles and start churning out props.

Continue reading “Development Tools Of The Prop-Making World”

Reproducing A DSKY

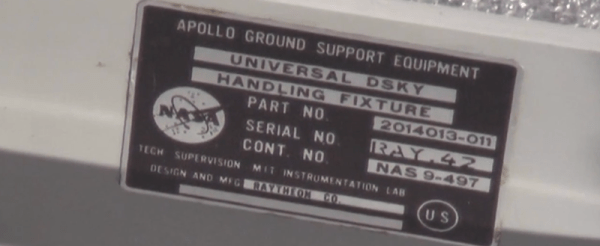
This is a project that is about a year and a half in the making, but [Fran] is finally digging into the most iconic part of the Apollo Guidance Computer and building the most accurate reproduction DSKY ever.

The Apollo Guidance Computer was a masterpiece of engineering and is frequently cited as the beginning of the computer revolution, but it didn’t really look that interesting – it looks like a vastly overbuilt server blade, really. When everyone thinks about the Apollo Guidance Computer, they think about the DSKY, the glowey keypad interface seen in the blockbuster hit Apollo 13 and the oddly accurate disappointment of Apollo 18. It’s the part of the Apollo Guidance Computer the Apollo astronauts actually interacted with, and has become the icon of the strange, early digital computers developed for NASA in the 60s.

There are a few modern DSKY replicas, but all of them are exceedingly anachronistic; all of these reproductions use seven-segment LEDs, something that didn’t exist in the 1960s. A true reproduction DSKY would use custom electroluminescent displays. These EL segments are powered by AC, and transistors back then were terrible, leading to another design choice – those EL segments were turned on and off by relays. It’s all completely crazy, and aerospace equipment to boot.

Because of the custom design and engineering choices that seem insane to the modern eye, there isn’t much in the way of documentation when it comes to making a reproduction DSKY. This is where [Fran] tapped a few of the contacts her historical deconstruction cred earned when she reverse engineered a Saturn V Launch Vehicle Digital Computer to call upon anyone who would have access to a real Apollo-era DSKY.

The first contact was the Kansas Cosmosphere who was kind enough to send extremely detailed photographs of the DSKYs in their archives. It would have been extremely nice to have old documentation made when the DSKYs were rolling off the assembly line, but that information is locked away in a file cabinet owned by Raytheon.

[Fran] got a break when she was contacted by curators at the National Air and Space Museum’s Garber facility who invited her down to DC. She was given the grand tour, including the most elusive aircraft in the museum’s collection, the Ho 229, the dual-turbojet Nazi flying wing. At the Garber facility, [Fran] received permission to take apart two DSKYs.

The main focus of [Fran]’s expedition to the Air and Space Museum was to figure out how the EL displays were constructed. The EL displays that exist today are completely transparent when turned off because of the development of transparent conductors.

The EL displays in the DSKY were based on earlier night lights manufactured by Sylvania. After looking at a few interesting items that included Gemini hardware and early DSKYs, this sort of construction was confirmed.

With a lot of pictures, a lot of measurements, a lot of CAD work, and some extremely tedious work, [Fran] was able to create the definitive reference for DSKY display elements. There are 154 separate switchable element in the display, all controlled by relays. These elements are not multiplexed; every element can be turned on and off individually.

Figuring out how the elements were put together was only one part of [Fran]’s research. Another goal was to figure out the electrical connections between the display and the rest of the DSKY. There, [Fran] found 160 gold pins in a custom socket. It’s bizarre, and more like a PGA socket than like the backplane connector [Fran] found in the Saturn V computer.

Even though [Fran]’s research was mostly on the EL panel inside the display, she did get a few more insights with her time with the DSKYs. The buttons are fantastic, and the best keys she’d ever used. This is just part one of what will be an incredibly involved project, and we’re looking forward to what [Fran] looks into next.

Boeing 777 From Manilla Folders, A 6+ Year Effort

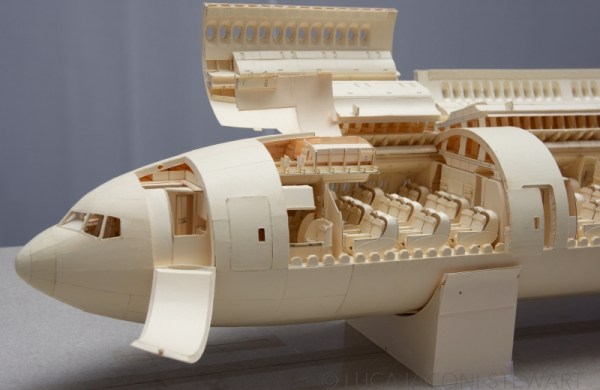
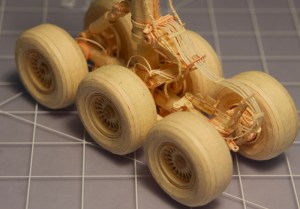
The closer you look the more you will be in awe of this shockingly intricate 777 replica. The fully-articulating landing gear alone has over 2,000 parts and 200 hours of assembly, not even including the penny-sized tires with individually-cut lug nuts. All carved from manilla office folders by hand.

HAD - 777 WingA high school art architecture class in 2008 inspired this build by teaching a few papercrafting techniques. When [Luca] got a hold of a precision Air India 777-300ER schematic, he started building this 5 foot long 1:60 scale model. His project has received a fair amount of media attention over the years, including some false reports that he was so focused on the build that he dropped out of college (he did, for 2 years, but for other reasons). 6.5 years in the making, [Luca] is rounding the homestretch.

HAD - 777 GearThe design is manually drawn in Illustrator from the schematics, then is printed directly onto the manilla folders. Wielding an X-acto knife like a watch-maker, [Luca] cuts all the segments out and places them with whispers of glue. Pistons. Axles. Clamps. Tie rods. Brackets. Even pneumatic hoses – fractions of a toothpick thin – are run to their proper locations. A mesh behind the engine was latticed manually from of hundreds of strands. If that was not enough, it all moves and works exactly as it does on the real thing.
Continue reading “Boeing 777 From Manilla Folders, A 6+ Year Effort”

Laser Cut Arc Reactor Replica

laser-cut-arc-reactor

We’re starting to become a repository for Arc Reactor replica projects. The one shown above uses mostly laser cut components. We missed it back in May when [Valentin Ameres] tipped us off the first time. But he sent it in again after seeing the 3D printed version earlier this month.

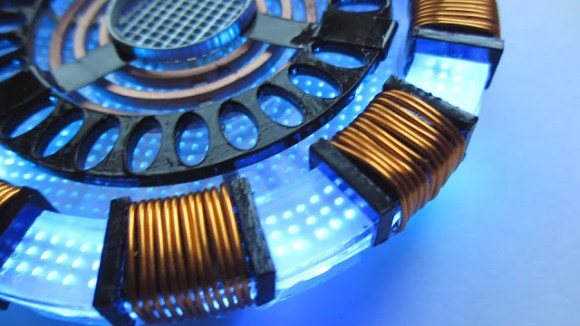
Our biggest gripe is that we don’t have our own laser cutter to try this out on. Everything has been cut from 2mm thick acrylic. The black, silver, and copper colored components were painted to achieve this look. Many of the clear parts also had a dot matrix etched into them to help with light diffusion.

Basic assembly just required the parts be glued together. The finishing touches include wire-wrapping the slots of the outer ring and adding LEDs and current limiting resistors.

The plans are not freely available, but the 3D printed version linked above doubles as a 123D tutorial. That should help get you up to speed designing your own if you are lucky enough to have time on laser cutter.

Continue reading “Laser Cut Arc Reactor Replica”

3D Printed Arc Reactor Replica

3d-printed-arc-reactor-replica

[James] just keeps cranking on the idea of the perfect arc reactor replica. This time around he’s made most of the parts using a 3D printer. His write-up covers the basics of the build, but he also used this opportunity to make some tutorial videos on designing the parts using Autodesk 123D.

This is definitely an improvement on his last prop, which was built out of dollar store parts. When designing the components he tried to be as true to the original movie design as possible, while keeping in mind the limitations of using a home 3D printer; he printed them on a Lolzbot AO-101.

The videos below give you a good idea of what it’s like to model parts using 123D. The tool set is pretty simple compared to something like Blender 3D. But [James] uses them in such a way that the components get complex fairly quickly. The second video includes some footage of the parts being printed, as well as the assembly process that adds wrapped wire for looks, and LEDs for illumination.

Continue reading “3D Printed Arc Reactor Replica”

Predator Suit For Monsterpalooza Includes Over-engineered Shoulder Cannon

off-the-hook-predator-suit

This Predator suit was premiered at this year’s Monsterpalooza conference. It’s nothing short of incredible. But the shoulder cannon is really what caught our attention. The thing is fully motorized and includes sound and light firing effects.

We saw a glimpse of what [Jerome Kelty] is capable of about two years ago. He was showing off an Arduino-based animatronics platform he put together for a Predator shoulder cannon that tracked based on where the predator’s helmet was pointing. But other than a video demonstration there wasn’t much info on the that actual build. This post makes up for that and then some.

A replica of this quality is rarely the work of just one person. A team of fans joined in to make it happen. After getting the molded parts for the backpack and canon from another team member [Jerome] set out to fit the support structure, motors, and control electronics into the space available. That meant a ton of milling, cutting, and shaping parts like the support arm seen above which integrates a servo motor into its rectangular outline. All of the controls fit in the backpack, with cables running to the helmet, as well as the cannon.

Continue reading “Predator Suit For Monsterpalooza Includes Over-engineered Shoulder Cannon”