A Lightsaber, With Rave Mode

How often after being exposed to Star Wars did you dream of having your own working lightsaber? These days — well, we don’t quite have the technology to build crystal-based weapons, but tailor-made lightsabers like redditor [interweber]’s are very much real.

Piggybacking off the Korbanth Graflex 2.0 kit — a sort of bare-bones lightsaber ready to personalize — [interweber] is using a Teensy 3.5 to handle things under the hilt. Instead of taking the easy route and cramming everything into said handle, a 3D printed a cradle for the electronics and speaker keep things secure. The blade is made up of two meters of APA102 LEDs.

As well as all the sound effects appropriate to ‘an elegant weapon for a more civilized age’, a cluster of buttons handle the various functions; , playing and cycling through music(more on that in a second), changing the color of the lightsaber — Jedi today, Sith tomorrow — enabling a flickering effect that mimics Kylo Ren’s lightsaber, color cycling, and a…. rave mode?

Continue reading “A Lightsaber, With Rave Mode”

Flux Capacitor Prop With Christopher Lloyd’s Stamp Of Approval

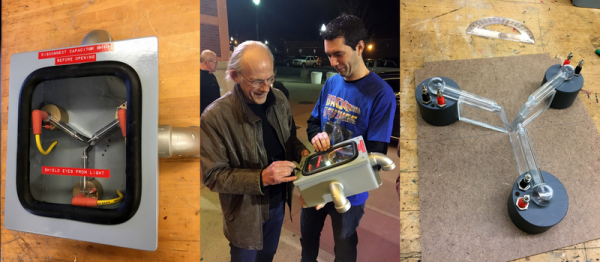
We love our props here at Hackaday, and whenever we come across a piece from the Back To The Future fandom, it’s hard to resist showcasing it. In this case, [Xyster101] is showing of his build of Doc Brown’s Flux Capacitor.

[Xyster101] opted for a plywood case — much more economical than the $125 it would have cost him for a proper electrical box. Inside, there’s some clever workarounds to make this look as close as possible to the original. Acrylic rods and spheres were shaped and glued together to replicate the trinity of glass tubes, 3/4″ plywood cut by a hole saw mimicked the solenoids, steel rods were sanded down for the trio of points in the centre of the device and the spark plug wires and banana connectors aren’t functional, but complete the look. Including paint, soldering and copious use of hot glue to hold everything in place, the build phase took about thirty hours.

The LEDs have multiple modes, controlled by DIP switches hidden under a pipe on the side of the box. There’s also motion sensor on the bottom of the case that triggers the LEDs to flicker when you walk by. And, if you want to take your time-travel to-go, there’s a nine volt plug to let you show it off wherever — or whenever — you’re traveling to. Check out the build video after the break.

Continue reading “Flux Capacitor Prop With Christopher Lloyd’s Stamp Of Approval”

Replica Fallout Terminal

If you’ve played Fallout 4, you’re familiar with the wall-mounted terminals in the game. They’ve got a post-apocalyptic aesthetic and the glowing green screen that calls out to anyone that grew up with computers and hacker movies from the 80s and 90s. Remember the first time you set your command line text to green? Don’t be embarrassed, we were all young once.

[PowerUpProps] liked the Fallout terminal so much they developed a replica. It’s a build that leans heavily on maker standards, a Raspberry Pi and 3D printing form the basis of the terminal. With ready access to such powerful tools, it makes starting such a project much more approachable. The key to the success of this build is the fine attention to detail in the finishing – the paint job looks incredible, and when photographed appropriately, it could be mistaken for the real thing an in-game screenshot.

An interesting touch is the use of a dark green acrylic window in front of the LCD, which gives the display a tinted hue. We’d like to see this compared with a clear glass window with a classic fishbowl curve to it, combined with greening up in software. The creator readily admits that this looks great at the command line, but is somewhat of a letdown when using the GUI.

Perhaps the only thing the prop build could use is some sort of user interface — the keyboard is only 3D printed and there’s no mouse or other pointing device included. There are some creative solutions to this problem, which we often see in other Fallout projects, like the ever popular Pip-Boy replica builds.

[Thanks to Sjoerd for the tip!]

Building A Replica Of An Ultraluxury Watch

In the world of late-stage capitalism, unchecked redistribution of wealth to the upper classes has led to the development of so-called ultraluxury watches. Free from any reasonable constraints on material or R&D cost, manufacturers are free to explore the outer limits of the horological art. [Karel] is an aspiring engineer and watch enthusiast, and has a taste for the creations of Urwerk. They decided to see if they could create a replica of the UR202 watch with nothing more than the marketing materials as a guide.

[Karel]’s first job was to create a model of the watch in CAD. For a regular watch this might be simple enough, but the UR202 is no run-of-the-mill timepiece. It features a highly irregular mechanism, full of things like a turbine regulated winding mechanism, telescoping rods instead of minute hands, and tumbling rotors to indicate the hours. The official product sheet bears some of these features out. Through careful analysis of photos and watching videos frame-by-frame, they managed to recreate what they believe to be a functioning mechanical model within their CAD software.

It was then time to try and build the timepiece for real. It was then that [Karel] started hitting some serious stumbling blocks. As a humble engineering student, it’s not often possible to purchase an entire machine shop capable of turning out the tiny, precision parts necessary to make even a basic watch mechanism. Your basic 3D printer squirting hot plastic isn’t going to cut it here. Farming out machining wasn’t an option as the cost would be astronomical. [Karel] instead decided on combining a Miyota movement with a machined aluminum base plate and parts 3D printed using a process known as “Multijet Modelling” which essentially is an inkjet printhead spitting out UV curable polymer.

In the end, [Karel] was able to get just the tumbling hour indicator working. The telescoping minute hand, compressed air turbine winding system, and other features didn’t make it into the build. However, the process of simulating these features within a CAD package, as well as manufacturing a semi-functional replica of the watch, was clearly a powerful learning experience. [Karel] used their passion to pursue a project that ended up giving them a strong grasp of some valuable skills, and that is something that is incredibly rewarding.

We’ve seen others trying to fabricate parts of a wristwatch at home. Keep your horological tips coming in!

[Thanks to Str Alorman for the tip!]

Soviet-Era Tank Gets The 3D Printed Treatment

3D printers are celebrated for their capacity to replace missing or broken parts. How about an entire T-62 tank?

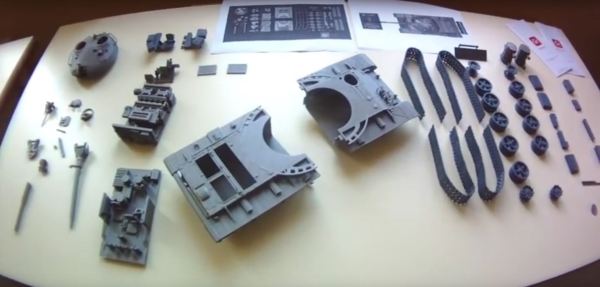
Now hold on a second — this is only a model replica. It is, however another expression of the myriad uses for 3D printers. Designed in Maya and requiring almost three weeks to print all 62 parts from about 70 meters of PLA filament.  The assembly is not terribly involved, made easier by printing a few large sections such as the crew section and hull while the parts don’t get much smaller than the turret hatches. Nonetheless, he final product is about as true to life as you can get when designing the parts from scratch.

Continue reading “Soviet-Era Tank Gets The 3D Printed Treatment”

Build A Replica Apple ///

[Mr. Name Required] pointed us to a great video on the modeling of a replica Apple /// to the small scale needed to contain a Raspberry Pi by [Charles Mangin].

[Mr. Name] pointed out that the video was a great example of the use of reference photos for modeling. [Charles] starts by finding the references he needs for the model. Google image search and some Apple history websites supplied him with the required images.

He modeled the Apple /// in Autodesk 123. It has sketch tools, but he chose to craft the paths in iDraw and import them into the software. This is most likely due to the better support for boolean combination tools in vector editing software. Otherwise he’d have to spend hours messing with the trim tool.

Later in the video he shows how to change the perspective in photographs to get a more orthographic view of an object. Then it’s time for some heavy modeling. He really pushes 123 to its limit.

The model is sent off for professional 3D printing to capture all the detail. Then it’s some finishing work and his miniature Apple /// is done. Video after the break.

Continue reading “Build A Replica Apple ///”

Mein Enigma

The World War II German Enigma encoding machine is something of an icon in engineering circles not just for its mechanical ingenuity but for the work of the wartime staff at Bletchley Park in decoding its messages. Without it we would not have had Colossus, the first programmable digital electronic computer, and subsequent technological developments might have taken a slower pace towards what we take for granted today.

Sadly for the Enigma enthusiast though, real machines are now few and far between. Our grandparents’ generation saw to that through the chaos and bombing of the fight across Europe. If you want to handle one you will have to either have an outrageous amount of money, work for a museum, or maybe for the GCHQ archivist.

This has not stopped our community building Enigma replicas, and the latest one to come to our attention here at Hackaday shows some promise. [lpaseen]’s meinEnigma is an electronic Enigma driven by an Arduino Nano, with rotary encoders to represent the Enigma rotors and multi-segment alphanumeric displays standing in for the lighted letters in the original. It supports all the different variations of rotors from the original in software, has a physical plugboard, and a serial port over USB through which all machine functions can be controlled. The machine as it stands is a fully working prototype, the plan is that a final machine will resemble the original as closely as possible.

All the code used in the project can be found on GitHub, along with [lpaseen]’s Arduino library for the Holtek HT16K33 keyboard/display chip used to handle those tasks.

We’ve featured a few Enigma machines on Hackaday over the years. One was built into a wristwatch, another into a hacked child’s toy, but the closest in aim to [lpaseen]’s offering is this rather attractive replica also driven by an Arduino. It is also worth mentioning that should your travels ever take you to Buckinghamshire you can visit the Bletchley Park Museum and neighboring  National Museum of Computing, to get the Enigma and Colossus story from the source.