Thumbs Up For This CRT Handheld Gaming Console

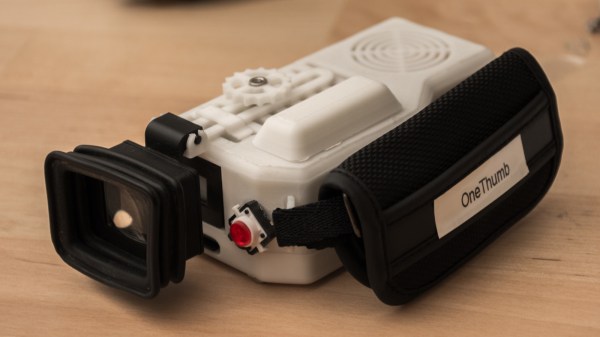
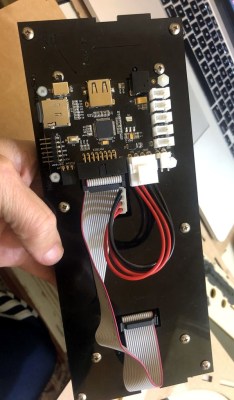
Despite all the progress video game graphics have made, it is safe to say that we won’t see any decline in oldschool 8-bit games any time soon. For some it’s about nostalgia, for others it’s just a great and simple-enough first step into game development itself. For [gocivici] it was a bit of both when he built this camcorder style, one-button gaming console.

With a Raspberry Pi Zero running PICO-8 at its core, [gocivici] salvaged the viewfinder of an old camcorder for the display, and that way turned it into a whole other kind of handheld console. For full ergonomic handling, one single, thumb-operated push button serves as only control option. This of course makes it a bit challenging to re-use existing games that would require more input options, so he and some friends decided to just write a suitable game on their own with the hopes that others might follow.

Unfortunately we don’t see a lot of projects using these old camcorder viewfinders, and considering modern LCD and OLED options it’s not really that surprising, but there’s just something intriguing about these tiny CRTs. So in case you want to see more of them, have a look at this tiny Atari display, and the DIY night vision monocle from a few years back. And to keep your eyes safe and sound, [gocivici] got you covered as well.

Continue reading “Thumbs Up For This CRT Handheld Gaming Console”

Arcade With LED Marquee Shows Off Your Game

We’ve seen a lot of arcade machine builds here on Hackaday. Seriously, a lot. Even more so since the Raspberry Pi took over the world and made it so you didn’t have to cannibalize an old laptop to build one anymore. It’s one of those projects with huge appeal: either you’re somebody who’s built their own arcade, or you’re somebody who wishes they had. But even after seeing all these builds, we occasionally come across a specimen that deserves special recognition.

LED display controller

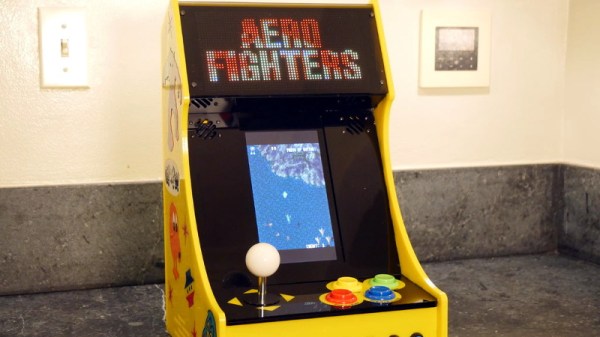
[Al Linke] recently wrote in to tell us about his arcade build, which we think you’ll agree is worth a closer look. The core build is actually a modification of a previously published design, but what makes this one unique is the addition of a programmable LED matrix in the top that actually shows the logo and artwork for whatever game you’re currently playing. This display really helps sell the overall look, and instantly makes the experience that much more authentic. Sure you don’t need the marquee of your home arcade machine to show era-appropriate artwork…but we know you want it to.

So how does one interface their Raspberry Pi with this beautiful 64×32 LED marquee display? Well it just so happens that [Al] is in the business of making cool LED displays, and even has a couple successful Kickstarter campaigns under his belt to prove it. He’s developed a board that lets you easily connect up to low-cost HUB75 LED panels such as the one used in the arcade. It’s been a few years since we’ve last seen a project that tackled these specific LED displays, and it’s encouraging to see how far things have come since then.

Even if you’re somehow not in love with the LED marquee, this build really does stand on its own as a fantastic example of a desktop arcade machine. [Al] went to great length to document his build, including putting together several videos during different phases of construction. If you’re curious about the start of the art for home arcade builds, this project would be a pretty good one to use as a barometer.

Whether it’s a full-size replica of the machine you spent your youth standing in front of, or an entirely new design made to your exacting specifications, there’s few projects that are a better conversation starter than one of these beauties blinking away in your living room.

Continue reading “Arcade With LED Marquee Shows Off Your Game”

Raspberry Pi Breathes Life Into A Scale Model SEGA

Miniature game consoles are all the rage right now. Many of the big names in gaming are releasing their own official “mini” versions of their classic machines, but naturally we see plenty of DIY builds around these parts as well. Generally they’re enclosed in a 3D printed model of whatever system they’re looking to emulate, but as you might expect that involves a lot of sanding and painting to achieve a professional look.

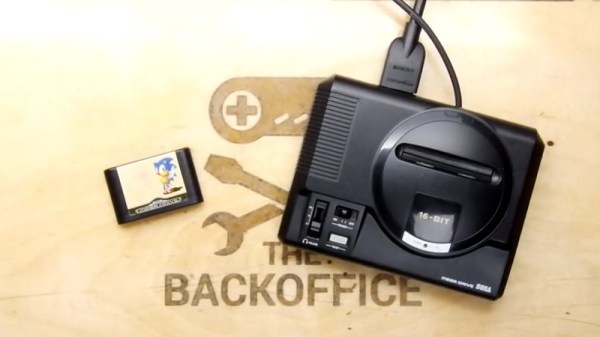
But for SEGA Genesis (or Mega Drive as it was known outside the US) fans, there’s a new option. A company by the name of Retro Electro Models has released a high-fidelity scale model of SEGA’s classic console, so naturally somebody hacked it to hold a Raspberry Pi. Wanting to do the scale detailing of the model justice, [Andrew Armstrong] went the extra mile to get the power button on the front of the console working, and even added support for swapping games via RFID tags.

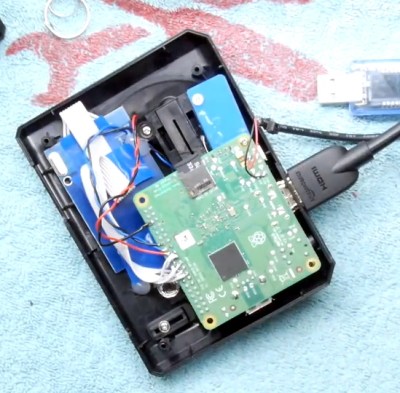
[Andrew] uses the Raspberry Pi 3 A+ which ended up being the perfect size to fit inside the model. Fitting the Pi Zero would have been even easier, but it lacks the horsepower of its bigger siblings. The RFID reader is connected to the Pi over SPI, and the reed switch used to detect when the power switch has been moved is wired directly to the GPIO pins. The system is powered by a USB cable soldered directly to Pi’s PCB and ran out a small hole in the back of the case.

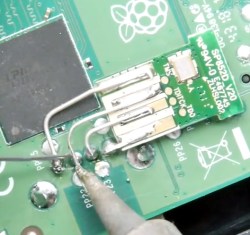
For input, [Andrew] is using a small wireless keyboard that includes a touch pad and gaming controls. Unfortunately, it has a proprietary receiver which had to be integrated into the system. In a particularly nice touch, he used snipped off component leads to “wire” the receiver’s PCB directly to the pins of the Pi’s USB port. Not only does it look cool, but provides a rigid enough connection that he didn’t even need to glue it down to keep it from rattling around inside the case. Definitely a tip to keep in the back of your mind.

The software side of this project is about what you’d expect for an emulation console, though with the added trickery of loading games based on their RFID tag. At this point [Andrew] only has a single “cartridge” for the system, so he simply drops the tags into the cartridge slot of the console to load up a new title. It doesn’t look like Retro Electro Models is selling loose cartridges (which makes sense, all things considered), so there might still be a job for your 3D printer yet if you want to have a library of scale cartridges to go with your console.

For those of you who were on Team Nintendo in the 1990’s, we’ve seen a similar build done with a 3D printed case. Of course, if even these consoles are a bit too recent for your tastes, you could build a miniature Vectrex instead.

Continue reading “Raspberry Pi Breathes Life Into A Scale Model SEGA”

Death Generator Makes Game Over More Personal

“Game over”. In this day and age of complex games with storylines and career modes that last for tens of hours, it’s not really a concept that has a lot of relevance. However, in the golden age of the arcade, those two words made it very clear that your time was up and it was time to find another quarter. Home games of this era were similarly blunt, and if you couldn’t rise to the challenge, you’d be seeing the death screen more often than not.

[foone] was a fan of Sierra’s classic adventure games, and decided to create a tool to generate custom versions of these Game Over/YOU DIED screens. Aptly named Death Generator, the tool is programmed in JavaScript and quickly expanded to cover a wide realm of classic titles. There are King’s Quest IV and V, Gold Rush!, and even modern titles like Cave Story+ and Undertale. There’s plenty of fun to be had typing in completely ridiculous quotes for various screens; our personal favourite is Skate or Die, though Police Quest comes a close second.

[foone] continues to maintain the site, and adds new games from time to time. Animated GIF support has been a recent addition for screens like Metroid and Bad Dudes, and there are even character choices for Super Mario Bros. The code is available on Github if you feel the need to tinker yourself.

SNES Controller Has A Pi Zero In The Trunk

We’re no stranger to seeing people jam a Raspberry Pi into an old gaming console to turn it into a RetroPie system. Frankly, at this point it seems like we’ve got to be getting close to seeing all possible permutations of the concept. According to the bingo card we keep here at Hackaday HQ we’re just waiting for somebody to put one into an Apple Bandai Pippin, creating the PiPi and achieving singularity. Get it done, people.

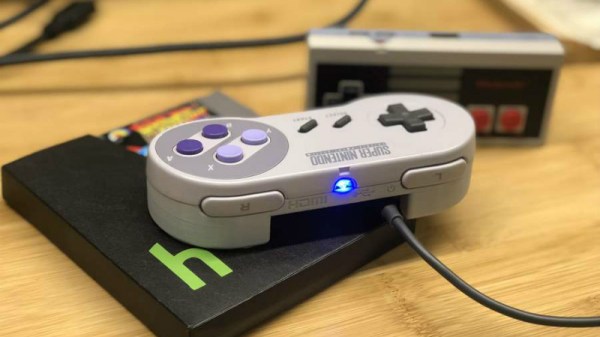
That being said, we’re still occasionally surprised by what people come up with. The Super GamePad Zero by [Zach Levine] is a fairly compelling take on the Pi-in-the-controller theme that we haven’t seen before, adding a 3D printed “caboose” to the stock Super Nintendo controller. The printed case extension, designed by Thingiverse user [Sigismond0], makes the controller about twice as thick, but that’s still not bad compared to modern game controllers.

In his guide [Zach] walks the reader through installing the Raspberry Pi running RetroPie in the expanded case. This includes putting a power LED where the controller’s cable used to go, and connecting the stock controller PCB to the Pi’s GPIO pins. This is an especially nice touch that not only saves you time and effort, but retains the original feel of the D-Pad and buttons. Just make sure the buttons on your donor controller aren’t shot before you start the build.

Adding a little more breathing room for your wiring isn’t the only reason to use the 3D printed bottom, either. It implements a very clever “shelf” design that exposes the Pi’s USB and HDMI ports on the rear of the controller. This allows you to easily connect power and video to the device without spoiling the overall look. With integrated labels for the connectors and a suitably matching filament color, the overall effect really does look like it could be a commercial product.

The SNES controller is an especially popular target for hacks and modifications. From commercially available kits to the wide array of homebrew builds, it there’s plenty of people who want to keep this legendary piece of gaming gear going strong into the 21st century

Continue reading “SNES Controller Has A Pi Zero In The Trunk”

Bring Your Own Controller Kits Just Add Bluetooth

Known for their build quality and low latency, the [8bitdo] line of Bluetooth controllers are generally well liked among classic videogame devotees. They match modern conveniences like rechargeable batteries and Bluetooth connectivity with old school color schemes and the tried-and-true feel of a D-pad. All of their current offerings are modeled to invoke the same feel of console controllers of the past, however, for some there is no substitute for the original. For that type of hobbyist, the company created DIY Bluetooth mod kits in the form of drop-in replacement PCBs.

The featured mod kits are for the original NES controller, SNES controller, and 6-button Genesis Controller. They feature a 180 mAh Li-ion battery for an estimated 7.5 hours of gameplay, and a unique barrel plug type USB charging cable. The charging port fills the void left by the controller’s connection cable and also doubles a the LED status indicator. Though for the Sega Genesis mod kit, the charge port changes to a standard micro USB.

The [8bitdo] website boasts compatibility across Android, Linux, Mac, and Windows (drivers permitting) and even Nintendo Switch. With the addition of one of the company’s Retro Receivers, you are able to use the controllers on the original NES or SNES alongside their contemporary NES/SNES classic console counterparts.

Continue reading “Bring Your Own Controller Kits Just Add Bluetooth”

Circuit-Sword Delivers Retro Justice

You can’t search for “retro gaming” without hitting a plethora of single board computers attached to all manner of controls, batteries, etc. Often these projects have an emphasis on functionality above all else but [Kite]’s Circuit-Sword is different. The Circuit-Sword is the heart of a RaspberryPi-based retro gaming machine with an enviable level of fit and finish.

Fundamentally the Circuit-Sword is a single board computer built around a Raspberry Pi Compute Module 3. We don’t see many projects which use a Compute Module instead of the full Pi, but here it is a perfect choice allowing [Kite] to useful peripherals without carrying the baggage of those that don’t make sense for a portable handheld (we’re looking at you, Ethernet). The Circuit-Sword adds USB-C to quickly charge an onboard LiPo (rates up to 1.5A available) and the appropriate headers to connect a specific LCD. The Compute Module omits wireless connectivity so [Kite] added an SDIO WiFi/Bluetooth module. And if you look closely, you may notice an external ATMega mediating a familiar looking set of button and switches.

Optional Drill Holes

We think those buttons and switches are the most interesting thing going on here, because the whole board is designed to fit into an original GameBoy enclosure. It turns out replacement enclosures are available from China in surprising variety (try searching for “gameboy housing”) as are a variety of parts to facilitate the installation of different screen options and more. One layer deeper in the wiki there are instructions for case mods you may want to perform to make everything work optimally. The number of possible options the user can mod-in are wide. Extra X/Y buttons? Shoulder buttons on the back? Play Station Portable-style slide joysticks? All detailed. For even more examples, try searching the SudoMod forums. For example, here’s a very visual build log by user [DarrylUK].

The case mod instructions are worth a glance even if you have no intent to build a device. There are some clever techniques to facilitate careful alignment of buttons and accurate hole drilling. Predicting their buyers might want a variety of options, [Kite] added reference drill holes in the PCB for the builder to re-drill for mounting buttons or joysticks. To facilitate adding status LEDs externally there is a tiny PCB jig included. There are even instructions for adding a faux game cartridge for the complete look.

If you want to buy one (we certainly do!) [Kite] does group buys periodically. Check out the wiki for links to the right interest form.

Thanks [Speednut Dave] for the tip!