CNC Embroidery Machine Punches Out Designs A Stitch At A Time

It’s doubtful that the early pioneers of CNC would have been able to imagine the range of the applications the technology would be used for. Once limited to cutting metal, CNC machines can now lance through materials using lasers and high-pressure jets of water, squirt molten plastic to build up 3D objects, and apparently even use needle and thread to create embroidered designs.

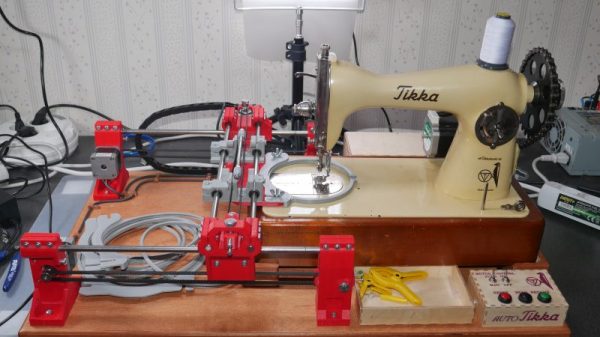
It may not seem like a typical CNC application, but [James Kolme]’s CNC embroidery machine sure looks familiar. Sitting in front of one of the prettiest sewing machines we’ve ever seen is a fairly typical X-Y gantry system. The stepper-controlled gantry moves an embroidery hoop under the needle of the sewing machine, which is actually the Z-axis of the machine. With the material properly positioned, a NEMA 23 stepper attached to the sewing machine through a sprocket and drive chain makes a stitch, slowly building up a design. Translating an embroidery pattern to G-code is done through Inkstitch, and extension to Inkscape. [James]’ write-up is great, and the video below shows it in action.

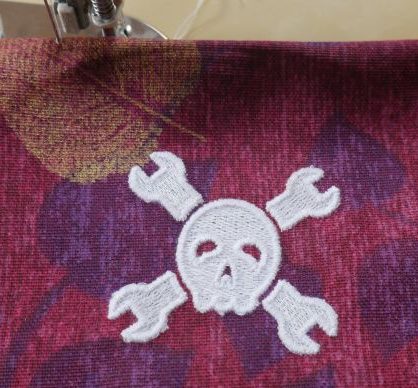
We’ve seen a CNC embroidery machine or two before, but our conspicuously non-embroidered hat is off to [James] on this one for its build quality and documentation. And the embroidered Jolly Wrencher doesn’t hurt either.

Continue reading “CNC Embroidery Machine Punches Out Designs A Stitch At A Time”

Restoring An Apollo Guidance Computer

The Apollo Guidance Computer is a remarkably important piece of computing history. It’s the computer that guided the Apollo lander to land on the moon. We’ve seen a few replica builds over the years, but [CuriousMarc] got a closer look at one of the real things. In this video, [Marc] gets a look inside as his colleagues take apart one of the original AGCs and get a closer look at the insides of this piece of computer history.  Continue reading “Restoring An Apollo Guidance Computer”

Generative Design Algorithms Prepare For Space

NASA is famously risk-averse, taking cautious approaches because billions of taxpayer dollars are at stake and each failure receives far more political attention than their many successes. So while moving the final frontier outward requires adopting new ideas, those ideas must first prove themselves through a lengthy process of risk-reduction. Autodesk’s research into generative design algorithms has just taken a significant step on this long journey with a planetary lander concept.

It was built jointly with a research division of NASA’s Jet Propulsion Laboratory, the birthplace of many successful interplanetary space probes. This project got a foot in the door by promising 30% weight savings over conventional design techniques. Large reduction in launch mass is always a good way to get a space engineer’s attention! Mimicking mother nature’s evolutionary process, these algorithms output very organic looking shapes. This is a relatively new approach to design optimization under exploration by multiple engineering software vendors. Not just Autodesk’s “Generative Design” but also “Topology Optimization” in SolidWorks, plus others. Though these shapes appear ideally suited to 3D printing, Autodesk also had to prove their algorithm could work with more traditional fabrication techniques like 5-axis CNC mills.

This is leading-edge research technology though some less specialized, customer-ready versions are starting to trickle out of research labs. Starting with an exclusive circle: People with right tiers of SolidWorks license, the paid (not free) tier of Autodesk Fusion 360, etc. We’ve looked at another recent project with nontraditional organic shapes, and we’ve looked at generative designs used for their form as well as their function. This category of CAD tools hold a lot of promise, and we’re optimistic they’ll soon become widely accessible so we can all put them to good use in our earthbound projects.

Possibly even before they fly to another planet.

[via Engadget]

Meat-Seeking Raspberry Pi Leads You To Flavortown

[Patrick McDavid] and his wife had a legitimate work-related reason for writing some Python code that would pull the exact latitude and longitude of the individual locations within a national retain chain from Google’s Geocoding API. But don’t worry about that part of the story. What’s important now is that this simple concept was then expanded into a pocket-sized device that will lead the holder to the nearest White Castle or Five Guys location.

The device, which [Patrick] lovingly referrers to as the “Cheeseburger Compass”, uses a Raspberry Pi 3, an Adafruit 16×2 LCD with keypad, a GPS module, and the requisite battery and charger circuit to make it mobile. With the coordinates for the various places one can obtain glorious artery clogging meat circles loaded up, the device will give the user the cardinal direction and current distance from the nearest location of the currently selected chain.

[Patrick] has published the source code for this meat-seeking gadget on GitHub, but notes that most of it is just piecing together existing libraries and tools. As with many Python projects, it turns out there’s already a popular library to do whatever it is you were trying to do manually, so his early attempts at calculating distances and bearings were ultimately replaced with turn-key solutions. Though he did come up with a quick piece of code that would convert a compass heading in degrees to a cardinal direction that he couldn’t find a better solution for. Maybe he should make it a library…

Sadly the original Cheeseburger Compass got destroyed from being carried around so much, but at least it died doing what it loved. [Patrick] says a second version of the device would likely switch over to a microcontroller rather than the full Raspberry Pi experience, as it would make the device much smaller and greatly improve on the roughly two hour battery life.

This project reminds us of the various geocache devices we’ve covered in the past, but with the notable addition of hot sizzling meat. Talk about improving on a good thing.

Vintage Rotary Phone Turned Virtual Assistant

Like many of us, [Zoltan Toth-Czifra] has completely embraced 21st century living. His home is awash in smart gadgets and dodads, from color changing light bulbs to Internet-connected cameras. But he’s also got a soft spot for the look and feel of vintage hardware, like the rotary phone he keeps kicking around to remind him of the old days. He recently decided to bridge these two worlds by turning the rotary phone into a modern voice controlled assistant.

The first piece of the puzzle was getting the old school phone connected to something a bit more modern, namely a Raspberry Pi. He didn’t want to hack the vintage phone apart, so he picked up a Grandstream HT801, an adapter that’s used to convert analog telephones to VoIP. [Zoltan] says this model specifically fit the bill as it had a function that allows you to configure a number to dial as soon the phone is lifted off the hook. This allows the user to just pick up the phone and start talking without having to dial anything manually. If you’re looking to pull off a similar setup, you should check to make sure the adapter has this function before pulling the trigger.

With the rotary phone now talking a more modern protocol, [Zoltan] just needed to get the Raspberry Pi side sorted out. He installed a SIP server so it could communicate with the HT801 adapter, and then got to work putting together his virtual assistant. Rather than plug into an existing system, he rolled his own by combining open source packages for controlling his various smart devices with the aptly named SpeechRecognition library for Python.

Right now he’s only programmed a few commands that his system can respond to for controlling his lights and music, but mentions that the system is modular enough that he can add new functions easily. He’s put the source for his virtual assistant framework up on GitHub, which he notes was written in less than 200 lines of original code by virtue of utilizing existing libraries for a lot of the heavy lifting. Open source is a beautiful thing.

In the past we’ve seen rotary phones go mobile thanks to GSM upgrades and dragged kicking and screaming onto the modern phone network with a built-in Raspberry Pi. But we think there’s something especially appealing about the approach [Zoltan] took which preserves the phone’s original hardware.

Continue reading “Vintage Rotary Phone Turned Virtual Assistant”

SNES Controller Has A Pi Zero In The Trunk

We’re no stranger to seeing people jam a Raspberry Pi into an old gaming console to turn it into a RetroPie system. Frankly, at this point it seems like we’ve got to be getting close to seeing all possible permutations of the concept. According to the bingo card we keep here at Hackaday HQ we’re just waiting for somebody to put one into an Apple Bandai Pippin, creating the PiPi and achieving singularity. Get it done, people.

That being said, we’re still occasionally surprised by what people come up with. The Super GamePad Zero by [Zach Levine] is a fairly compelling take on the Pi-in-the-controller theme that we haven’t seen before, adding a 3D printed “caboose” to the stock Super Nintendo controller. The printed case extension, designed by Thingiverse user [Sigismond0], makes the controller about twice as thick, but that’s still not bad compared to modern game controllers.

In his guide [Zach] walks the reader through installing the Raspberry Pi running RetroPie in the expanded case. This includes putting a power LED where the controller’s cable used to go, and connecting the stock controller PCB to the Pi’s GPIO pins. This is an especially nice touch that not only saves you time and effort, but retains the original feel of the D-Pad and buttons. Just make sure the buttons on your donor controller aren’t shot before you start the build.

Adding a little more breathing room for your wiring isn’t the only reason to use the 3D printed bottom, either. It implements a very clever “shelf” design that exposes the Pi’s USB and HDMI ports on the rear of the controller. This allows you to easily connect power and video to the device without spoiling the overall look. With integrated labels for the connectors and a suitably matching filament color, the overall effect really does look like it could be a commercial product.

The SNES controller is an especially popular target for hacks and modifications. From commercially available kits to the wide array of homebrew builds, it there’s plenty of people who want to keep this legendary piece of gaming gear going strong into the 21st century

Continue reading “SNES Controller Has A Pi Zero In The Trunk”

High Voltage Measurement Is Shockingly Safe

With the right equipment and training, it’s possible to safely work on energized power lines in the 500 kV range with bare hands. Most of us, though, don’t have the right equipment or training, and should take great care when working with any appreciable amount of voltage. If you want to safely measure even the voltages of the wiring in your house there’s still substantial danger, and you’ll want to take some precautions like using isolated amplifiers.

While there are other safe methods for measuring line voltage or protecting your oscilloscope, [Jason]’s isolated amplifier method uses high voltage capacitors to achieve isolation. The input is then digitized, sent across the capacitors, and then converted back to an analog signal on the other side. This project makes use of a chip from TI to provide the isolation, and [Jason] was able to build it on a perfboard while making many design considerations to ensure it’s as safe as possible, like encasing high voltage sections in epoxy and properly fusing the circuit.

[Jason] also discusses the limitations of this method of isolation on his site, and goes into a lot of technical details about the circuit as well. It probably wouldn’t get a UL certification, but the circuit performs well and even caught a local voltage sag while he was measuring the local power grid. If this method doesn’t meet all of your isolation needs, though, there are a lot of other ways to go about solving the problem.