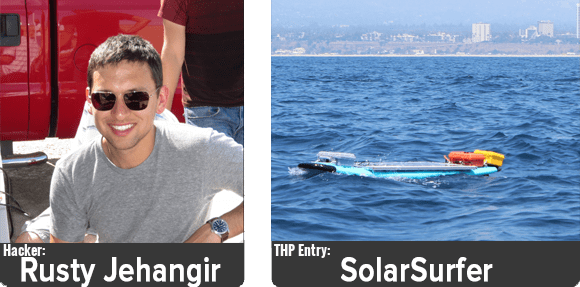
0.19 Leagues Under The Sea

ROV

[Doug] and [Kay] have been building a steel 70-foot sailboat for the last few years, and since it’s a little too cold to work outside their home/shop in Oklahoma, they’re bringing their projects inside for the winter. Until it warms up a bit, they’re working on an underwater ROV capable of diving to 3000 feet below the waves, maneuvering on the ocean floor, and sending video and side-scan sonar back to their homebuilt ship.

Like [Doug] and [Kay]’s adventures in shipbuilding, they’re documenting the entire build process of ROV construction via YouTube videos. The first video covers the construction of a pressure vessel out of a huge piece of 10″ ID, half inch wall steel pipe. The design of the ROV will look somewhat like a torpedo, towed by the ship with cameras pointing in all directions.

For communication with the surface everything is passing over a single Cat5 cable. They’re using an Ethernet extender that uses a twisted wire pair to bring Ethernet to the ocean bottom. With that, a few IP webcams relay video up to the ship and a simple Arduino setup allows for control of the ships thrusters.

The thrusters? Instead of an expensive custom solution they’re using off the shelf brushless motors for RC cars and planes. By potting the coils of a brushless outrunner motor, [Doug] and [Kay] found this solution makes an awful lot of sense; it’s cheap, fairly reliable, doesn’t require a whole lot of engineering, and most importantly cheap.

Bunch of videos below, or just check out [Doug] and [Kay]’s progress on their slightly out-of-date blog.

Continue reading “0.19 Leagues Under The Sea”

Submersible Camera Snaps Pics Of Ocean Going Predators

RPi-submersible-camera-rig
This camera rig uses a Raspberry Pi to send a camera down fifty meters (mirror on RPi blog) in order to spy on sharks. We got really excited at first thinking that it might be using the camera module from the Raspberry Pi Foundation but that isn’t the case. Do keep reading though, there’s a lot of cool stuff involved in this one.

The project used a collection of camera units spread over a large area to monitor shark activity. Each is mounted on an anchored buoy, using solar panels and a lead acid gel battery for power. The RPi itself remains topside in a waterproof box. It connects to the camera using a 50-foot Ethernet patch cable.

We figure the challenge of building the hardware parallels that of designing an underwater ROV. The camera needs an enclosure that can stand up to the pressure at that depth while allowing the cable to pass through it. There is also an interesting note in the project log about getting the camera exposure settings to behave.

High Voltage ROV Adventures

[Eirik] wrote in to share the build log for the third iteration of his underwater ROV. The first two project were completed and tested (you may remember reading about it back in January), but both had issues that caused general failure. Most notably, the introduction of water where he didn’t want it. But this time around he seems to have gotten everything right, successfully taking this little guy down to twenty meters without a leak.

One of the problems he had on version two was supplying electricity from the surface. He needs 12V at up to 10A, and had to use a tether made of 14 AWG to make it happen. That’s a lot of heavy wire to be hauling around and it made the ROV virtually unable to move itself. He wanted to go back to using Cat5e cable but it won’t handle that kind of current. He ended up using an inverter at the surface to up the voltage to 130V, and a switch mode supply on the ROV to get back to 12V. This caused noise on the data lines which he fixed by adding a full-wave rectifer to the inverter’s output.

The dive video after the break shows off the crystal-clear camera shots this thing can capture.

Continue reading “High Voltage ROV Adventures”

Water Glider Prototype

[Byrel Mitchell] wrote in to share some details on this water glider which he has been working on with his classmates at the Nonlinear Autonomous Systems lab of Michigan Technological University. As its name implies, it glides through the water rather than using propulsion systems typically found on underwater ROVs. The wings on either side of the body are fixed in place, converting changes in ballast to forward momentum.

The front of the glider is at the bottom right of the image above. Look closely and you’ll see a trio of syringes pointed toward the nose. These act as the ballast tanks. A gear motor moves a pinion connected to the syringe plungers, allowing the Arduino which drives the device to fill and empty the tanks with water. When full the nose sinks and the glider moves forward, when empty it rises to the surface which also results in forward movement.

After the break you can find two videos The first shows off the functionality and demonstrates the device in a swimming pool. The second covers the details of the control systems.

Continue reading “Water Glider Prototype”

LEGO ROV Without A Tether

[Brane] built an underwater ROV from LEGO mindstorm parts. Look closely at this image and you should notice something missing. The tether that normally carries power and control lines from an ROV to the surface is missing. This is a wireless solution that lets him control the device using an Xbox controller.

The video after the break shows about five minutes of test drive footage. [Brane] has a big aquarium in which he can test the thing. Since he put it together as his senior engineering project at University it’s likely that this is a testing facility at the school. Here’s the little we know about the hardware: It’s using NXT Mindstorm parts to control the motors, with a sealed chamber for a battery. Connectivity is provided by an XBee module with an NXT adapter board called the NXTBee. A laptop with its own XBee module makes up the other end of communications. Right now [Brane] uses an Xbox controller connected to the laptop, but a standalone device would be easy to build by hacking the XBee and controller together directly.

Continue reading “LEGO ROV Without A Tether”

DIY ROV Explores The Watery Depths

This rig looks so good it’s hard to believe this is the first ROV that [DZL] has ever built. It houses an HD camera which feeds the display at the operator’s station. You can see the controller to the left of that screen which uses a joystick and buttons to pilot the underwater vessel.

In order to simplify construction, [DZL] decided not to use propellers. The problem with that technique is that you need to have bearings that will allow the propeller shafts to turn without letting water in. Propulsion is instead provided by a group of small water pumps whose intake is on one end and outflow is on the other. These are mounted at various places on the body and each have one power cable that connects to the control circuitry in the main housing. The passage of cables through the enclosure is another possible leak point, but [DZL] found some off the shelf bushings that ended up making it pretty easy.

The link at the top is a round-up of all the different project posts. For us, the most interesting Flickr set is the one showing how the enclosure is put together. There is also a pretty neat dive video after the break that shows the craft being tested underwater.

Continue reading “DIY ROV Explores The Watery Depths”

Purdue IEEE ROV


Purdue University’s IEEE branch participated in this year’s Marine Advanced Technology Education Center Competition, taking second place for the Hybris ROV seen above. The competition included several compulsory functions, including the ability to cap an underwater oil well, collect biological samples, and take water samples at depth.

What they came up with is a quick and agile watercraft that easily overcomes a lot of the hardware hangups that typically plague ROV builds. There are eight thrusters, four for vertical motion and the other four take care of horizontal movement. The gripper mechanism can be clearly seen on the front of the craft, with two cylindrical containers housing the electrical components.

Don’t miss out on the project definition page. Each challenge is discusses in detail, along with the team’s solution. We were impressed by the amount of information they have posted, including overview of each electrical component as well as design files and source code. If you want to see how the first run of the competition went, click through the break to find embedded video.

Continue reading “Purdue IEEE ROV”