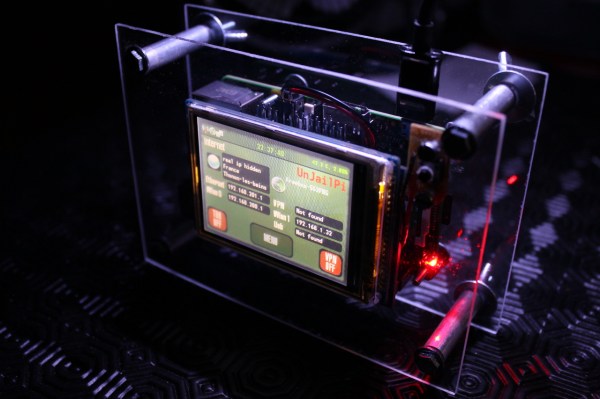
RFID Tag Cell Phone

Simple Hack Puts An RFID Tag Inside Your Mobile Phone

RFID security systems have become quite common these days. Many corporations now use RFID cards, or badges, in place of physical keys. It’s not hard to understand why. They easily fit inside of a standard wallet, they require no power source, and the keys can be revoked with a few keystrokes. No need to change the locks, no need to collect keys from everyone.

[Shawn] recently set up one of these systems for his own office, but he found that the RFID cards were just a bit too bulky for his liking. He thought it would be really neat if he could just use his cell phone to open the doors, since he always carries it anyways. He tried searching for a cell phone case that contained an RFID tag but wasn’t able to come up with anything at the time. His solution was to do it himself.

[Shawn] first needed to get the RFID tag out of the plastic card without damaging the chip or antenna coil. He knew that acetone can be used to melt away certain types of plastic and rubber, and figured he might as well try it out with the RFID card. He placed the card in a beaker and covered it with acetone. He then sealed the beaker in a plastic bag to help prevent the acetone from evaporating.

After around 45 minutes of soaking, [Shawn] was able to peel the plastic layers off of the electronics. He was left with a tiny RFID chip and a large, flat copper coil. He removed the cover from the back of his iPhone 4S and taped the chip and coil to the inside of the phone. There was enough room for him to seal the whole thing back up underneath the original cover.

Even though the phone has multiple radios, they don’t seem to cause any noticeable interference. [Shawn] can now just hold his phone up to the RFID readers and open the door, instead of having to carry an extra card around. Looking at his phone, you would never even know he modified it.

[Thanks Thief Dark]

Arduino garage door opener

Arduino Garage Door Opener Is Security Minded

Do it yourself garage door openers must be all the rage nowadays. We just got word of another take on this popular idea. [Giles] was commissioned by his friend to find a way to control the friend’s garage door using a smart phone. The request was understandable, considering the costly garage door remote and the fact that the buttons on the expensive remote tended to fail after a while. The inspiration for this project came from some YouTube videos of other similar projects. Those projects all paired an Arduino with a Bluetooth headset in order to control the door from a mobile phone. [Giles] understood that while this would get the job done, it wouldn’t be very secure. Bluetooth headsets typically connect to mobile phones using a four digit PIN. Many of them have known default PINs and even if the default is changed, it wouldn’t take very long to guess a four digit PIN. [Giles] knew he had to find a more secure way.

Continue reading “Arduino Garage Door Opener Is Security Minded”

Rackmount RasPi Leaves No Excuse To Lose Data

RasPi backup server

[Frank] knows how important backups are for data security, but his old method of plugging a hard drive in to take manual backups every so often is not the most reliable or secure way of backing up data. He realized he was going to need a secure, automated solution. He didn’t need a full-sized computer with a ton of power; why waste electricity for something so simple? His solution was to use a Raspberry Pi as the backup computer.

The main problem he faced with the Pi was finding a way to make it rack mountable. [Frank] started with an empty 1U server case. He then had to bend a few metal plates in order to securely mount the backup drive into the case. A couple of small rubber pads help dampen any vibrations caused by the hard drive.

The computer power supply was able to put out the 12V needed for the hard disk, but not the 5V required to run the Pi. [Frank’s] solution was to use an LM2596 based switching supply to turn the 12V into 5V. He soldered the power supply wires directly to the Pi, thinking that a USB plug might vibrate loose over time. Mounting the Pi to the computer case should have been the trickiest part but [Frank] made it easy by simply gluing the Pi’s plastic case to the inside of the computer case. When all was said in done, the backup server pulls 29W under full load, 9W with the disk spinning, and only about 2W in an idle state.

On the software side of things, [Frank’s] backup box uses bash shell scripts to get the job done. The Pi connects to his main server via VPN and then the bash scripts use rsync to actually collect the files. The system not only saves backups every night, but also keeps week old backups just in case. If you are really paranoid about your backups, try hooking up a custom battery backup solution to your Pi. If a Pi just isn’t doing it for you, you can always try one of many other methods.

Developed On Hackaday: 2 Days Left To Submit Your Design!

We’re sure that many of Hackaday readers already know that one of the two main components of the Mooltipass project is a smart card, containing (among others) the AES-256 encryption key. Two weeks ago we asked if you’d be interested coming up with a design that will be printed on the final card. As usual, many people were eager to contribute and recently sent us a few suggestions. If you missed the call and would like to join in, it’s not too late! You may still send your CMYK vector image at mathieu[at]hackaday[dot]com by sunday. More detailed specifications may be found here.

In a few days we’ll also publish on Hackaday a project update, as we recently received the top and bottom PCBs for Olivier’s design. The low level libraries will soon be finished and hopefully a few days later we’ll be able to ship a few devices to developers and beta testers. We’re also still looking for contributors that may be interested in helping us to develop browser plugins.

The Mooltipass team would also like to thank our dear readers that gave us a skull on Hackaday projects!

A Real Malware In A Mouse

mouseagain

After reading an April Fools joke we fell for, [Mortimer] decided to replicate this project that turns the common USB mouse into a powerful tool that can bring down corporations and governments. Actually, he just gave himself one-click access to Hackaday, but that’s just as good.

The guts of this modified mouse are pretty simple; the left click, right click, and wheel click of the mouse are wired up to three pins on an Arduino Pro Micro. The USB port of the ‘duino is configured as a USB HID device and has the ability to send keyboard commands in response to any input on the mouse.

Right now, [Mortimer] has this mouse configured that when the left click button is pressed, it highlights the address bar of his browser and types in http://www.hackaday.com. Not quite as subversive as reading extremely small codes printed on a mousepad with the optical sensor, but enough to build upon this project and do some serious damage to a computer.

Video of [Mort]’s mouse below.

Continue reading “A Real Malware In A Mouse”

Malware In A Mouse

Keyloggers, in both hardware and software forms, have been around for a long, long time. More devious keyloggers are smart enough to ‘type’ commands into a computer and install Trojans, back doors, and other really nasty stuff. What about mice, though? Surely there’s no way the humble USB mouse could become an avenue of attack for some crazy security shenanigans, right?

As it turns out, yes, breaking into a computer with nothing but a USB mouse is possible. The folks over at CT Magazine, the preeminent German computer rag, have made the Trojan mouse (German, terrible Google translation)

The only input a mouse receives are button presses, scroll wheel ticks, and the view from a tiny, crappy camera embedded in the base. The build reads this camera with an Arduino, and when a certain pattern of gray and grayer pixels appear, it triggers a command to download a file from the Internet. From there, and from a security standpoint, Bob’s your uncle.

Looking through the camera inside a mouse is nothing new; it’s been done over the Internet and turned into the worst scanner ever made. Still, being able to process that image data and do something with it is very cool. Just don’t accept mouse pads from strangers.

Danke [Ianmcmill] for the tip.

Developed On Hackaday: Security And Arduino Compatibility

2013-12_Developed_on_Hackaday

Some of our readers noticed that the Hackaday community open-source offline password keeper (aka Mooltipass) has two incompatible characteristics: being secure and Arduino compatible.

Why is that? Arduino compatibility implies including a way to change the device firmware and accessing the microcontroller’s pins to connect shields. Therefore, some ill-intentioned individuals may replace the original firmware with one that would log all user’s inputs and passwords, or in another case simply sniff the uC’s signals. The ‘hackers’ would then later come to extract the recorded data. Consequently, we needed a secure tamper-proof Mooltipass version and an Arduino-compatible one, while allowing the former to become the latter.

Olivier’s design, though completely closed, will have several thinner surfaces directly above the Arduino headers. As a compromise, we therefore thought of sending a bootloader-free assembled version to the people only interested in the password keeper functionality, while sending a non-assembled version (with a pre-burnt bootloader) to the tinkerers. The Arduino enthusiasts would just need to cut the plastic at the strategic places (and perhaps solder headers to save costs). The main advantage of doing so is that the case would be the same for both versions. The drawback is that each board would have a different firmware depending on who it is intended for.

What do our reader think? For more detailed updates on the Mooltipass current status, you can always join the official Google group.