CNC Router Skateboard

Self Replicating Skateboard…. What?!?!?

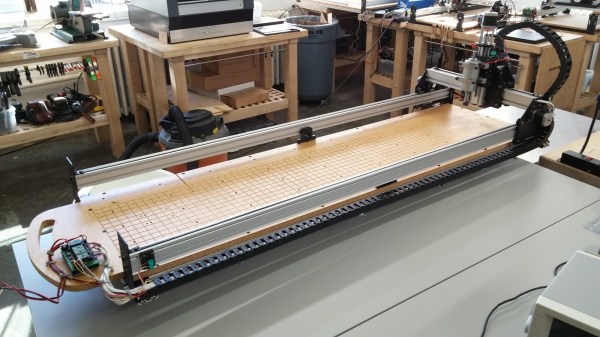
[Bart] and company over at Pumping Station One make a lot of skateboard decks. They wanted to build a CNC Router that was not only portable but had a size that was optimized for cutting skateboard decks. The project got a little out of hand and the CNC Router ended up also being a skateboard! As crazy as that sounds, the craziest part may be that they built it in just one night.

CNC Router SkateboardThe project started off with some stock Shapeoko 2 parts. Achieving the deck-cutting size required shortening the X Axis and tripling the length of the Y Axis resulting in a 250 x 1200mm work envelope. The DC spindle used accepts ER16 collets and has a fully variable speed control. The stand alone selectable 24/48 volt power supply has a neat DIY handle to ease transportation. Even though the router itself has skateboard trucks, it also has a handle at the front so it’s easy to grab and drag behind you.

The guys that built this admit that, as a skateboard, it is kind of crappy. They do go on to mention that a 230lb dude was able to ride it without incident. As a project, however, they hit their goals on the head, ending up with an easily-transportable dedicated skateboard-deck-making CNC Router.

Carvey, The CNC Machine For Everyone

Over the past few years, [Bart Dring] has contributed immensely to the homebrew CNC machine scene, with the creation of MakerSlide linear rail, the buildlog.net open source laser cutters and CNC machines, and a host of other builds that have brought the power of digital fabrication to garages and workshops the world over. After a year of work, he, along with Inventables, is releasing Carvey, the CNC machine for everyone else.

Carvey is heavily inspired by Inventables other CNC machine, the Shapeoko, but built to be the Makerbot to the Shapeoko’s RepRap, without all the baggage that goes along with that analogy, of course. The machine has a 300W spindle capable of cutting wood, plastic, foam, carbon fiber, and linoleum, as well as aluminum and brass. There are a few interesting features like a color-coded bit system, and this time the machine has an enclosure for containing MDF dust.

CiebwEA13yxYp576g_7HRNUx06KmzO3QEqGCLfs4kRo
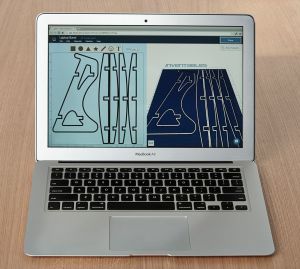
CAD programs might be a little too foreboding for someone just getting into the world of CNC, so Inventables has created their own design program called Easel. It’s a web app that allows you to design all your parts for the Carvey and send them all to the machine without worrying about speeds, feeds and all the other intimidating machinist terminology. You can, of course, output GCode from Easel, so those of us with slightly more complex toolchains can still use the Carvey.

Inventables is Kickstarting their production, with the non-early bird Carveys going for $2400. That’s a bit cheaper than some extremely similar machines we’ve seen on Kickstarter before.

A Tale Of Two Ring Boxes

This is a tale of two hearts, two engagements, and two ring boxes. About a couple of years ago, [curtisabrina] proposed to his girlfriend. Rather than just hand her the ring, he placed it in a locking ring box [imgur link] he custom-made. The box seems normal at first glance, but lifting up the first drawer reveals a complex and ornate gear system. The gears can only be turned by a pair of interlocking heart-shaped keys – a gift [curtisabrina] had given her months earlier. The mechanism is nothing short of stunning – planetary reductions drive a spring-loaded iris which opens to reveal an engagement ring.

[curtisabrina] built his ring box after hours at his signmaking job. The job gave him access to some incredible tools, such as the MultiCam 3000 series CNC. The box turned out great, and he showed his work off in a Reddit thread.

Fast forward two years. [joetemus] was getting ready to propose to his girlfriend, and wanted to do something similar. He didn’t have access to high-end shop tools, but he did have a Shapeoko 2. Using the original box as inspiration, [joetemus] started designing. Over time, trial, and error, a second ring box emerged [imgur link]. Like the original box, [joetemus] started with a rough cut board. Nearly every part, including the aluminum gears, was cut on the Shapeoko 2. [joetemus] also celebrated his accomplishment with a Reddit thread.

[joetemus’s] ring box isn’t quite as complex or polished as [curtisabrina’s], but he was working with a machine that cost much less than the equipment [curtisabrina] was using. We think both of them are great, and are happy to report that both of their girlfriends said, “Yes!”

Continue reading “A Tale Of Two Ring Boxes”

Handheld Game System Powered By Arduino

DIY Handheld Game System

These days, it’s easy enough to play games on the go. If you have a smart phone, you are pretty much set. That doesn’t mean you can’t still have fun designing and building your own portable gaming system, though.

[randrews] did just that. He started out by purchasing a small memory LCD display from Adafruit. The screen he chose is low power as far as screens go, so it would be a good fit for this project. After testing the screen with a quick demo program, it was time to start designing the circuit board.

[randrews] used Eagle to design the circuit. He hand routed all of the traces to avoid any weird issues that the auto router can sometimes cause. He made an efficient use of the space on the board by mounting the screen over top of the ATMega chip and the other supporting components. The screen is designed to plug in and out of the socket, this way it can be removed to get to the chip. [randrews] needs to be able to reach the chip in order to reprogram it for different games.

Once the board design was finished, [randrews] used his Shapeoko CNC mill to cut it out of a copper clad board. He warns that you need to be careful doing this, since breathing fiberglass dust is detrimental to living a long and healthy life. Once the board was milled out, [randrews] used a small Dremel drill press to drill all of the holes.

The final piece of the puzzle was to figure out the power situation. [randrews] designed a second smaller PCB for this. The power board holds two 3V coin cell batteries. The Arduino expects 5V, so [randrews] had to use a voltage regulator. This power board also contains the power switch for the whole system.

The power board was milled and populated. Then it was time to do some measurements. [randrews] measured the current draw and calculates that he should be able to get around 15 hours of play time using the two 3V coin cell batteries. Not bad considering the size.

[via Reddit]

Humble Beginnings Of A Pick And Place Machine

beginnings

[Pete’s] invented a product called an AIR Patch Cable designed to interface with an airplane’s intercom, and is looking to manufacture and assemble them himself — unfortunately, the circuit boards are tiny, and SMD components aren’t exactly the easiest to install. So he decided to build a pick and place machine to do it for him!

It’s not finished yet, but [Pete] has reached a major milestone — he’s finished the base CNC machine aspect of it. He opted for a kit build for the major mechanical components, the Shapeoko 2 — its a solid design and if you decided to make something from scratch it’d probably cost much more and take a lot longer.

From there he began selecting his electronics individually. He’s chosen the Big Easy Driver by Sparkfun to control his stepper motors, which supports a maximum size of NEMA 17 steppers, so he bought five of those too. To control it all, he’s using LinuxCNC which is an excellent choice — and if you’re not crazy about Linux, you can actually download Ubuntu 10.04 with LinuxCNC pre-installed for you to make it super easy — you’ll just need an old dedicated PC to use.

Continue reading “Humble Beginnings Of A Pick And Place Machine”

ShapeOko Build Log — It’s A CNC Mill In A Box

shapeoko-build-log

We’re not blatantly trying to promo this product. It’s just that the build log covering a ShapeOko assembly process taken on by [Anool] is like crack for those of us who have yet to acquire our own desktop CNC mills.

Like the title says, this thing is basically a mill in a box. But [Anool] decided to order the version of the kit that doesn’t come with any motors or control electronics. He also planned for future upgrades by ordering additional extruded rail to increase the size of the ShapeOko. After assembling the frame his decision to source stepper motors locally bit him as they were out of stock. But there was still plenty to do preparing control electronics during the wait. He based his system on a Raspberry Pi which talks to an Arduino to address the motors and monitor the sensors.

Once all the parts were finally accounted for he tested the rig as a pen plotter. The pen was eventually replaced with the router motor and that ring light PCB seen above was the first thing he milled with it.

[Thanks Justin]

Building A Bigger Shapeoko Router

Hackaday alumni [Will O’Brien] sent in a few projects he’s been working on lately while he’s in the process of upgrading his workspace. He’s building a 1200 x 1200 mm CNC router based on the Shapeoko router, and it sure looks like he’s having fun doing it.

The Shapeoko router is based on the Makerslide open source linear bearing system. This system uses common aluminum extrusions as the frame of a very simple, very inexpensive CNC router. The Makerslide system is designed to be expandable; if you want a larger axis, just bolt in a longer piece of aluminum extrusion. We haven’t seen many Makerslide builds take advantage of this fact, a shame as the stock Shapeoko only has a build area of 200 mm square.

[Will] is expanding this build area to 1200 mm square, but of course this means beefing up some parts of the build. He’s already moved up to very hefty 250 oz/in Nema 23 stepper motors (up from the Nema 17s for a standard Shapeoko), as well as beefing up the motor mount a great deal.

[Will] also sourced a few lengths of cable drag chain (yes, that’s what it’s called) to keep all the wires for his huge CNC routers out of the path of a moving gantry and spinning motors. It looks like he’s got a very nice build shaping up, and we can’t wait to see it in action.