Wireless SNES Controller For Logitech Receiver

SNES

A while back, Logitech introduced their version of a wireless interface for keyboards, mice, and other human-oriented peripherals. Yes, they could have used Bluetooth, but that’s neither here nor there. What we do know, though, is that it’s now possible to stuff one of these Logitech transmitters into a Super Nintendo controller, allowing it to operate with your fancy-schmancy wireless keyboards and mice.

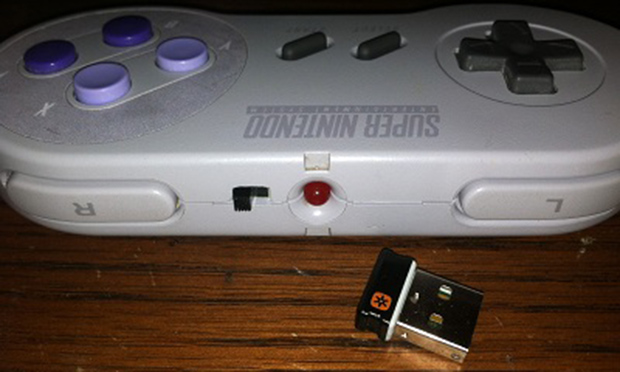
[Warrior_Rocker] wanted to retain as much of the stock appearance of the original controller as possible. To do this, he salvaged the Logitech transmitter from an old handheld Logitech keyboard/touchpad combo. The membrane of the keyboard connected directly to the transmitter, meaning tracing out the connections of the membrane to each pin was required to get a button mapping that made sense.

Once the lines of the SNES controller were wired up to the transmitter, [Warrior] needed a way to power his new wireless controller. The old keyboard used a pair of AA cells wired in parallel. With two AA cells, the keyboard had about a year of battery life, so with a single AAA cell, [Warrior]’s SNES controller should last a few months or more.

Except for a switch and a missing cable, [Warrior]’s wireless controller looks exactly like a stock controller. Pretty impressive, given this build is the product of stuff he just had lying around.

How The Game Genie Works

Those of us old enough to remember blowing into cartridges will probably remember the Game Genie – a device that plugs in to an NES, SNES, Sega Genesis, or Game Boy that gives the player extra lives, items, changes the difficulty, or otherwise modifies the gameplay. To someone who doesn’t yet know where the 1-up is in the first level of Super Mario Bros., the Game Genie seems magical. There is, of course, a rhyme and reason behind the Genie and [The Mighty Mike Master] put together a great walkthrough of how the Game Genie works.

There are two varieties of Game Genie codes – 6-character codes and 8-character codes. Both these types of codes translate into a 15-bit address in the game ROM (from 0x8000 to 0xFFFF for the 6502-based NES) and a data byte. For the 6-character codes, whenever the address referenced by the Game Genie code is accessed, a specific data byte is returned. Thus, infinite lives become a reality with just a 6-character code.

Some games, especially ones made in the late years of their respective systems, use memory mapping to increase the code and data provided on the cartridges. Since areas of data are constantly being taken in and out of the CPU’s address space, merely returning a set value whenever a specific address is accessed would be disastrous. For this bank-switching setup, the Game Genie uses an 8-bit code; it’s just like the 6-bit code, only with the addition of a ‘compare’ byte. Using an 8-bit code, the Game Genie returns a specific byte if the compare bytes are equal. Otherwise, the Genie lets hands off the original data to the CPU.

Of course, all this information could be gleaned from the original patent for the Game Genie. As for the circuitry inside the Game Genie, there’s really not much aside from an un-Googleable GAL (general array logic) and a tiny epoxied microcontroller. It’s an amazingly simple device for all the amazement it imbued in our young impressionable minds.

Continue reading “How The Game Genie Works”

SNESoIP: It’s Exactly What It Sounds Like

prototype-small

Here’s a cool hack for those of you wishing to play some retro multiplayer SNES games online!

[Michael Fitzmayer] is a resident hacker at shackspace; der hackerspace in StuttgartHe’s come up with this clever little ethernet adapter network-bridge that can share local controller-inputs over the internet. The entire project is open-source, and readily available on github. It’s still in the early stage of development, but it is already fully functional. The firmware is small and will fit on an ATmega8, and by the looks of the component list it’s a fairly easy build.

He’s even integrated a switch mode (hold B and Y during boot), which avoids trying to figure out which controller will be player one! After all, don’t you remember untangling the controller cords, trying to figure out which one is which?

We know you had a favorite controller and would give the other “crappy” one to your guest.

Example video is after the break.

Continue reading “SNESoIP: It’s Exactly What It Sounds Like”

Hackaday Links: Sunday, June 9th, 2013

hackaday-links-chain

This week we saw an interesting animated motorcycle tail light over on Reddit. But there wasn’t really enough background to get its own feature.

The NeuroKnitting project captures brainwaves by weaving them into a scarf.

On Semiconductor is showing off an 8x8x8 LED cube which they claim as 12,000 LEDs. We can’t figure out where all those LEDs are used in the design, but maybe you can. Here’s one that we know has 4096 LEDs in its matrix.

[Jeff] used hard drive platters as the disc section of his original Enterprise desk model.

Play around with an SNES controller and Arduino by following [Damon’s] guide.

Hackaday Alum [Jeremy Cook] posted an update of his laser graffiti project. His earlier effort used camera tricks to capture the image but this time around he’s exciting phosphorescent glow material to make a persistent display visible to the human eye.

This server hides in plain sight after being wrapped in a hard cover book binding. Hopefully this won’t cause heat dissipation problems.

[Trumpkin] built his own Nixie tube wristwatch which we think has the potential to be as neat as the one [Woz] wears.


SNES Headphones Scream Out For Bluetooth Control

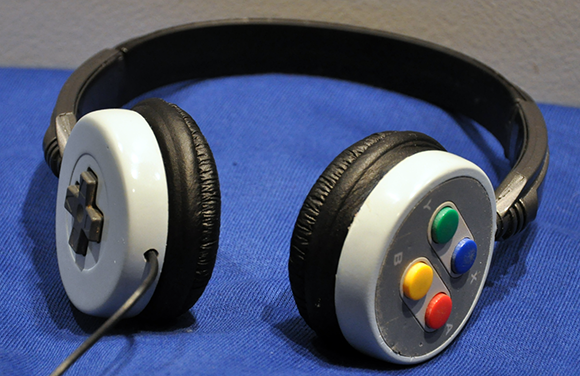
Here’s a build that just exudes nerd cred. It’s an SNES controller modified into a pair of headphones, straight from the workshop of [lyberty5].

The build began by stealing a controller from a PAL SNES and carefully dremeling the buttons and d-pad loose from their plastic frame. The PCB was cut in half, and the remaining plastic was carefully crafted into round speaker enclosures with the help of some epoxy. hot glue, and possibly a few pieces of styrene.

The result is a perfectly formed pair of SNES headphones, with a build quality right up there with the best case mods we’ve seen. Unfortunately, while the buttons are still attached to the PCB, they don’t do anything. We’re thinking a small Bluetooth adapter – or even repurposing a set of Bluetooth headphones with volume and play controls – would be a wonderful use for the 20-year-old, candy-like buttons.

Still, an awesome build, and [lyberty5] really shows off his craft by constructing these wonderful headphones. You can see the time-lapse of the build after the break.

Continue reading “SNES Headphones Scream Out For Bluetooth Control”

Hacking A PAL SNES To Output 50Hz Or 60Hz With A Single Switch

snes-pal-ntsc-mod

[Derecho] grabbed a PAL format Super Nintendo but wanted to make it play nicely with a 60 Hertz NTSC screen. His hack added a single switch to choose between 50 Hz and 60 Hz.

Take a look at the image above to see his alterations to the mainboard. The jumpers soldered to the two chips at the top are by far the trickiest part of the project. Each of the pins he soldered to needed to first be lifted from the PCB pad so that they no longer make contact with the etched traces. The technique he used involves heating the pin with an iron, then gently lifting it with a pin or a razor knife/blade. If you’ve got some experience populating SMD boards with a handheld iron this shouldn’t prove too difficult. The rest of the hack involves adding a 3-position switch (along with a 2k2 resistor) to choose between output modes based on what format game is being played.

Retro Gaming Just In-case

retro-gaming-just-in-case

You can look and look, but you won’t find a Super Nintendo inside of this retro gaming rig. [Webrow] is giving his vintage hardware a rest, and taking this all-in-one game emulator suitcase wherever he goes.

The machine at the heart of his build is of course a Raspberry Pi. You really can’t beat the ubiquitous board for cost, power, and hardware extensibility. An LCD panel from a broken laptop comes along for the ride having been mounted in the lid. For a long time there was no hope for reusing these panels, but [Webrow] found an adapter board (for nearly the same price as the RPi) which converts the DVI from the Pi to the LVDS needed by the screen. The connections and mounting scheme for the screen were where most of the project work was done. Connecting the controllers simply involved soldering some SNES controller sockets to an RPi breakout connector. We do have to compliment him on the red bezel which hides all of the power cords and other unsightly bits. The case look sturdy and ready to play!