Custom HTPC And Home Media Server

[Benoit Frigon]’s builds are a tribute to tidiness: both his HTPC and media server are elegant creations packed full of features. He has quite the knack for clean builds in this form factor; his PBX server was met with high praise earlier this summer.

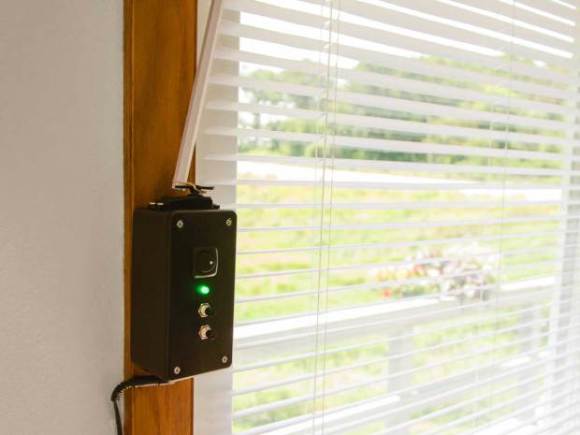
For the HTPC, [Benoit] gutted and cleaned an old DVR case and modified it to house a Mini-ITX board. He added standoff mounts to support the motherboard, then sketched up a template for the IO shield as a guide for cutting the back panel. The front of the DVR case originally had a 4-digit 7-segment display and a few simple buttons. Though he kept the original button layout, [Benoit] chose to replace the segment displays with a 20×2 character LCD. The new display is controlled via a python script on the HTPC, which runs an OpenElec Linux distro with XBMC 12.0.

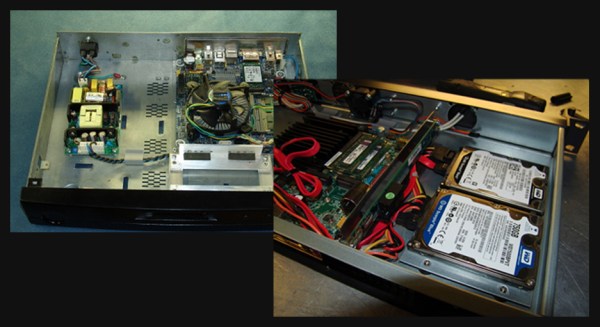
The HTPC’s hard drive bay is a bit lighter these days, because [Benoit] decided to migrate his media storage to a separate server. Inside the new home media server is yet another Mini-ITX motherboard with an embedded Atom N2800 that runs Ubuntu Server. Live television streams via a WinTV HVR-2550 TV tuner and TVHeadend software. The case originally suspended the tuner from the IO bracket on the back (and nowhere else), which left the rest of the card dangerously unsupported inside. [Benoit] solved the problem by building an additional aluminum bracket that firmly holds both the PCIe riser and the tuner. Check out both builds’ pages for downloadable templates, software details and bill of materials.

Temp-Sensitive Automatic Blinds

blindMinder

Any opportunity to shave a few bucks off your power bill is probably worth considering, especially if it’s a device like [Steve Hoefer’s] Mini Blind Minder. This little guy staves off (or welcomes) the sun by monitoring the room with a temperature sensor and checking against a setpoint. If the room is too warm or too cool, the top-mounted servo will spin the wand and close or open the blinds, respectively.

[Steve] started by building a homemade Arduino shield from some perfboard to which he added a handful of discrete components: some current-limiting resistors for the RGB LED indicator light and a 10k trim pot for fine-tuning the temp sensor. Although this build forgoes an LCD readout to display precise information, it does provide feedback by stepping the RGB LED’s color through a spectrum of blue to red to indicate how the current room temperature compares to your setpoint. The two momentary pushbuttons beneath the light allow the user to adjust the setpoint up or down.

See the video below for a detailed guide to building your own, and take a look at a similar automatic blinds build from earlier this year that opens and closes in response to ambient light.

Continue reading “Temp-Sensitive Automatic Blinds”

Arduino-based Enigma Replica Is Fully Functional

This open-source Enigma replica by the folks at [ST-Geotronics] is simply stunning. They drew their inspiration from a hilarious build we saw a few years ago that hacked a children’s toy into an Enigma machine. Their project is instead modeled on the original Enigma M4 cipher machine, and aside from a bit of artistic license, we think they nailed the visual style. As for functionality, the guide claims everything works, right down to the plugboard.

Rather than try to immediately cram everything into the final enclosure, the [ST-Geotronics] gang painstakingly worked out a prototype to be sure the four 16-segment LED displays had been wired correctly and functioned properly. The next step was laying out a swarm of buttons and resistors on a 6″x8″ perfboard. They used charlieplexing to handle the 16-segment displays (which actually have 17 LEDs each), and deceptively disguised each display as a nixie tube by mounting them vertically and encasing them in a transparent dome. The case follows the M4’s original dimensions and consists of a plywood box with scrap steel for the top plate.

Swing by their Instructables page for more details. There you can find several Arduino sketches to test functionality and the code for five different M4 operation modes.

How The Game Genie Works

Those of us old enough to remember blowing into cartridges will probably remember the Game Genie – a device that plugs in to an NES, SNES, Sega Genesis, or Game Boy that gives the player extra lives, items, changes the difficulty, or otherwise modifies the gameplay. To someone who doesn’t yet know where the 1-up is in the first level of Super Mario Bros., the Game Genie seems magical. There is, of course, a rhyme and reason behind the Genie and [The Mighty Mike Master] put together a great walkthrough of how the Game Genie works.

There are two varieties of Game Genie codes – 6-character codes and 8-character codes. Both these types of codes translate into a 15-bit address in the game ROM (from 0x8000 to 0xFFFF for the 6502-based NES) and a data byte. For the 6-character codes, whenever the address referenced by the Game Genie code is accessed, a specific data byte is returned. Thus, infinite lives become a reality with just a 6-character code.

Some games, especially ones made in the late years of their respective systems, use memory mapping to increase the code and data provided on the cartridges. Since areas of data are constantly being taken in and out of the CPU’s address space, merely returning a set value whenever a specific address is accessed would be disastrous. For this bank-switching setup, the Game Genie uses an 8-bit code; it’s just like the 6-bit code, only with the addition of a ‘compare’ byte. Using an 8-bit code, the Game Genie returns a specific byte if the compare bytes are equal. Otherwise, the Genie lets hands off the original data to the CPU.

Of course, all this information could be gleaned from the original patent for the Game Genie. As for the circuitry inside the Game Genie, there’s really not much aside from an un-Googleable GAL (general array logic) and a tiny epoxied microcontroller. It’s an amazingly simple device for all the amazement it imbued in our young impressionable minds.

Continue reading “How The Game Genie Works”

Hackaday Hackerspace Henchmen == Free Stuff For You

2013-10-01_Hackaday_Hackerspace_Henchmen_banner-580x200

Are you a member of your local Hackerspace? Do you want some free stuff? Then you need to become one of the Hackaday Hackerspace Henchmen.

Hackerspaces are amazing places full of smart people pulling off delightful hacks. But often the outside world doesn’t hear about them. When a member completes a project they show it to the other members, quenching the need to share the awesomeness and ridding them of the drive which normally prompts someone to publish a post about it. We want to see what you’ve been up to at your Hackerspace, and making it public will help in sharing ideas between Hackerspaces. Send us the details and we’ll thank you with some swag in return, and with a few special rewards for the most exception hacks. Keep reading for prize details and how this is all going to work.

Continue reading “Hackaday Hackerspace Henchmen == Free Stuff For You”

Custom Arcade Control Panel

Anybody can fire up an emulator and play arcade games of yesteryear, but if you want to capture more of the nostalgia, you should build a custom arcade control panel. [Quinn] started her build by narrowing down which games she was most interested in playing, and decided on a straightforward 2-player setup. The biggest challenge was finding joysticks that would allow for switchable 4-way or 8-way control: some games such as Ms. Pac Man were made for 4-way joystick input, and the added positions on a 8-way can lead to confused inputs and frustrated players.

[Quinn] found the solution with a pair of Ultimarc Servo Stik joysticks, which use a servo motor to swap between 4 and 8-way mode. The output from both the joysticks and the buttons feed into an iPac encoder, which converts the signal to emulate a USB keyboard. The panel was first mocked up on butcher paper, with dimensions borrowed from various games: the panel itself resembles Mortal Kombat 2, while the buttons are spaced to match X-Men vs Street Fighter 2. [Quinn] chose some spare melamine—plywood with a plastic coating—to construct the panel, drilled some holes and used a router to carve out space for the joysticks. A USB hub was added to power the servos and to make room for future additions, which [Quinn] will have no difficulty implementing considering that her electrical layout is enviably clean. To cap it all off, she fit two “coin slot” buttons: a quarter placed into a slot serves as a start button when pressed.

Be sure to see the videos after the break that demonstrate the coin buttons and the servos, then check out a different retro joystick hack for a tripod controller, or look to the future with the Steam Controller.

Continue reading “Custom Arcade Control Panel”

Handheld Console Build-off

gc

The above pic isn’t a new Wii U controller from Nintendo – it’s the product of the 2013 Portable Build-Off Challenge over at the Made By Bacteria forums. Every year the Bacman forums hold a contest to build the best portabalized console, and like every year this year’s entries are top-notch.

One of the more interesting projects this year is a handheld PlayStation 2 put together by [Gman]. It uses a PS2 Slim motherboard and a dualshock 2 controller along with a 4-inch screen to stuff an entire PS2 into a convenient handheld gaming device. [Gman] ditched the CD drive and opted to play games off the USB drive, a clever substitution that really reduces the size and power consumption.

In our humble opinion, the best looking console mod is the one shown above by [Bungle]. It’s a portable GameCube stuffed inside a handmade case with a WiiKey Fusion that allows games to be played off an SD card. It’s an amazing build, and we can only hope [Bungle] will make a few molds of his case.

The entire contest has an incredible display of console modding expertise, and is well worth a look.