USB Temperature Logger With Some Extra Tricks

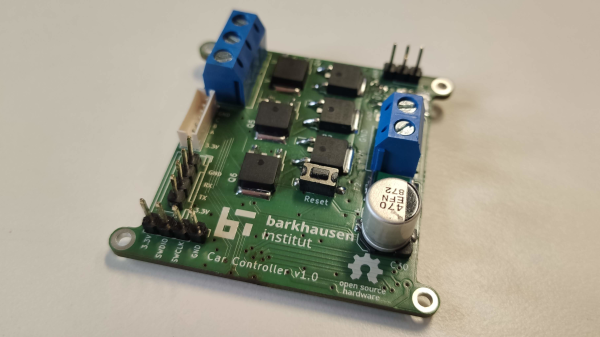
Many of us electronics hacker types tend to have at least the same common equipment on our benches, namely a multimeter, an oscilloscope, some sort of adjustable power supply, and maybe a logic analyzer. These are great tools covering many bases, but dealing with temperature measurements is often neglected. A sudden need for such often results in just buying a either dedicated measurement unit, or some cheap eBay thermocouple board and just rolling with a few hacks. [Jana Marie Hemsing] had a need for measuring the thermal side of things, and got fed up with hacking with piles of boards, and designed herself a proper instrument for the task.

The result is a very tidy four-channel thermocouple frontend, feeding the data into the host computer via USB. Each of the four channels can either be a K-type input or a NTC thermistor input, decided at board assembly time, but you could just build two units with four channels of each and cover all bases. The K-type thermocouple input is based around the MAX31855 series device. While the ‘KASA’ suffixed device is probably most common, if you need to dedicate some channels to handling one of the other six or so other common thermocouple types, that just needs the appropriate MAX31855 variant dropping in, and you’re good to go.

For the controller, [Jana] has chosen the common STM32F0x microcontroller, which handles all the USB protocol side of things. The extra functionality added allows direct driving of a heater controller via the DRV8837 H-Bridge, with a extra few open collector outputs for other things you might want to drive. This allows the logger to function as a kind-of thermal IO device. Firmware is written in good old fashioned STM32 HAL, using the standard STM32CubeMX and the GCC toolchain. It looks like the Makefile came via the STM32 Project Generator route. The firmware has a neat trick up its sleeve too; with a flick of the switch on the back, the firmware can switch between outputting CSV data over a standard USB CDC link (a virtual serial port), or it can present a SCPI terminal interface, enabling integration into existing SCPI-based test flows. Nice work!

We’ve seen a few logging projects on these fair pages, like this battery powered ESP32 logger device. If IoT logging is more your thing, here you go.

A vintage pocket calculator with extra exposed circuitry added

I2C Breathes New Life Into Casio Pocket Calculator

When is a pocket calculator more than just a calculator? [Andrew Menadue] has been pushing the limits of his 1970s Casio FX-502P by adding all sorts of modern functionality via the calculator’s expansion port.

Several older Casio calculators included an expansion port for connecting cassette tape storage and printing functionality. Data on the FX-502P could be saved on cassette tape using the well-known Kansas City standard, however this signal was produced by Casio’s FA-1 calculator cradle, not the FX-502P itself. To interact with the calculator itself would require an understanding of whatever protocol Casio designed for this particular model.

It turns out that the protocol is a little quirky compared to its contemporaries, with variable length data packets and inverted data logic, (zero volts is ‘1’ and three volts is ‘0’). Once the protocol was untangled, it was ‘simply’ a matter of connecting the calculator to the GPIO interface on the STM32, and using some software wizardry to start shooting data packets back and forth.

This hack can be used to send and receive data from an SD card (via a RAM buffer), however it’s the other expansion capabilities that really make us wonder. [Andrew] has demonstrated how easy it is to add a real-time clock or thermal printer. Using the I2C capabilities of the STM32, it’s likely that all sorts of gadgets and sensors could be coupled with this vintage calculator, and many others like it.

You can find even more details about this hack over here, including some follow up videos to the original hack. No stranger to vintage calculators, we last featured [Andrew] after he retrofitted a modern LCD display to an old Casio. It’s charming to see how these calculators are far from obsolete.

Continue reading “I2C Breathes New Life Into Casio Pocket Calculator”

Dummy The Robot Arm Is Not So Dumb

[Zhihui Jun] is a name you’re going to want to remember because this Chinese maker has created quite probably one of the most complete open-source robot arms (video in Chinese with subtitles, embedded below) we’ve ever seen. This project has to be seen to be believed. Every aspect of the design from concept, mechanical CAD, electronics design and software covering embedded, 3D GUI, and so on, is the work of one maker, in just their spare time! Sound like we’re talking it up too much? Just watch the video and try to keep up!

After an initial review of toy robots versus more industrial units, it was quickly decided that servos weren’t going to cut it – too little torque and lacking in precision. BLDC motors offer great precision and torque when paired with a good controller, but they are tricky to make small enough, so an off-the-shelf compact harmonic drive was selected and paired with a stepper motor to get the required performance. This was multiplied by six and dropped into some slick CNC machined aluminum parts to complete the mechanics. A custom closed-loop stepper controller mounts directly to the rear of each motor. That’s really nice too.

Stepper controller mounts on the motor rear – smart!

Control electronics are based around the STM32 using an ESP32 for Wi-Fi connectivity, but the pace of the video is so fast it’s hard to keep up with how much of the design operates. There is a brief mention that the controller runs the LiteOS kernel for Harmony OS, but no details we can find. The project GitHub has many of the gory details to pore over perhaps a bit light in places but the promise is made to expand that. For remote control, there’s a BLE-connected teaching device (called ‘Peak’) with a touch screen, again details pending. Oh, did we mention there’s a force-feedback (a PS5 Adaptive Trigger had to die for the cause) remote control unit that uses binocular cameras to track motion, with an AHRS setup giving orientation and that all this is powered by a Huawei Atlas edge AI processing system? This was greatly glossed over in the video like it was just some side-note not worth talking about. We hope details of that get made public soon!

Threading a needle through a grape by remote control

The dedicated GUI, written in what looks like Unity, allows robot programming and motion planning, but since those harmonic drives are back-drivable, the robot can be moved by hand and record movements for replaying later. Some work with AR has been started, but that looks like early in the process, the features just keep on coming!

Quite frankly there is so much happening that it’s hard to summarise here and do the project any sort of justice, so to that end we suggest popping over to YT and taking a look for yourselves.

We love robots ’round these parts, especially robot arms, here’s a big one by [Jeremy Fielding],  and if you think stepper motors aren’t necessary, because servo motors can be made to work just fine, you may be right.

Continue reading “Dummy The Robot Arm Is Not So Dumb”

A Solari Mechanical Digital Clock Hack With A Little Extra

[Alfredo Cortellini] was perusing an antique shop in Bologna, and came across a nice example of a late 1950s timepiece, in the shape of a Solari Cifra 5 slave clock, but as the shop owner warned, it could never tell the time by itself. That sounded like a challenge, and the resulting hack is a nice, respectful tweak of the internals to bring it into the modern era. Since the clock requires a single pulse-per-minute in order to track time, the simplest track often followed is to open the back, set the correct time manually by poking the appropriate levers, and then let an external circuit take over clocking it. [Alfredo] wanted autonomy, and came up with a solution to make the thing fully adjust itself automatically.

Electronics-wise, initial prototyping was performed with a Nucleo 32 dev board and a pile of modules, before moving to a custom PCB designed in Altium Designer. An STM32G031 runs the show, with a few push buttons and a SSD1306 OLED display forming the UI.

Using some strategically-placed magnets and hall effect sensors, the status of the internal mechanism could be determined. Minute advancements were effected by driving the clock’s 24V electromagnet with a DRV8871 motor driver IC, the power supply for which was generated from the USB supply via a TPS61041 boost converter. In order to synchronise the mechanism with the electronics, the unit could have been driven to advance a minute at a time, but since every hour would need sixty pulses, this could take a while given the limited speed at which that could be done reliably. The solution was to sneak in a crafty MG996R high-torque servo motor, which pushes on the hour-advancement lever, allowing the unit to be zeroed much faster. Sensing of the zero-hour position was done by monitoring the date-advance mechanism, that is not used in this model of clock. Once zeroed, the clock could then be advanced to the correct time and kept current. Firmware source, utililising FreeRTOS can be found on the project GItHub, with schematics and Fusion360 files on the Hackaday.IO project linked above.

If you were thinking you’ve seen these Solari soft-flap displays here before, you’d be quite correct, but if you’re not so much interested in marking the passage of time, but bending such devices to your other indication whims, we’ve got you covered also.

Continue reading “A Solari Mechanical Digital Clock Hack With A Little Extra”

Another Neat General Purpose Soldering Iron Driver

Over on Hackaday.io, user [Tomasz Jastrzebski] has designed a tidy-looking custom controller for driving temperature-controlled soldering irons. The design is intended to be general purpose, capable of operating with irons rated for different voltages and probe type, be they thermocouple- or thermistor-based. Rather than integrating a power supply, this is handled by an external unit, giving the possibility of feeding this from a variety of sources that are not necessarily tied to the grid.

Hardware-wise, we’ve got the ubiquitous STM32 microcontroller in charge of the show, with a nice front end based on the INA823 instrumentation amplifier, referenced to a REF2030 precision voltage source. The input stage is configured as a versatile Wheatstone bridge input circuit, giving plenty of scope for tweaking.

There are a few extra features in the design that aren’t necessarily needed for a soldering iron driver, such as RTC support, complete with supercapacitor backup, but then this doesn’t have to drive a soldering iron, it could drive any DC heater with temperature feedback. With a change in firmware, this could serve other tasks. One potential feature that springs to mind — have the unit automatically power down at a certain time of day in case it was left on accidentally.

The schematic has a lot of relevant detail — in that many parts have a good list of alternatives, presumably because of the semiconductor shortages — which is a good habit to get into if you ask us. Many of us involved with manufacturing have been doing this for years, as it makes sense to give the assembly house the extra options, but this really is basically mandatory practice now.

Firmware for the STM32G0 series microcontroller is based on the STM32 HAL, keeping it simple, with a Visual Studio Code project provided for your convenience. All hardware (KiCAD) and firmware can be found on the project GitHub.

We’ve seen a few projects like this over the years, like this Really Universal Soldering Controller, a custom controller for JBC irons, and this great portable Arduino-based unit.

Custom Piano Tickles The Ivories

The core ethos of “hacking” is usually interpreted as modifying something for a use that it wasn’t originally built for. Plenty of builds are modifications or improvements on existing technology, but sometimes that just isn’t enough. Sometimes we have to go all the way down and build something completely from scratch, and [Balthasar]’s recent piano-like musical instrument fits squarely into this category.

This electronic keyboard is completely designed and built from scratch, including the structure of the instrument and the keys themselves. [Balthasar] made each one by hand out of wood and then built an action mechanism for them to register presses. While they don’t detect velocity or pressure, the instrument is capable of defining the waveform and envelope for any note, is able to play multiple notes per key, and is able to change individual octaves. This is thanks to a custom 6×12 matrix connected to a STM32 microcontroller. Part of the reason [Balthasar] chose this microcontroller is that it can do some of the calculations needed to produce music in a single clock cycle, which is an impressive and under-reported feature for the platform.

With everything built and wired together, the keyboard is shockingly versatile. With the custom matrix it is easy to switch individual octaves on the piano to any range programmable, making the 61-key piano capable of sounding like a full 88-key piano. Any sound can be programmed in as well, further increasing its versatility, which is all the more impressive for being built from the ground up. While this build focuses more on the electronics of a keyboard, we have seen other builds which replicate the physical action of a traditional acoustic piano as well.

Continue reading “Custom Piano Tickles The Ivories”

Hacked DSP5005 unit showing amp-hours screen

Another DPS5005 Alternative Firmware

These cheap Chinese-built programmable power supplies are nothing new, we’ve been using them for years. They’re not particularly good power supplies, since current feedback is in software, but for some tasks they’re a great fit and you can’t argue with the price. Alternative firmware projects have also been a thing for a while too, but none we’ve seen have been quite as capable and polished as this latest DPS firmware project by [Profi-max.] We’ve not come across the source code yet, but at least the binary image is freely downloadable.Battery charge screen on hacked DPS5005

The firmware has some interesting features, such as programmable pre-sets intended for battery charging applications. In fact, there is a dedicated battery charge mode screen. We want to warn, however, that charging lithium ion batteries with this might not be at all wise, not in the least because of a lack of protection hardware in place. It would be very easy to destroy the unit or overheat a battery this way! However, if you must do this, there are a few features to help you out, such as a handy ‘counters’ screen showing approximate charge delivered.

Remote programmability is, as usual, via the easily hacked in serial port, with firmware support for Bluetooth serial modules if wired USB serial doesn’t suit. For those who like to mount things differently, the screen can be rotated by holding a key on power-up, or if you hook up a MPU6050 accelerometer/gyro module it will even do it automatically!

To update a stock DPS unit, the only requirements are access to an ST-Link compatible programmer dongle, to target the STM32 SWD programming interface, and the STM32CubeProgrammer utility. Open source alternatives to that are also available, stlink comes to mind as a good option. Once you have the module PCB popped out of its plastic casing, only three wires need tacking onto a handy set of pads to complete the connection to the programmer dongle. Pretty simple stuff.

If you’re looking for a similar project, with source immediately available, then checkout the OpenDPS project we covered a few years ago, and if you’re thinking of going crazy, building a DIY open source electronics lab, we got you covered.

Continue reading “Another DPS5005 Alternative Firmware”