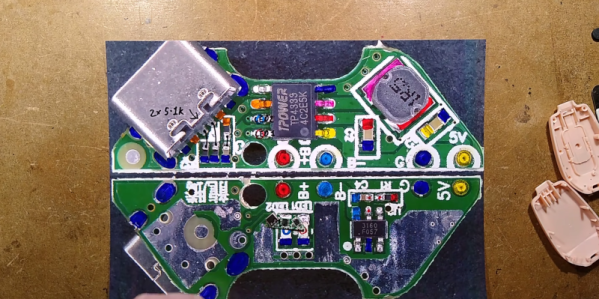
It isn’t clear to us how [mrsylvain59] came into possession of a late-model piece of military gear from the German airforce, but we enjoyed watching the teardown below anyway. According to the documentation, the thing has a huge price tag, although we all know that the military usually pays top dollar for various reasons, so we are guessing the cost of the parts is quite a bit less than the price tag.
We don’t think [mrsylvain59] was sure what the amplifier (verstärker is German for amplifier) does. However, we recognized it as an avionics box from a UH-1 helicopter. We aren’t sure of its exact function, but it is classified under “Automatic Pilot Mechanisms and Airborne Gyro Components.”
Teardowns are great because they let us peek not only at a product’s components, but also gain insight into the design decisions and implementations of hardware. For teardowns, we’re used to waiting until enthusiasts and enterprising hackers create them, so it came as a bit of a surprise to see Sony themselves share detailed teardowns of the new PlayStation VR2 hardware. (If you prefer the direct video links, Engineer [Takamasa Araki] shows off the headset, and [Takeshi Igarashi] does the same for the controllers.)
The “adaptive trigger” module responsible for the unique feedback.
One particularly intriguing detail is the custom tool [Araki] uses to hold the headset at various stages of the disassembly, which is visible in the picture above. It looks 3D-printed and carefully designed, and while we’re not sure what it’s made from, it does have a strong resemblance to certain high-temperature SLA resins. Those cure into hard, glassy, off-yellow translucent prints like what we see here.
As for the controller, we get a good look at a deeply interesting assembly Sony calls their “adaptive trigger”. What’s so clever about it? Not only can it cause the user to feel a variable amount of resistance when pulling the trigger, it can even actively push back against one’s finger, and the way it works is simple and effective. It is pretty much the same as what is in the PS5 controller, so to find out all about how it works, check out our PS5 controller teardown coverage.
The headset and controller teardown videos are embedded just below. Did anything in them catch your interest? Know of any other companies doing their own teardowns? Let us know in the comments!
The pandemic brought with it a need to maintain adequate ventilation in enclosed spaces, and thus, there’s been considerable interest in inexpensive C02 monitors. Unfortunately, there are unscrupulous actors out there that have seen this as a chance to make a quick profit.
Recently [bigclivedotcom] got one such low-cost CO2 sensor on his bench for a teardown, and confirms that it’s a fake. But in doing so he reveals a fascinating story of design decisions good and bad, from something which could almost have been a useful product.
Behind the slick color display is a PCB with an unidentified microcontroller, power supply circuitry, a DHT11 environmental sensor, and a further small module which purports to be the CO2 sensor. He quickly demonstrates with a SodaStream that it doesn’t respond to CO2 at all, and through further tests is able to identify it as an alcohol sensor.
Beyond the alcohol sensor he analyses the PSU circuitry. It has a place for a battery protection chip but it’s not fitted, and an error in the regulator circuitry leads to a slow drain of the unprotected cell. Most oddly there’s an entire 5 volt switching regulator circuit that’s fitted but unused, being in place to support a missing infra-red module. Finally the screen is an application-specific LCD part.
It’s clear some effort went in to the design of this unit, and we can’t help wondering whether it could have started life as a design for a higher-spec genuine unit. But as [Clive] says, it’s a party detector, and of little more use than as a project case and battery.
The original Roomba robotic vacuum cleaner led to loads of clones and lookalikes over the years, and one of them is the ALEE mopping “robot”. [Raymond] tears it down and reveals what’s inside. Turns out it contains mostly regret! Although it does host some design cleverness in its own way.
Technically the ALEE, which cost [Raymond] a cool $85 USD, is not a robot since it has no sensors. And unless a dragging a wet cloth pad kept moist by a crude drip reservoir counts as “mopping”, it’s not much of a mop, either.
This one-motor unit (and tiny battery) is responsible for both motion and direction control. There are no sensors.
There is one interesting aspect to this thing, and it’s to do with the drive system and direction control. The whole thing is driven by a single motor, and not a very powerful one. The center of the robot has a pair of wheels that are both driven at the same rate and speed, and the wheel assembly can pivot around its axis. That’s about it. There are not even any bump sensors of any kind.
So how does this thing move, let alone change direction to (poorly) emulate an original Roomba-like crisscross pattern? The control board appears to have one job: if the motor stalls, reverse direction. That, combined with the fact that the drive unit can pivot and the enclosure is dragging a wet rag, appears to be all the chaos that’s needed to turn bonking into a wall into an undefined direction change.
It’s not great performance, but it sure is some impressive cost-cutting. You can see it bonk around unimpressively in a short video, embedded below the page break.
Just to be clear, [Raymond] knows perfectly well what he’s in for when he obtains cheap tech items from overseas retailers for teardowns. The ALEE does have some mildly interesting secrets to share, but overall, it really wasn’t worth it. Sometimes cheap tech has hacker potential, but there’s no such potential here. Seriously, don’t buy this thing.
[Ben Katz] designed the original MIT Mini Cheetah robot, which easily captured attention and imagination with its decidedly un-robotic movements and backflips. Not long after [Ben]’s masters thesis went online, clones of the actuators started to show up at overseas sellers, and a few months after that, clones of the whole robot. [Ben] recently had the opportunity to disassemble just such a clone by Dogotix and see what was inside.
Mini sheep, meet mini cheetah.
Amusingly, one of the first things he noticed is that the “feet” are still just off-the-shelf squash balls, same as his original mini cheetah design. As for the rest of the leg, inside is a belt that goes past some tensioners, connecting the knee joint to an actuator in the shoulder.
As one may expect, these parts are subject to a fair bit of stress, so they have to be sturdy. This design allows for slender yet strong legs without putting an actuator in the knee joint, and you may recall we’ve seen a similar robot gain the ability to stand with the addition of a rigid brace.
It’s interesting to read [Ben]’s thoughts as he disassembles and photographs the unit, and you’ll have to read his post to catch them all. But in the meantime, why not take a moment to see how a neighbor’s curious sheep react to the robot in the video embedded below? The robot botches a backflip due to a low battery, but the sheep seem suitably impressed anyway.
As more and more electric vehicles penetrate the market, there’s going to have to be a proportional rise in the number of charging stations that are built into parking garages, apartment complexes, and even private homes. And the more that happens, the more chargers we’re going to start seeing where security is at best an afterthought in their design.
But as this EV charger teardown and reverse engineering shows, it doesn’t necessarily have to be that way. The charger is a Zaptec Pro station that can do up to 22 kW, and the analysis was done by [Harrison Sand] and [Andreas Claesson]. These are just the kinds of chargers that will likely be widely installed over the next decade, and there’s surprisingly little to them. [Harrison] and [Andreas] found a pair of PCBs, one for the power electronics and one for the control circuits. The latter supports a number of connectivity options, like 4G, WiFi, and Bluetooth, plus some RFID and powerline communications. There are two microcontrollers, a PIC and an ARM Cortex-A7.
Despite the ARM chip, the board seemed to lack an obvious JTAG port, and while some unpopulated pads did end up having a UART line, there was no shell access possible. An on-board micro SD card slot seemed an obvious target for attack, and some of the Linux images they tried yielded at least a partial boot-up, but without knowing the specific hardware configuration on the board, that’s just shooting in the dark. That’s when the NAND flash chip was popped off the board to dump the firmware, which allowed them to extract the devicetree and build a custom bootloader to finally own root.
The article has a lot of fascinating details on the exploit and what they discovered after getting in, like the fact that even if you had the factory-set Bluetooth PIN, you wouldn’t be able to get free charging. So overall, a pretty good security setup, even if they were able to get in by dumping the firmware. This all reminds us a little of the smart meter reverse engineering our friend [Hash] has been doing, in terms of both methodology and results.
It used to be that every well-stocked doomsday bunker had a Geiger counter. These days, you don’t have to have a big tube-based meter. You can inexpensively get a compact digital instrument to handle your radiation detection needs. [DiodeGoneWild] reviews and tears down such a unit from FNIRSI. The case looks like several other similar instruments we’ve seen lately, so presumably, someone is mass-producing these handheld meter cases. You can see the video, below. The meter reads the absolute radioactivity and can also measure cumulative exposure.
After measuring a few common radioactive items, we get to the teardown. Inside, of course, is an ordinary tube. A few screws reveal a typical rechargeable battery, a fairly simple PCB with a microcontroller and battery backup for the real-time clock. A lot of the board is involved in multiplying voltage up to the several hundred volts required for the Geiger tube.
The other side of the PCB has only buttons, a vibration motor, and, of course, the LCD. We don’t know how you might test the relative accuracy other than comparing it to a known-good meter. The bare tube was, of course, more sensitive without the plastic cover, but that could be calibrated out, too.