Miniscule Intervalometer

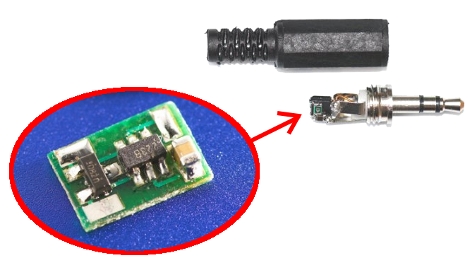
Calling this intervalomemter small would be a glaring understatement. It’s tiny enough to fit inside the plastic cover for a 2.5mm jack for use with a Canon DSLR camera. We should point out that the image we put together is a bit misleading. The picture of the jack is version 1 of this circuit and uses an 8-pin SOIC chip. The board in the oval is version 2, with a PIC 10f222 SOT23-6 package making it even smaller than the original version.

This is used for time-lapse photography. When plugged in the chip draws power from the camera. Get this: it learns the timing interval by listening for the first two images. Once you’ve snapped the first two pictures the PIC will continue to take images based on that initial delay. Amazing.

[Thanks AW via DIY Photography]

Hackaday Links: July 25, 2010

Radio Receiver

If you never got the chance to build one as a kid [JoOngle] takes you through the steps to build your own radio receiver. Details are a bit scarce but it’s nothing your friend Google can’t help you out with.

Fixing a Blackberry trackball

If your Blackberry trackball stops working well you can try this non-technical fix. Remember when mice used to have a ball in them and you would need to clean out the gunk from time to time? Forcefully skidding your Blackberry across a piece of paper does a similar service.

Linux time lapse

Open source can be a great help to small businesses. Here’s a way to use a Linux machine to make time-lapse movies from surveillance camera feeds. We especially enjoy the use of a desktop wallpaper that has the terminal commands necessary to start recording.

Host a webpage with Dropbox

Here’s a way to host a simple webpage using Dropbox. It’s one of those easy ideas that you wouldn’t come up with yourself. When you place an HTML file in your Dropbox you can get a public URL which will be built as a webpage when visited with a browser.

Inline splicing

To round out the weekend here’s [Osgeld’s] tips on inline wire splicing. We laughed as he recounted spearing himself with stray strands. This is pretty simple stuff but he’s explained it well and who’s to pass up a good tip?
2-axis Motion Timelapse Photography

[Milapse] picked up a motorized telescope base a few years ago. He’s using it to add motion to time-lapse photography. The base provides two-axis rotation controlled with a handheld keypad. Custom firmware and a bit of software allow for computer control. [Milapse] is pretty well-known in the time-lapse photography circles of the Inter-web. He’s posted a ten minute video explaining his setup and programming work for the hardware.

His use of a quality camera produces some nice video.However cost at $200 for the base, if you just want to play around with the concept you might want to stick to a webcam and LEGO setup.

[Thanks Jack]

Hackaday Links: Sunday, November 29

Sometimes we wonder if we’re making good choices with PCB layout when using EagleCAD. Watch how the pros do it with a video of an hour-long Adafruit PCB layout session compressed into seven minutes.

[Elijah] documented his RepStrap build. This is a chicken-or-egg project in that RepStrap machines are built without the assistance of an already existing RepRap.

Here’s an ASUS concept from CeBIT this year for a laptop that has two touch screens and no physical keyboard. Isn’t this just the DS project we saw this week but in a nice case?

[James] conjured up a physical realization of the Spinning Wheel of Death for an art exhibit. We can’t stop smiling when looking at this artful hack.

I’m sure nobody will raise an eyebrow when you pop out that roll of duct-tape and affix your phone to the airplane window. That’s what [floe] did to make this airline flight time-lapse video with an Android phone. Aren’t you supposed to turn off all electronics for takeoff?

Time-lapse Courtesy Of Arduino

arduino-time-lapse

[Ross] put together a small package for use with time-lapse photography. The Nikon camera he’s using can snap a picture when it receives an IR command. [Ross’] solution connects an IR LED to an Arduino to generate this signal. The delay between frames is set with a potentiometer that is read in through the ADC. This is quite a bit less involved than the last solution we saw.

The unit consisting of an Arduino clone, a 9v battery, and the IR LED on a cable is easy to fit into a camera bag. He’s posted the code and we’ve embedded an example of his work after the break. An enclosure as well as time references around the potentiometer would complete this handy tool.

Continue reading “Time-lapse Courtesy Of Arduino”

Time Lapse Light Sculptures

time_lapse_light_sculptures

[Jared] sent us a feature he posted involving time-lapse photography and an LED. Using a custom built aparatus an LED is moved on two axis’ during a long exposure of around thirty seconds. The frame is wood and PVC with two gearhead motors powered by AA batteries to provide the locomotion. The LED is powered by a 3v button cell and automatically transitions through different colors.

Toyaanisqatsi: Time Lapse Control Using LEGO Parts

[youtube=http://www.youtube.com/watch?v=Fm1fFQfGc9M&feature=player_embedded]
A simple panning motion can add impact to the already-dramatic effect of time lapse photography. To accomplish this, frugal cinematographers sometimes build [Rube Goldberg] contraptions from clock motors, VCR parts or telescope tracking mounts. Hack a Day reader [Stephan Martin] has assembled a clever bargain-basement system using an Arduino-driven stepper motor and a reduction gear system built up from LEGO Technic parts, along with some Processing code on a host PC to direct the show.

While the photography is a bit crude (using just a webcam), [Stephan’s] underlying motion control setup might interest budding filmmakers with [Ron Fricke] aspirations but Top Ramen budgets. What’s more, unlike rigid clock motor approaches, software control of the camera mount has the potential for some interesting non-linear, fluid movements.