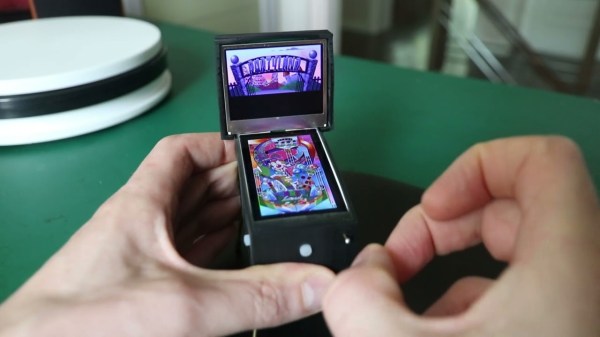
Ask Hackaday: How Small Is Your Shop?

Electronics, metalwork, carpentry, sewing — however you express your inner hacker, you’ve got to have a place to work. Most of us start out small, assembling projects on the kitchen table, or sharing space on a computer desk. But eventually, if we’re lucky, we all move on to some kind of dedicated space. My first “shop” was a corner of the basement my Dad used for his carpentry projects. He built me what seemed at the time like a huge bench but was probably only about five feet long. Small was fine with me, though, and on that bench I plotted and planned and drew schematics and had my first real lesson in why you don’t reach for a soldering iron without looking first. My thumb still bears that scar as a reminder.

Many of us outgrow that first tiny space eventually, as projects (and accumulated junk) outpace the available space. Some of us go on to build workspaces to die for; personally, I feel wholly inadequate whenever I see Frank Howarth’s immense wood shop, with its high ceilings, huge windows for natural light, and what amounts to a loading dock. Whenever I see it I think The work I could do in there!

Or could I? Is bigger necessarily better when it comes to workspaces? Would more space make me a better craftsman?

Continue reading “Ask Hackaday: How Small Is Your Shop?”

MEMS: The Biggest Word In Small

What’s tiny and on track to be worth $22 billion dollars by 2018? MEMS (Micro Electrical Mechanical Systems). That’s a catch-all phrase for microscopic devices that have moving parts. Usually, the component sizes range from 0.1 mm to 0.001 mm, which is tiny, indeed. There are some researchers working with even smaller components, sometimes referenced as NEMS (Nano Electrical Mechanical Systems).

Resonant Cantilever by [Pcflet01], CC BY-SA 3.0
MEMS have a wide range of applications including ink jet printers, accelerometers, gyroscopes, microphones, pressure sensors, displays, and more. Many of the sensors in a typical cell phone would not be possible without MEMS. There are many ways that MEMS devices are built, but just to get a flavor, consider the cantilever (see right), one of the most common MEMS constructions.

Continue reading “MEMS: The Biggest Word In Small”

Seiko Spring Drive Movement Being Assembled

Keeping Time With A Spring Powered Integrated Circuit

Watch aficionados have a certain lust for mechanical watches. These old school designs rely on a spring that’s wound up to store energy. The movement, an intricate set of gears and other mechanical bits, ensures that the hands on the watch face rotates at the right speed. They can be considered major feats of mechanical engineering, with hundreds of pieces in an enclosure that fits on the wrist. They’re quite cheap, and you have to pay a lot for accuracy.

Quartz watches are what you usually see nowadays. They use a quartz crystal oscillator, usually running at 32.768 kHz. These watches are powered by batteries, and beat out their mechanical counterparts for accuracy. They’re also extremely cheap.

Back in 1977, a watchmaker at Seiko set off to make a mechanical watch regulated by a quartz crystal. This watch would be the best of both words. It did not become a reality until 1997, when Seiko launched the Spring Drive Movement.

A Blog To Watch goes through the design and history of the Spring Drive movement. Essentially, it uses a super low power integrated circuit, which consumes only 25 nanowatts. This IC receives power from the wound up spring, and controls an electromagnetic brake which allows the movement to be timed precisely. The writeup gives a full explanation of how the watch works, then goes through the 30 year progression from idea to product.

Once you’ve wrapped your head around that particularly awesome piece of engineering, you might want to jump into the details that make those quartz crystal resonators so useful.

[Thanks to John K. for the tip!]

DIY I2C Devices With ATtiny85

[Pawel] has a weather station, and its nerve-center is a Raspberry Pi. He wanted to include a light sensor but the problem is, the Pi doesn’t have a built-in ADC to read the voltage off the light-dependent resistor that he (presumably) had in his junk box. You can, of course, buy I2C ADC chips and modules, but when you’ve already got a microcontroller that has ADC peripherals on board, why bother?

[Pawel] wired up a tremendously simple circuit, downloaded some I2C slave-mode code, and added an LED for good measure. It’s all up on GitHub if you’re interested.

cropped_shot_2016-10-21-112958
Bright by Day, Dark by Night!

We’re covering this because we rarely see people coding for I2C slave devices. Everyone and their mom uses I2C to connect to sensors, for which the Arduino “Wire” library or “i2c-tools” on the Pi do just fine. But what do you do when you want to make the I2C device? [Pawel]’s project makes use of TinyWireS, a slave-mode SPI and I2C library for AVR ATtiny Arduino projects.

Here, [Pawel] just wanted a light sensor. But if you’re building your own devices, the sky is the limit. What’s the most esoteric I2C sensor that you can imagine? (And is it really the case that we haven’t seen an I2C slave device hack since 2010?)

Transcend Wifi SD Card Is A Tiny Linux Server

[jamesone111] bought a Transcend WifiSD card, presumably for photography, but it may just have been because he heard that they’re actually tiny Linux servers.

He read a post about these cards on the OpenWRT forums. They’re all a similar configuration of a relatively large amount of memory (compared to the usual embedded computer), a WiFi chip, and an ARM processor running a tiny Linux install. The card acts as a WiFi access point with a little server running on it, and waits for the user to connect to it via a website. It also has a mode where it will connect to up to three access points specified by the user, but it doesn’t actually have a way to tell the user what its IP address is; which is kind of funny.

[jamesone111] hacked around with the Transcend card for a bit. He found it pretty insecure, which as long as you’re not a naked celebrity, shouldn’t be a huge issue. For the hacker this is great as it opens up the chance of hacking the firmware for other uses.

Some have already pulled off some cool hacks with these cards. For example, [peterburk] hacked a similar card by PQI to turn his iPod into a portable file server. 

Tiny Tiny RGB LED Displays

Hackaday.io contributor extraordinaire [al1] has been playing around with small LEDs a lot lately, which inevitably leads to playing around with large groups of small LEDs. Matrixes of tiny RGB LEDs, to be precise.

Where's the LED?
Where’s the LED?

First, he took 128 0404 SMD RGB LEDs (yes, 40 thousandths of an inch on each side) and crammed them onto a board that’s just under 37 mm x 24 mm. He calls the project 384:LED (after all, each of those 128 packages has three diodes inside). A microcontroller and the driver chips are located on a separate driver board, which piggy-backs via pin headers to the LED board. Of course, he had to use 0.05 inch headers, because this thing is really small.

Of course, no project is without its hitches. [al1] bought LEDs with the wrong footprint by mistake, so he had a bunch of (subtly different) 0404 LEDs left over. Time for an 8×8 matrix! 192:LED isn’t just the first project cut in half, though. It’s a complete re-design with a four-layer board and the microcontroller on the back-side. And as befits a scrounge project with lots of extreme soldering, he even pulled the microcontroller off of a cheap digital FM radio. Kudos!

We’re in awe of [al1]’s tiny, tiny hacking skills. Now it’s time to get some equally cool graphics up on those little displays.

Adorable Matchbox Robot

[wattnotions] has been playing with matches, well the box they come in anyway. One day he was letting synapses fire unsupervised, and wondered if he could build a robot inside of a matchbox. His first prototype was a coin lithium battery and scrounged motors from those 3 US Dollar servos you can buy by the dozen. It scooted around just fine, but it drained the battery instantly and was a little boring.

Next, he etched a board. It had a little PIC micro, a connector for a mini LiPo, and an H bridge. It fired up just fine, and even though it drained the battery way too fast, at least it wasn’t brainless anymore. In our experience, robots tend to discard all the useful data they collect anyway, so being blind wasn’t too much of a problem.

Inspired and encouraged, with synapses gloriously undeterred, [wattnotions] set out to make a version 2. This time he ordered a board from OSHPark, made a 3D model in SketchUp, and proceeded to lock himself out from his own chip. Without a high voltage programmerhe was out of luck. The development was unfortunately put on hold.

It was fun to read along with [wattnotions] as he went on a small robot adventure. We hope he’ll complete a version 3 and have a swarm of the little fellows scooting around.

Continue reading “Adorable Matchbox Robot”