Automated Chip Burning

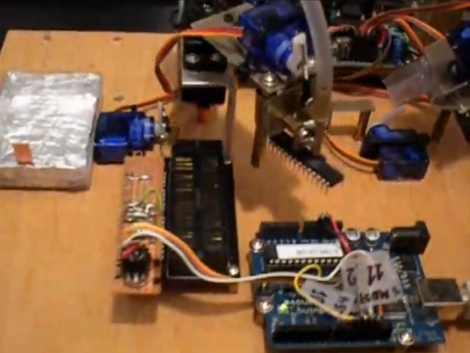
[Alexsoulis] needed to burn the Arduino bootloader to a slew of ATmega328 chips. Instead of sitting there and plugged the chips into a programmer one at a time, he build a robotic microcontroller programmer.

It starts with the DIP package microcontrollers in a tube, with a servo motor to dispense them one-by-one. An arm swings over and picks up the chip with a fish pump powered vacuum tweezers similar to the pick-and-place head we saw recently. From there the chip is dropped into a ZIF socket and programmed by an Arduino. Once the process is complete it is moved to the side and the process repeats.

We’ve reported on using an Arduino as an AVR programmer but we’ve never actually done it ourselves (we use an AVR Dragon programmer). Take a look at the video after the break and let us know if you think the actual programming seems incredibly slow.

Continue reading “Automated Chip Burning”

Open Source Pick-and-place

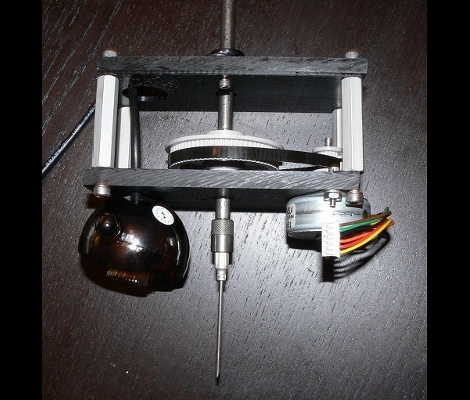
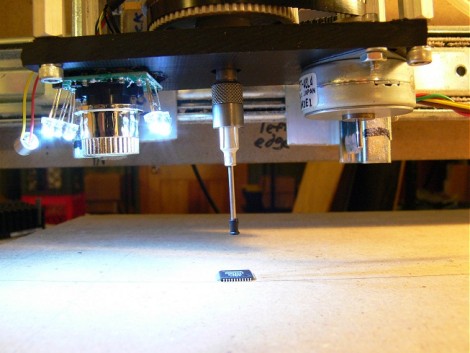
This is a vacuum tweezers head for an open source pick-and-place. Those are the machines that professional printed circuit board manufacturers use to populate a circuit board with components before heading to the reflow oven. [Drmn4ea] built it with at-home rapid manufacturing in mind. The black orb on the left is a webcam for optical placement. The needle in the middle is an interchangeable vacuum-tool head. The motor on the right allows for different attachments to be swapped in automatically to suit a variety of parts.

This interfaces with a 3-axis CNC machine and should be easily compatible with a RepRap, Makerbot, or similar device. We wonder how he plans to handle reels of components, but this is a well-executed first step in the journey to a complete solution.

Want to see a professional pick-and-place at work? Check out one of SparkFun’s machines busy build a board after the break.

Continue reading “Open Source Pick-and-place”

Thieves, Armed With A Vacuum Cleaner, Still On The Run

Thieves in Paris have been stealing money with the clever use of a vacuum. Not just bits of change here and there, they’ve stolen over 500,000 euros. They noticed that Monoprix supermarkets use a pneumatic tube system to transport rolls of cash to and from the safe. Realizing this was the weakest point in the security, they simply drilled a big hole in the tube, hooked up a vacuum and sucked the cash out. Forget lock picking or safe cracking, this had to be ridiculously easy.

The thieves are still out there, sucking their way to riches. At this point, they’ve hit 15 locations. Their luck has to run out some time right?

[via Slashdot]

Headphone Tube Preamp Kit

If you’re curious about tube amps but don’t have a firm enough knowledge base to dive right in you might want to try a kit. [Mark Houston] reviewed one such kit and we enjoyed reading about his experiences. It comes with everything you need save soldering tools, an enclosure, and the final connectors ([Mark] used RCA connectors). There is a full schematic available and the assembly instructions take you through tube matching and using that piece of copper coil you see in the picture to wind your own inductor. Consider trying this primer before you jump into building a single tube, multiple tube, or an amplifier of your own design.

[Thanks Gio]

Tiny Tube Amp For Headphones

We like to check in from time to time on the scratch-built tube amp scene. [Rogers Gomez] recently posted his build of a headphone tube amp. This is somewhat related to his work from 2008, but this time around it’s simple enough to serve as an entry into amplifier construction for beginners. The PCB layout is clean and simple, makes for easy board etching, and it’s small enough to fit into an enclosure that can pass as a headphone accessory. Only one tube is needed, with a total parts bill coming in around the $50 mark. If you build it, heed his advice on testing with a pair of cheap headphones before you risk plugging in your prized pair.

Still want an amp but don’t care to source the vacuum tube? [Giovanni], who sent in the original tip, build one a while back and housed it in an external CD-ROM enclosure.

Thermos Temperature Meter

[youtube=http://www.youtube.com/watch?v=UXsxtEmKgbw]

We’re always a little surprised by how well a vacuum thermos works, but eventually the contents will cool down (or warm up depending on what’s in there). [Gamesh_] added a temperature meter to his thermos using an Arduino and a temperature sensor. The original post is in Portuguese but [Bruno] republished it in English.

The temperature sensor has been repurposed from a digital thermometer meant for taking your temperature. Holes for the LEDs making up the indicator bar were melted in the side of the plastic housing. When the hot liquid is poured out at about 0:45 into the video you can glimpse the Arduino hanging our on the other side of the pot and a power cord running off behind the laptop. It would be nice to see this migrated over to a less powerful chip and run from a small coin cell, but we like the concept.

Vacuum Pick And Place For SMD Parts

[Pete] has written up this in depth how-to on building a vacuum pick and place from an aquarium pump and a pen. The pump conversion to vacuum is extremely simple, with a slight modification to a valve being all that is necessary. The pen is only slightly more involved, but still extremely simple. This entire project could be done in an evening for less than $30. If you’re doing a ton of SMD work, it could be a no-brainer.

[thanks Drone]