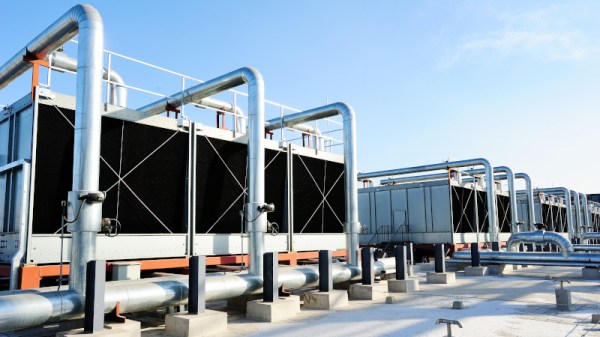
When it comes to high-performance desktop PCs, particularly in the world of gaming, water cooling is popular and effective. However, in the world of datacenters, servers rely on traditional air cooling more often than not, in combination with huge AC systems that keep server rooms at the appropriate temperature.
However, datacenters can use water cooling, too! It just doesn’t always look quite how you’d expect.
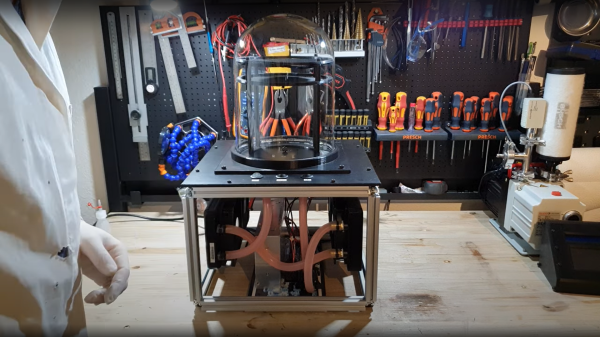
[Advanced Tinkering] over on YouTube has some pretty unique content, on subjects of chemistry and physics that are a little more, interesting let’s say — anyone fancy distilling cesium? The subject of this build is the visualization of ionizing radiation tracks, with one of our old favorite physics demonstrators, the venerable cloud chamber. The build video (embedded below,) shows the basic construction and performance of a Peltier effect cooler setup. The system is used to create a layer of supersaturated (and cold) alcohol vapor in which the radiation source or other experiment can be immersed.
Peltier modules are a great solution for moving heat from one surface to another, but they are not terribly efficient at it, especially if you don’t keep the hot side temperature in check. Effectively they are a short-distance heat pump, so you need to dump the hot-side heat elsewhere. The method [Advanced Tinkering] chose here was to use a pair of off-the-shelf water cooling blocks, mounted into a 3D printed plate. The hot side dumps into a pair of fan-cooled radiators. Four double-layer Peltier modules are wired in parallel to a 60A power supply, which seems like a lot, but Peltier modules are hungry little things. A reasonable amount of power is needed to drive the cooling fans and water pump. The vapor source is a simple pad of liquid alcohol at the top of the stack, just above a metal screen which is held at a high voltage. The vertical electric field allows visualization of the charge of emitted particles, which will curve up or down depending on their polarity.
As can be seen from the second video linked below, some really nice cloud trails are produced, so it looks like they got the setup just right!
There’s an old joke about the Thermos bottle that keeps things hot and cold, so someone loaded it with soup and ice cream. That joke is a little close to home when it comes to FDM 3D printers.
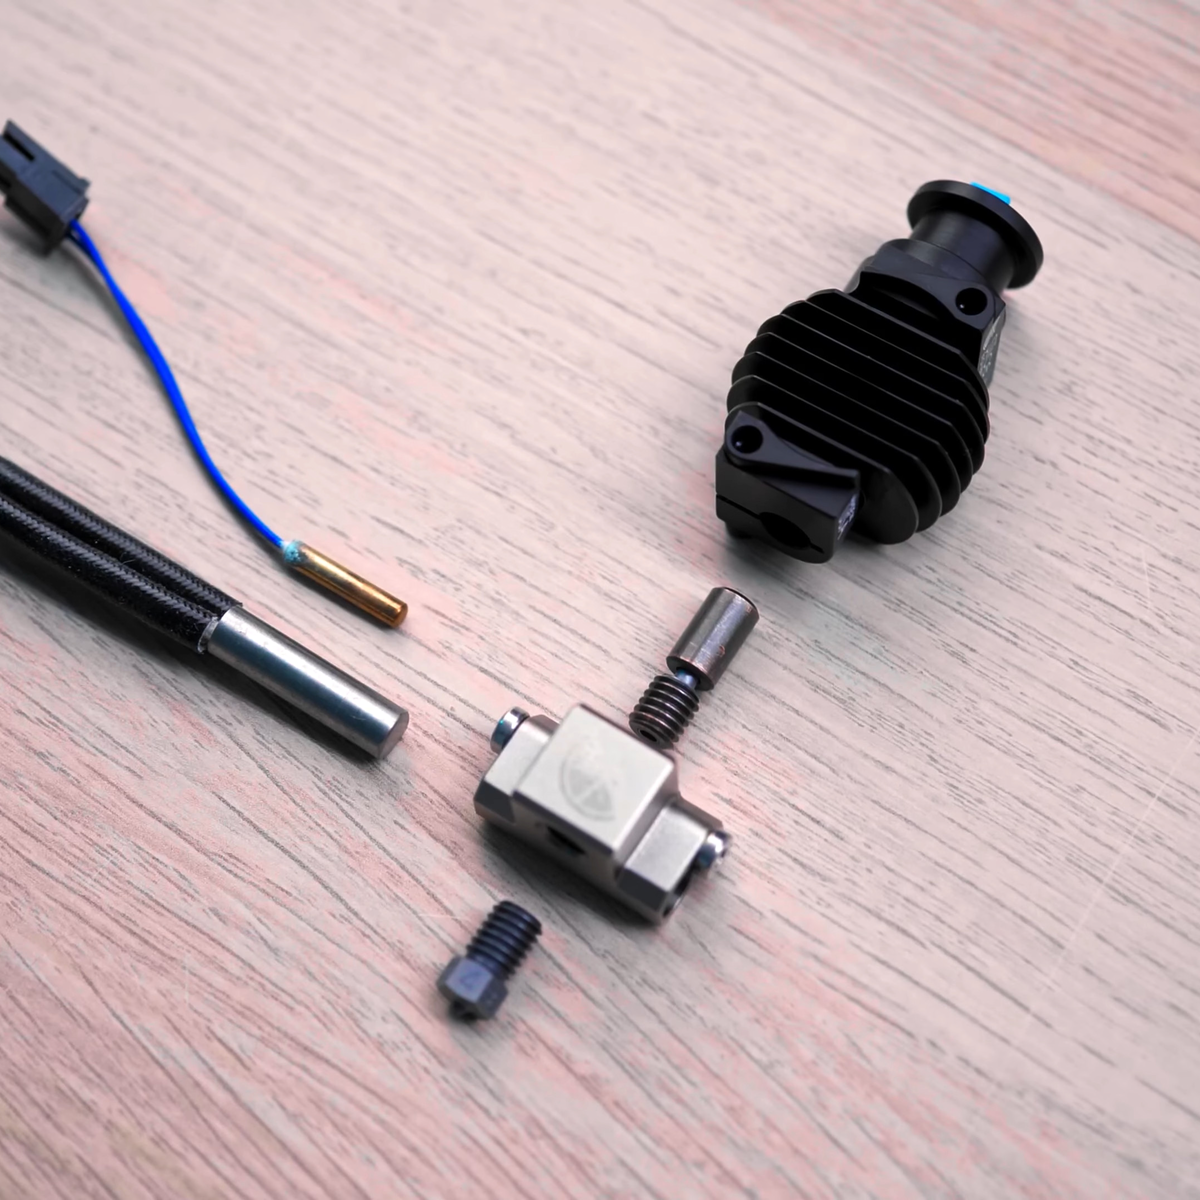
You want to melt plastic, of course, or things won’t print, so you need heat. But if the plastic filament gets hot too early, it will get soft, expand, and jam. Heat crawling up the hot end like this is known as heat creep and there are a variety of ways that hot ends try to cope with the need to be hot and cold at the same time. Most hotends today are air-cooled with a small fan. But water-cooled hotends have been around for a while and are showing up more and more. Is it a gimmick? Are you using, planning to use, or have used (and abandoned) water cooling on your hot end?
Heat Break
The most common method is to use a heat-break between the heating block and the rest of the filament path. The heat-break is designed to transfer as little heat as necessary, and it usually screws into a large heat sink that has a fan running over it. What heat makes it across the break should blow away with the fan cooling.
High tech solutions include making heat-breaks out of titanium or even two dissimilar metals, all with the aim of transferring less heat into the cooler part of the hot end. More modern hot ends use support structures so the heatbreak doesn’t need mechanical rigidity, and they can make very thin-walled heatbreaks that don’t transmit much heat. Surely, then, this is case closed, right? Maybe not.
While it is true that a standard heat-break and a fan can do the job for common 3D printing tasks, there can be problems. First, if you want to print fast — time is money, after all — you need more power to melt more filament per second. If a heatbreak transfers 10% of the heat, this increases demands on the upstream cooling. Some engineering materials want to print at higher temperatures, so you can have the same problem there as well. If you want to heat the entire print chamber, which can help with certain printing materials, that can also cause problems since the ambient air is now hotter. Blowing hot air around isn’t going to cool as effectively. Not to mention, fans that can operate at high temperatures are notoriously expensive.
There are other downsides to fans. Over a long print, a marginal system might eventually let enough heat creep up. Then there’s the noise of a fan blowing during operation. True, you probably have other fans and noisy parts, but it is still one more noise source. With water cooling, you can move the radiator outside a heated enclosure and use larger, slower, and quieter fans while getting more cooling right where you want it. Continue reading “3D Printering: Water-Cooled Hotends”→
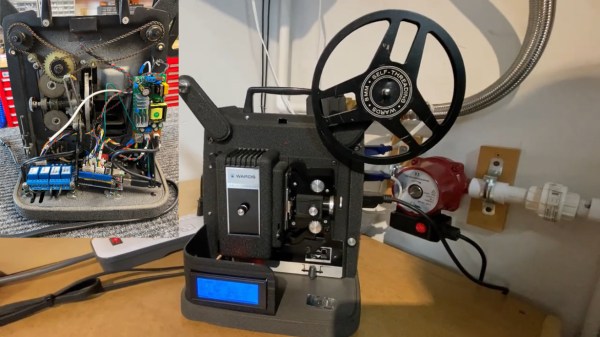
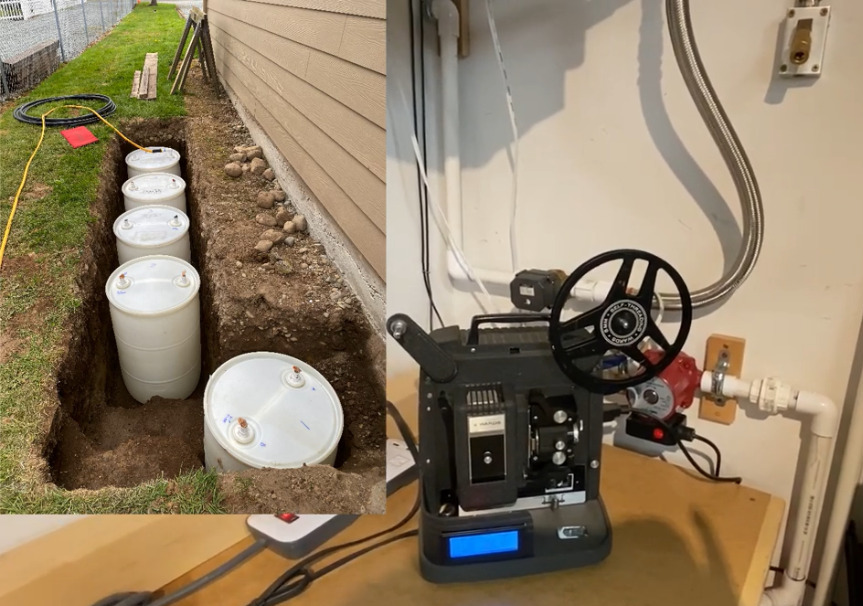
Having any kind of shop is pretty great, no matter how large it may be or where it’s located. If the shop is in an outbuilding, you get to make more noise. On the other hand, it will probably get pretty darn hot in the summer without some kind of cooling system, especially if you don’t have a window for a breeze (or a window A/C unit).
[Curtis in Seattle] built an awesome thermal battery-based cooling system for his shop. The battery part consists of five 55-gallon drums full of tap water that are connected in series and buried a foot underground, about two feet out from the wall. There are two radiators filled with water and strapped to 20″ box fans — one inside the shop, which sends heat from the shop into the water, and another outside that transfers heat out of the water and into the cool night air. Most summer days, the 800-square-foot shop stays at a cool 71°F (21.7°C).
We love that the controls are housed in an old film projector. Inside there’s an Arduino Uno running the show and taking input from four DS18B20 one-wire temperature sensors for measuring indoor, outdoor, battery, and ground temperatures. There are four modes accessible through the LCD menu — idle, cool the shop, recharge mode, and a freeze mode in case the outside temperature plummets. Why didn’t [Curtis in Seattle] use anti-freeze? It’s too expensive, plus it doesn’t usually get that cold. (Although we hear that Seattle got several inches of snow for Christmas.) Check it out after the break.
A classic problem. You have a new CPU and a 15-year old water cooling system. Of course, the bracket doesn’t fit. Time to buy a new cooler? Not if you are [der8auer]. You design a new bracket and mill it out of aluminum.
Honestly, it might seem overkill, but it makes sense. After all, no matter how new the CPU is, using water to cool it still works the same way, in principle.
The Canon EOS R5 is a highly capable, and correspondingly very expensive camera. Capable of recording video in 8K in a compact frame size, it unfortunately suffers from frustrating overheating issues. Always one to try an unconventional solution to a common problem, [Matt] decided to whip up a watercooling solution. What ensues is pure, top-notch engineering.
The watercooling setup is amusing, but the real star of the show is the custom copper heatsink that transforms the camera’s performance without spoiling its practicality.
Upon its original release, Canon had the R5 camera simply shut off on a 20 minute timer when recording 8K video. When the userbase complained, an updated firmware was released that used an onboard sensor and would only shutdown when excessive temperatures were reached. Under these conditions, the camera could record for around 25 minutes at 20 °C. [Matt] set about disassembling the camera to investigate, figuring out that the main processor was the primary source of heat. With a poor connection to its heatsink and buried under a power supply PCB, there simply wasn’t anywhere for heat to go, leaving the camera to regularly overheat and take hours to cool down.
After whipping up an amusing but impractical watercooling solution and verifying it allowed the camera to record indefinitely, [Matt] set about some proper thermal engineering. A custom copper heatsink was produced for inside the camera, bonded directly to the processor and DRAM with thermal paste instead of poor-quality thermal tape. This then directs heat out through the plastic back of the camera. In cool environments, this is enough to allow the camera to record continuously. In warmer environments, simply adding a small fan to the back of the camera was enough to keep things operational indefinitely.
[Matt] finishes the video by pointing out that Canon could have made the camera far more useful for videographers by simply investing a little more time into the camera’s cooling design, while also generating more profits by selling a cooling accessory for extended recording. We’ve seen some of [Matt’s] work before too, such as this DIY 4K projector build. Video after the break.
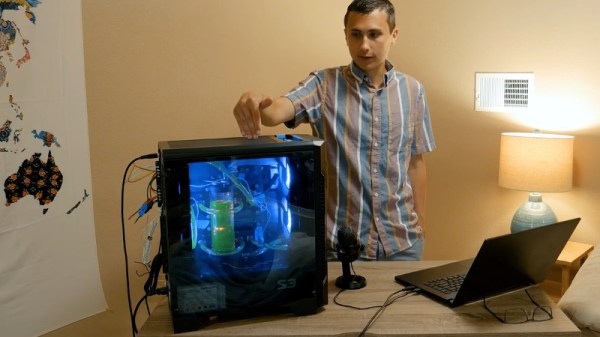
At first glance, you might think the piece of hardware pictured here is a modern gaming computer. It’s got water cooling, RGB LED lighting, and an ATX power supply, all of which happen to be mounted inside a flashy computer case complete with a clear window. In truth, it’s hard to see it as anything but a gaming PC.
In actuality, it’s an incredible custom electronic load that [EE for Everyone] has been developing over the last four months that’s been specifically designed to take advantage of all the cheap hardware out there intended for high-performance computers. After all, why scratch build a water cooling system or enclosure when there’s such a wide array of ready-made ones available online?
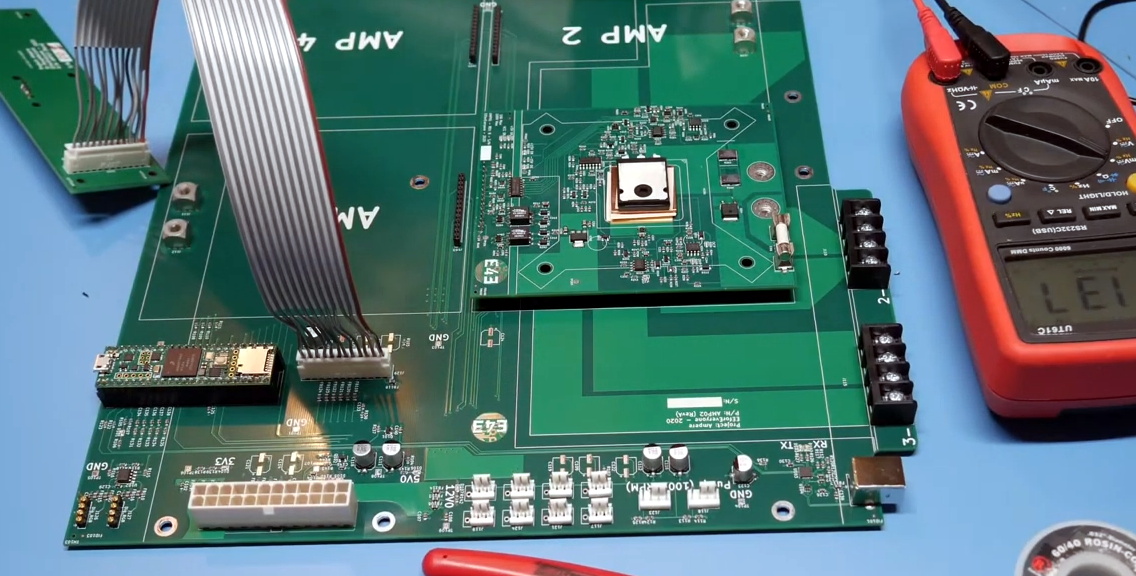
The “motherboard” with single load module installed.
Inside that fancy case is a large PCB taking the place of the original motherboard, to which four electronic load modules slot into. Each of these loads is designed to accept a standard Intel CPU cooler, be it the traditional heatsink and fan, or a water block for liquid cooling. With the current system installed [EE for Everyone] can push the individual modules up to 275 watts before the temperatures rise to unacceptable levels, though he’s hoping to push that a little higher with some future tweaks.
So what’s the end game here? Are we all expected to have a massive RGB-lit electronic load hidden under the bench? Not exactly. All of this has been part of an effort to design a highly accurate electronic load for the hobbyist which [EE for Everyone] refers to as the “Community Edition” of the project. Those smaller loads will be derived from the individual modules being used in this larger testing rig.
 heat pump, so you need to dump the hot-side heat elsewhere. The method [Advanced Tinkering] chose here was to use a pair of off-the-shelf water cooling blocks, mounted into a 3D printed plate. The hot side dumps into a pair of fan-cooled radiators. Four double-layer Peltier modules are wired in parallel to a 60A power supply, which seems like a lot, but Peltier modules are hungry little things. A reasonable amount of power is needed to drive the cooling fans and water pump. The vapor source is a simple pad of liquid alcohol at the top of the stack, just above a metal screen which is held at a high voltage. The vertical electric field allows visualization of the charge of emitted particles, which will curve up or down depending on their polarity.