LED Tells You When Your Server Has Melted

LED

One of the benefits of writing for Hackaday is the ability to command at will a legion of readers to descend on unsuspecting web servers. Most of the time a server can handle the load of thousands of connections. On the rare occasion, though, a server is turned into a pile of slag and dross to the satisfaction of us here at Hackaday and to the ire of admins everywhere.

Checking to see if your server is still running or not isn’t terribly interesting, though. [Eric] thought it would be cool to have a proper physical visualization of how busy his server is, and ended up using a blink(1) USB-controllable LED to display his current server load.

The blink(1) is a small, USB controlled RGB LED that can be used as a universal indicator light. [Eric] had the idea of plugging it in to one of his servers and having the brightness of the LED change in response to the load on the server. He did this with a Python script that queries the Google Analytics API and returns a value from 0 to 255 in response to how popular his server was in the last 10 minutes.

Of course, there’s always a chance Hackaday could Slashdot his server. In that case, the blink(1) glows a steady red, alerting [Eric] to his popularity.

Hackaday-proofing Your Hackerspace’s Server

Last month we posted a tutorial from Hub City Labs on making your own PCBs at home. At the time, Hub City was hosting their hackerspace web site on a tiny vps graciously provided by a member. As you might expect, the throngs of Hackaday readers turned Hub City Labs’ server into a pile of molten slag and made their admin’s hair a little more gray. Their web site is up again, and Hub City provided a tutorial on protecting your server from the ravages of being Slashdotted, Farked, Reddited, and even Hackaday’d.

The solution for the first few hours was to transfer Hub City Labs’ site to an Amazon EC2 instance. Since then, they’ve moved over to a Debian EC2 instance that is able to handle half a million pageviews an hour for a WordPress site.

This amazing capability required a good bit of optimizations. A WordPress installation is set to run cron tasks on every page load; not good if you’re going to see thousands of hits every minute. The guys added define(‘DISABLE_WP_CRON’, true) to their wp-config.php file and set all the background tasks – checking to see if a page should be updated – to a fixed schedule every minute or so. Along with an increase in the WordPress cache, these optimizations increased the number of pageviews an hour from 1500 to 60000.

To get up to half a million pageviews an hour, the EC2 instance was loaded up with Varnish, a front-end cache that really speeds things up.

The result – 375 million pageviews for $15 a month – is more than Hub City Labs will probably ever need. The nature of hackerspace web sites, though – light load until Hackaday, Slashdot, or Reddit figure out you did something cool – means hosting on an expandable EC2 instance is probably the way to go.

Lightweight Web Server Using The MSP430

Need a tiny web server? [Rob] over on the 43oh forums made an Ethernet booster pack for the very popular TI MSP430 microcontroller. If that’s not enough, [Rob] also put together an all-in-one solution with a MSP430 and Ethernet controller that can be powered by a battery. Along with the web server that fits in just 5k of flash, we’re going to say [Rob] has a very good solution for remote sensing and data logging.

For his Ethernet-enabled 430, [Rob] chose to use the WIZnet W5200 Ethernet controller. This chip communicates with the 430 via and SPI interface and has a hardware TCP/IP stack that supports TCP, UDP, and PPPoE, offloading all the low-level stuff off of the 430 and onto the Ethernet controller.

After the break there are a pair of videos of [Rob] showing off his tiny web server. A few neat features include a full memory dump of the 430, as well as a reading the states of all the pins via an HTML page. If you’re looking for a way to collect data over Ethernet, we don’t think you could do better than [Rob]’s tiny 430-based web server. Also, if you’d like to control a few devices over the Internet, [Rob] included a few optoisolators  for lights or appliances.

The code is available on the 43oh forum page, but [Rob] says he’ll clean that up and put it in a Git.

Continue reading “Lightweight Web Server Using The MSP430”

Embedded Linux Meets Arduino With The Rascal Micro

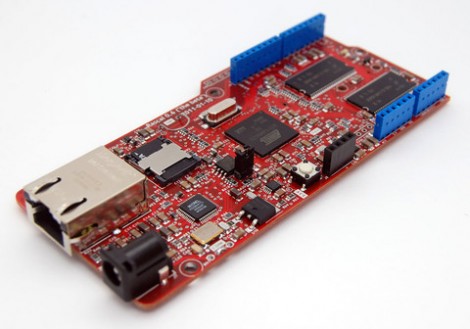
Behold the Rascal Micro. It’s running embedded Linux and has a dual-row of pin headers which probably seem pretty familiar. The idea here is to bring Arduino hardware (ie: shields) to a party with a powerful web server.

The image above is the beta version of the hardware. What’s being shown off in a recent Engadget demo is a version that slides two USB ports in between the barrel jack and the NIC. This makes it easy to jump over to wireless with the use of a USB dongle, or you can figure out what other peripherals you want to include in your project.

The novelty here is that the web server included a built-in editor. So not only can it serve you a webpage to control hardware or display sensor status, but it will let you edit the interface without needing to reflash anything.

The price rings in somewhere around $100-150, and like the popular Raspberry Pi board, you can’t get your hands on it right now.

Building The Backend Of Internet Controlled Devices

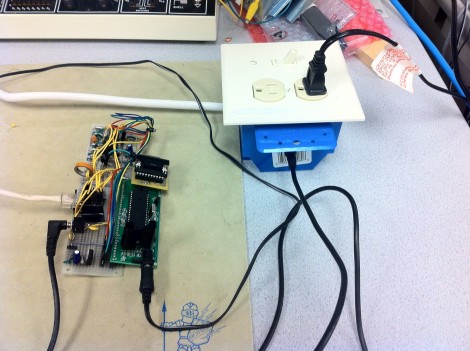
[Adam] and [Jeremy] took on the challenge of designing a system that would make it easy to control appliances from the Internet. We’ve seen the concept many times before; it involves some method of switching mains power and connecting that mechanism to the Internet. This design is both well planned and nicely executed.

We’re always very interested in the power switching for a project like this. It’s good that an approved electrical box houses all of the high-voltage parts in the project. Here a GA8-2B02 solid state relay switches power between the incoming cord and the two outlets. We didn’t get a look in the box, but hopefully there’s a partition between those wires and the low-voltage control wiring which uses a standard 3.5 mm audio jack as an interconnect.

An ATmega644 drives the control signal for the relay. It’s connected via Ethernet cable to the Internet through the use of an ENC28J60 chip which takes care of LAN communications. This is essentially a light-weight web server that will be easy to adapt to receive commands from just about any web-connected sender.

[Thanks Bruce]

Over-the-air FM Radio Gains Internet Control

[Old bit collector] is giving up control of his radio dial to the Internet. He combined a couple of Parallax products which now allow him to tune, adjust volume, and toggle the power for an FM radio receiver.

The setup is pretty simple. An FM receiver module is mounted in the breadboard seen above which helps to break out its control pins. Those are connected to a Parallax Spinnarette web server board. It’s auxiliary I/O pins are controlled via a web interface that he set up and plans to operate with the browser on his Android phone. But as you can see after the break, any web browser works as long as you know the correct address.

This is pretty good if you’re on a quest to make everything controllable from your smart phone. But we would love to use the concept to make our own streaming radio. You’d be able to tune in to all of your local stations from anywhere in the world.

Continue reading “Over-the-air FM Radio Gains Internet Control”

DIY PIC Development Board And Web Server

websd

Inspired by a project featured here on Hack-a-Day, [arthurb] bought himself a PIC 24F and started experimenting once he learned the ins and outs of programming the chip. Using a breadboard and a nest of wires was fine for his first few projects, but as he advanced, he began to feel the need for a full-fledged development board. With a list of required features in mind he got to work, constructing a well thought out board as well as a handful of expansion boards that can be used for various other projects. His main development board includes Ethernet connectivity for use with his web server software, the ability to utilize an SD card for storage, and a USB port for programming. His expansion boards include a temperature sensor, a numeric touchpad, as well as a video output module. Overall it is a pretty impressive build, considering he had never programmed a PIC before starting this project. All of his boards are thoroughly documented, and he has included plenty of source code in hopes of helping other individuals just starting out in PIC programming.

You can see his web server in action here, but keep in mind that it is running off a PIC, so please be courteous in your usage.