ultimate-breadboard

The Ultimate Breadboard – A Prototyping Station That Has It All

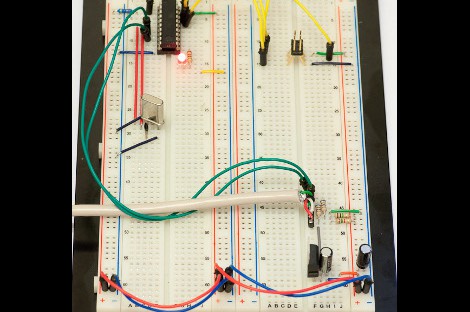
[Claudio] was working on a homebrew oscilloscope project when he started thinking about how unsuitable a standard breadboard is for a large-scale project. Rather than adding components on top of components until they became what he lovingly calls a “fragile, unforgiving crapstack”, he decided to build himself the Ultimate Breadboard.

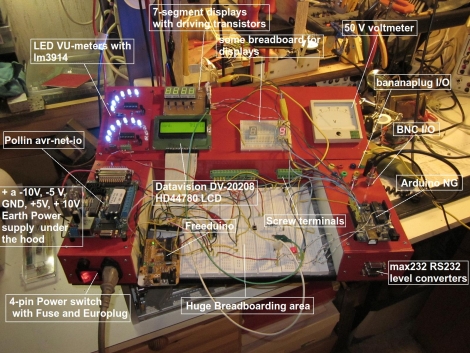
He packed so much into his design, that it’s honestly hard to know where to begin describing it. Aside from an appropriately large breadboarding surface embedded in the center of the console, he added a power supply to the left hand side, which sits just below an Avr-Net-IO board. The right side of the console features an Arduino NG, and a pair of level converters. He also added some LED-based VU meters, a couple of 7-segment displays, an LCD display, an analog voltmeter, along with plenty of I/O connectors.

The Ultimate Breadboard might look a bit daunting at first, but it seems like an awesome setup on which to do any sort of prototyping. Be sure to check out the video below for more details and to see [Claudio] give a tour of the device.

Continue reading “The Ultimate Breadboard – A Prototyping Station That Has It All”

Dice Gauntlet Joins Cosplay With D&D Gaming

If you needed a reason to dress up for your next Dungeons & Dragons adventure this is surely it. Not only will this attractive wrist adornment go right along with your medieval theme, but the gauntlet doubles as a multi-sided digital die.

Sparkfun whipped up this tutorial which details the build. Yep, they’re hawking their own goods but we must say this is one of the few projects using sewable electronics which we thoroughly enjoy. It calls for several Lilypad modules, including an Arduino board, accelerometer, and slide switches. The switches let you select the number of sides for the die you are about to roll. The accelerometer starts the fun when you shake your wrist back and forth (that’s what she said). The project is powered by a rechargeable battery, which we always like to see, and uses a four-digit seven segment display located where the face of a wristwatch is normally found.

Of course, you could get the shaking action and use no batteries at all if you wish.

Suzuki V-Strom Current Gear Indicator

[Iron Jungle] just finished building this gear indicator for his motorcycle. It uses a red 7-segment display to show the rider what gear is currently engaged. This hack is pretty common and makes us wonder why all motorcycles don’t come standard with the feature? But then again, if they did you wouldn’t have a reason to hack them.

The motorcycle does have a gear sensor; apparently it only lacks a way to display this data. The sensor outputs a signal between 0 and 5V which [Iron Jungle] reads using a PICAXE 18M2 microcontroller. Patching into that signal wasn’t hard at all. Once he found the correct wire he simply removed a portion of the insulation and soldered a lead to the conductor. This should stand up to the vibrations encountered in an automotive application like this one. Since the computing power is already there, he also included a DS18B20 to take ambient air temperature readings. Check out the quick demo after the break.

This is not the first time we’ve seen the V-Storm get a custom gear indicator. But if you really want to go all out, perhaps you need to build an interface for your tablet or smart phone. Continue reading “Suzuki V-Strom Current Gear Indicator”

Playing Video Games For A College Application

As a senior in high school, [Owen] has been waiting to hear from the colleges he applied to for months now. Some of his applications wanted a mid-year report to see if he didn’t come down with senioritis. [Owen] realized these colleges allowed additional materials beyond a high school transcript, so he built a tiny video game that shows his electrical and programming skills.

The Demomite, as [Owen] calls his build, is an amazing piece of work. The entire system is based around an ATtiny2313 with a measly 2kB of program memory. Aside from a graphic LCD from Sparkfun and a repurposed NES controller, there isn’t much else to the build. As a study in minimalism and simplicity, [Owen] gets a big congrats from us.

The entire game fits in the 2kB of flash on the ATtiny, mostly due to coding the entire thing in assembly. You can check out [Owen]’s time-lapse construction video, software demo, and the video he sent to colleges after the break.

Continue reading “Playing Video Games For A College Application”

MIDI Controlled Speak-and-Spell

We all love the Arduino, but does the Arduino love us back? There used to be a time when the Arduino couldn’t express it’s deepest emotions, but now that [Nick] hooked up a speech synthesis chip from a Speak & Spell, it can finally whisper sweet robotic nothings to us.

The original 1980s Speak & Spell contained a fabulously high-tech speech synthesizer from Texas Instruments. This innovative chip predated [Stephen Hawking]’s voice and went on to be featured in the numerous speech add-ons for 80s microcomputers like the Apple II, BBC Micro, and a number of Atari arcade games.

[Nick] has been working on his Speak & Spell project for several months now, and he’s getting around to testing the PCBs he made. By his own admission, connecting an Arduino to a Speak & Spell is a little difficult, but he’s got a few tricks up his sleeve to get around the limitations of the hardware. The final goal of [Nick]’s project is a MIDI-controllable Speak & Sound speech synth for the Arduino. This has been done before, but never from a reverse-engineered Speak & Spell.

You can check out [Nick]’s progress in interfacing the Speak & Spell speech chip after the break. There’s still work to do, but it’s still very impressive.

Continue reading “MIDI Controlled Speak-and-Spell”

Learning To Use The V-USB (AVR USB Firmware) Library

The V-USB library is a pretty handy piece of code that lets you add USB connectivity to ATtiny microcontrollers (it was previously named tinyUSB). But if you’ve ever looked into adding the library to your own projects you may have been stymied by the complexity of the code. There are many examples, but there’s a lack of a concise quick-start for the uninitiated. [Joonas Pihlajamaa] has been working to correct that shortfall with his four-part V-USB tutorial series. It’s not for the absolute newbie; you should already be comfortable working with AVR chips but that’s the only real prerequisite we can see.

He starts the series with a look into the hardware considerations. USB provides a 5V power rail but the data lines expect 3.3V logic so this must be accounted for. With the test rig built on a breadboard he moves on to pick apart the code, covering various user-defined variables that you’ll need to set based on your project’s needs. We’re going to keep this on the back burner and hopefully the Troll Sniffing Rat will get a makeover (although we must say comments have been a lot nicer as of late… keep it up!).

We’ve embedded links to all four tutorial parts after the break.

Continue reading “Learning To Use The V-USB (AVR USB Firmware) Library”

RFID Reader Gets User Inputs And Smart Card Write Capability

[Navic] added a slew of abilities to his RFID reader. It’s now a full-featured RFID reader and smart card writer with extras. When we looked at it last time the unit was just an RFID and smart card reader in a project enclosure. You could see the RFID code of a tag displayed on the LCD screen, but there wasn’t a lot more to it than that.

The upgrade uses the same project enclosure but he’s added four buttons below the display. These allow him to access the different features that he’s implemented. The first one, which is shown in the video after the break, allows him to store up to six tags in the EEPROM of the Basic Stamp which drives the unit. He can dump these tag codes to a smart card (pictured above), but also has the option of interfacing with a PC to read from and write to that card.

We don’t think you can directly write RFID tags with the device, but we could be wrong.

Continue reading “RFID Reader Gets User Inputs And Smart Card Write Capability”