Apex Electronics, Your Souce For Oscilloscopes And Drop Tanks

While some of the Hackaday crew is in LA for The Gathering, we decided to make a trip out to Apex Electronics, easily the oldest and largest electronics surplus store on the west coast.

Inside Apex, everything is stacked to the 20-foot ceiling with any electronic component you can imagine. Want a shopping cart full of huge capacitors? Awesome. Tube sockets? Done. Any kind of wire imaginable? That takes up two aisles. Test equipment abounds as well with oscilloscopes, signal analyzers and function generators, multimeters, and even a pair of cockpit voice recorders.

There’s also an outside yard at Apex containing at least two airplanes (one is a Cessna 150 that’s crying out to be made into a flight simulator), yet more test equipment, tons of video equipment, a few aircraft drop tanks, and enough aluminum extrusion to build anything.

If you’re wondering how fair the prices are at Apex, I picked up a grab bag assortment of wire wrap sockets (including a few 64-pin DIPs) that would cost $100 through the usual eBay/Chinese retailers for only $5. [Mike] picked up some stepper motors, proto boards, a pound of standoffs, and a dozen some vintage 7-segment displays for $20. No clue how much the test equipment costs, but from what we’ve seen the prices are low.

We’re not the first EE/Hacker Blog/Vlog to visit Apex. [Dave Jones] made the trek a few years ago and posted an awesome video. Below you’ll find a ton of pictures from our trip.

Continue reading “Apex Electronics, Your Souce For Oscilloscopes And Drop Tanks”

Final Key : A Mooltipass-like Device

Since the Hackaday community started working on our offline password keeper, Mooltipass, we’ve received several similar projects in our tips line. The Final Key may be the most professional looking one yet. Similarly to the Mooltipass, it is based on an Atmel ATMega32U4 but only includes one button and one LED, all enclosed in a 3D printed case.

The Final Key is connected to the host computer via USB and is enumerated as a composite Communication Device / HID Keyboard, requiring windows-based devices to install drivers. AES-256 encrypted passwords are stored on the device and can only be accessed once the button has been pressed and the correct 256 bit password has been presented through the command line interface. Credentials management and access is also done through the latter. Unfortunately, the Arduino source code can’t be found on [cyberstalker]’s website, so if you see interesting features that you would like to be integrated in Mooltipass you may send us a message to our Google Group.

Make Me A Drink, Drinkmo.

[Cabe Atwell’s] latest project is a work of art. Let us introduce the Drinkmotizer: a Raspberry Pi Drink Mixing Robot.

As [Cabe] says, almost every engineer has a drink-mixing robot on their project todo list. We’d probably have to agree; they’re functional, cool, and useful at parties.

You need the Drinkmotizer at your party… At some point, dexterity for drink mixing is lost at a gathering.

Drinkmo is your designated, sober, mixologist.

Your enabler.

Your friend.

Drinkmo works by rotating a long leadscrew that moves the mixing glass from bottle to bottle. The entire setup is made using aluminum extrusion, and is by nature, completely expandable. On the top shelf are gravity fed shot dispensers, controlled by 12VDC car lock actuators. The chaser station (at the end, on the right) works differently. The chaser bottle is actually pressurized by a paintball gun tank and dispensed using a solenoid valve. We hope he’s got a pressure regulator in there, considering the pressure capacity of paintball tanks can range from anywhere from 1000-3000PSI!

The entire system is controlled by a Raspberry Pi running Raspbian, and [Cabe] is using Tkinter for the GUI of the program. He’s got tons of info on the original forum post linked above (including the schematic!), and if you stick around after the break, there’s a very well produced video of Drinkmo in all its glory.

Continue reading “Make Me A Drink, Drinkmo.”

Educational Circuit Box For Young Aspiring Hackers

image4

Here’s a great idea: an Educational Circuit Box you can make to get kids interested in electronics! What looks like a boring project box with wires sticking out might just become a box of wonder and curiosity for young ones.

[Fileark] built this for his son, and has happily shared it on his blog for others to recreate. As you can probably guess from the picture, it makes use of a project box, LEDs, buttons, switches, and female header pins. Using the included breadboard jumpers picked up off of eBay, it allows your kid to learn about circuits by plugging in different components and seeing what happens.

The majority of the parts he used were salvaged from scrap electronics he had laying about. It’s a great way to turn e-waste into something fun and educational for kids! For more information about the project, stick around after the break to see [Fileark] explain (and his son demonstrate!) it in a video.

Continue reading “Educational Circuit Box For Young Aspiring Hackers”

Retrotechtacular: How A Bicycle Is Made

Does your bicycle master boardwalk and quagmire with aplomb? If it was built by the Raleigh Bicycle Company, it ought to. This week’s Retrotechtacular is a 1945-era look into the start-to-finish production of a standard bicycle. At the time of filming, Raleigh had already been producing bicycles for nearly 60 years.
The film centers on a boy and his father discussing the purchase of a bicycle in the drawing office of the plant where a bicycle begins its life. The penny-farthing gets a brief mention so that the modern “safety model”—wherein the rider sits balanced between two wheels of equal size—can be compared. The pair are speaking with the chief designer about the model and the father inquires as to their manufacturing process.

We are given the complete story from frame to forks and from hubs to handlebars. The frame is forged from high-quality steel whose mettle is tested both with heat and with a strain much greater than it will receive in manufacture or use. It is formed from long pieces that are rolled into tubes, flame sealed at the joint, and cut to length. The frame pieces are connected with brackets, which are formed from a single piece of steel. This process is particularly interesting.

Continue reading “Retrotechtacular: How A Bicycle Is Made”

A Meccano Pinball Machine

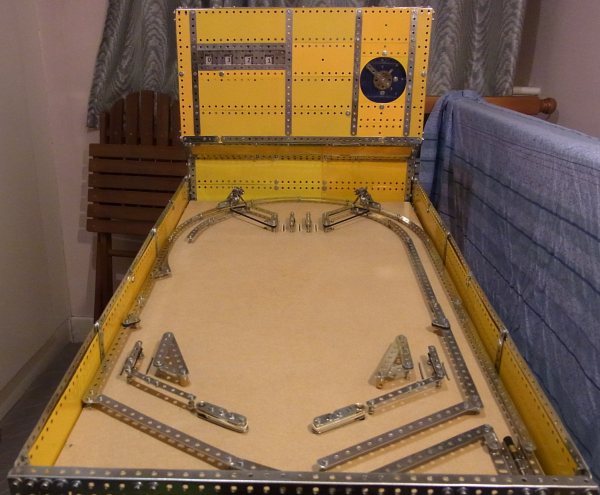
This pinball table is almost entirely out of Meccano Construction Set parts. [Brian Leach]’s Meccano Pinball Machine features a digit counter, a kick out hole, flippers, and a timer.

The digit counter is likely the most complex part of the build. By sending it an electrical signal, either the ones, tens, or hundreds digit can be incremented. The electrical signal engages an electromagnet, which connects a motor to the wheel to increment the score. A mechanism ensures the next digit is incremented when a digit rolls over from 9 to 0, and allows the counter to be zeroed.

Rolling the ball over the set of rollover switches increments the score. A mechanism is used to ensure that the switch will trigger with a small weight. Arcing was an issue, which was reduced by adding a snubber to suppress the transient.

The pinball machine was demoed at the South East London Meccano Club, and is a great demonstration of what can be built with the construction kit. After the break, check out a video of the pinball machine.

Continue reading “A Meccano Pinball Machine”

Finding The Fix For A Dimmed 27″ IMac Screen

machack27

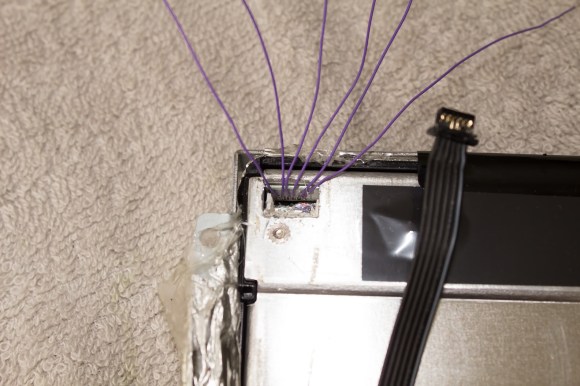
Like many with a 27″ iMac, [Gerry’s] been experiencing some screen brightness issues. According to him, Apple’s been largely ignoring the problem and the community’s outcry, which led to [Kaos2k] poking around inside to hack together a fix. It’s a solution clearly born from trial and error; [Kaos2k’s] initial post on the issue simply recommending “applying pressure” to the panel itself, which would sometimes cause the dim screen to spring back to life.

It turns out that heat (or stress, or something) from the screen causes the solder joints to weaken on the board where a 6-pin connector hooks up, dimming the screen to eye-strain levels. Some Mac users are suing over it, because the problem tends to show up just outside of the warranty window and affects a large number of people. [Kaos2k], however, provided the much needed solution for those looking to get the fix over with: just solder the cable directly to the board. Our tipster, [Gerry], has documented his experiences over at his blog, and was kind enough to make a step-by-step video of the repair, which you can see after the break.

Continue reading “Finding The Fix For A Dimmed 27″ IMac Screen”