A Star Tracking Telescope Mount

[Chris] recently got his hands on an old telescope. While this small refractor with an altitude-azimuth mount is sufficient for taking a gander at big objects in our solar system, high-end telescopes can be so much cooler. Large reflecting telescopes can track the night sky for hours, and usually come with a computer interface and a GOTO button. Combine this with Stellarium, the open source sky map, and you can have an entire observatory in your back yard.

For [Chris]’ entry into the 2016 Hackaday Prize, he’s giving his old telescope an upgrade. With a Raspberry Pi, a few 3D printed adapters, and a new telescope mount to create a homebrew telescope computer.

The alt-az mount really isn’t the right tool for the astronomical job. The earth spins on a tilted axis, and if you want to hold things in the night sky still, it has to turn in two axes. An equatorial mount is much more compatible with the celestial sphere. Right now, [Chris] is looking into a German equatorial mount, a telescope that is able to track an individual star through the night sky using only a clock drive motor.

To give this telescope a brain, he’ll be using a Raspberry Pi, GPS, magnetometer, and ostensibly a real-time clock to make sure the build knows where the stars are. After that, it’s a simple matter of pointing the telescope via computer and using a Raspberry Pi camera to peer into the heavens with a very, very small image sensor.

While anyone with three or four hundred dollars could simply buy a telescope with similar features, that’s really not the point for [Chris], or for amateur astronomy. There is a long, long history of amateur astronomers building their own mirrors, lenses, and mounts. [Chris] is just continuing this very long tradition, and in the process building a great entry for the 2016 Hackaday Prize

The HackadayPrize2016 is Sponsored by:

What’s A Piezo Optomechanical Circuit?

Ever hear of a piezo-optomechanical circuit? We hadn’t either. Let’s break it down. Piezo implies some transducer that converts motion to and from energy. Opto implies light. Mechanical implies…well, mechanics. The device, from National Institute of Standards and Technology (NIST),  converts signals among optical, acoustic and radio waves. They claim a system based on this design could move and store information in future computers.

At the heart of this circuit is an optomechanical cavity, in the form of a suspended nanoscale beam. Within the beam are a series of holes that act as mirrors for very specific photons. The photons bounce back and forth thousands of times before escaping the cavity. Simultaneously, the nanoscale beam confines phonons, that is, mechanical vibrations. The photons and phonons exchange energy. Vibrations of the beam influence the buildup of photons and the photons influence the mechanical vibrations. The strength of this mutual interaction, or coupling, is one of the largest reported for an optomechanical system.

In addition to the cavities, the device includes acoustic waveguides. By channeling phonons into the optomechanical device, the device can manipulate the motion of the nanoscale beam directly and, thus, change the properties of the light trapped in the device.  An “interdigitated transducer” (IDT), which is a type of piezoelectric transducer like the ones used in surface wave devices, allows linking radio frequency electromagnetic waves, light, and acoustic waves.

The work appeared in Nature Photonics and was also the subject of a presentation at the March 2016 meeting of the American Physical Society. We’ve covered piezo transducers before, and while we’ve seen some unusual uses, we’ve never covered anything this exotic.

Quieting A Cheap LCD Projector

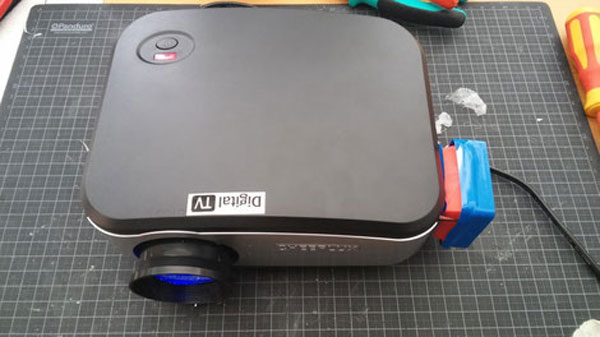
There’s an old saying along the lines of “You pay peanuts, you get monkeys”. That’s true of technology, too, but a good hacker can sometimes teach an old monkey new tricks. [Heye] bought an LCD projector for $60 off AliExpress, and it turned out to be rather noisy: the air fan that sucked in air to cool the LED light source made a whooshing noise.

No surprise there, but rather than give up, he decided to see what he could do about the noise. So, he took the projector apart. After some excavation, he realized that the main source of noise was the input fan, which  was small and partly covered. That’s a recipe for noise, so he cut out the plastic grille over it and mounted a larger, quieter fan on the outside. He also designed and 3D printed an external hood for this larger fan. The result, he says, is much quieter than the original, and still keeps the LED light source fairly cool. It’s a neat hack that shows how a few hours and a bit of ingenuity can sometimes make a cheap device better.

Projector hacks are a staple here. And our favorite? Swapping out the light source for a candle.

3D Cocooner (3D Lattice Printer)

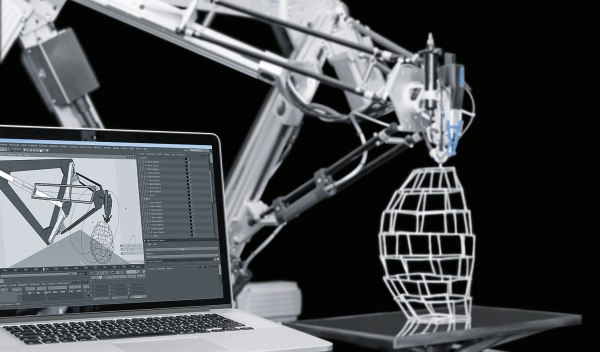
Sometimes it feels like we haven’t yet tapped into all the possibilities of additive manufacturing. Festo, a company that loves to try innovative things (and not always bring them to market), just came up with something called the 3D Cocooner — essentially, a rostock style 3D printer on its side, with a UV cure feature to allow it to build up skeletal structures and lattice style shapes.

Similar to the MX3D-Metal 3D printer (which is currently on a mission to build a bridge end-to-end — by itself), this 3D printer specializes in printing structures as opposed to the more traditional layer approach. It’s called the 3D Cocooner as it is a bionic technology platform designed to “spin” complex lattices, very similar to naturally occurring structures.

The cool thing is, it’s not actually using plastic filament like most printers — it’s actually printing using string! The string is covered with a special UV resin which is then hardened into place as soon as it is expelled from the print head — making this more like a giant robot spider than a 3D printer.

Continue reading “3D Cocooner (3D Lattice Printer)”

MDF as a mold master. It works, but nowhere near as well as tooling board.

Materials To Know: Medium Density Fiberboard

MDF is the cheapest and flattest wood you can buy at local hardware stores. It’s uniform in thickness, and easy to work with. It’s no wonder that it shows up in a lot of projects. MDF stands for Medium Density Fiberboard. It’s made by pressing materials together along with some steam, typically wood, fibers and glue. This bonds the fibers very tightly. Sometimes MDF is constructed much like plywood. Thinner layers of MDF will be made. Then those layers will be laminated together under glue and steam.The laminated MDF is not as good as the monolithic kind. It tends to tear and break out along the layers, but it’s hard to tell which kind you will get.

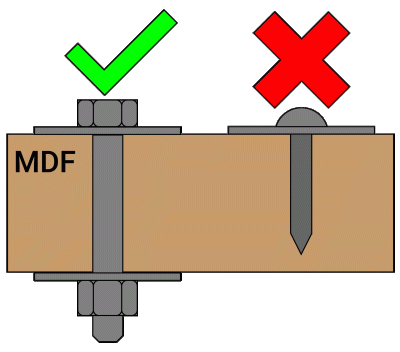
Proper way to attatch a fastener to MDF.

MDF is great, but it has a few properties to watch for. First, MDF is very weak in bending and tension. It has a Modulus of Elasticity that’s about half of plywood. Due to its structure, short interlocking fibers bound together by glue and pressure, it doesn’t take a lot to cause a crack, and then, quickly, a break. If you’d like to test this, take a sheet of MDF, cut it with a knife, flip it over, and hit the sheet right behind your cut. Chances are the MDF will split surprisingly easily right at that point.

Because of the way MDF is constructed, fasteners tend to pull out of it easily. This means that you must always make sure a fastener that sees dynamic loads (say a bearing mount) goes through the MDF to the other side into a washer and bolt. MDF also tends to compress locally after a time, so even with a washer and bolt it is possible that you will see some ovaling of the holes. If you’re going to use screws, make sure they don’t experience a lot of force, also choose ones with very large threads instead of a finer pitch. Lastly, always use a pilot hole in MDF. Any particle board can split in alarming ways. For example, if you just drive a screw into MDF, it may appear to go well at first. Then it will suddenly jump back against you. This happened because the screw is compressing the fibers in front of it, causing an upward force. The only thing pressing against that force is the top layer of laminate contacting the threads. The screw then jumps out, tearing the top layer of particle board apart.

Continue reading “Materials To Know: Medium Density Fiberboard”

Hackaday Invades Toronto

Next Wednesday, April 20th, Hackaday will invade Toronto.

[Sophi Kravitz] and [Michael Guilfoil] are heading north of the border to meet up with our friends at HacklabTO. They’ll be hosting a Bring A Hack meetup with drinks, snacks, and swag.

Since this is a Bring A Hack, attendees are encouraged to bring whatever project you’re working on and show it off, give a lightning talk, and pitch it to the community. [Sophi]’s last visit to Toronto brought some crazy hardware to the meetup, including a gaming glove for a Commodore 64, a demonstration of Ontario’s power plants, testing hamburgers for anything that is not beef with PCR, and analog synthesizers.

Since the Hackaday Prize is in full swing, this is an excellent opportunity to team up with fellow Torontonians for a great Prize entry, or just bounce a few ideas off people to see if your idea is feasible.

The meet and greet at the Hacklab is free, but we would request that you RSVP for the event. The event is also on Hackaday.io, just in case you’d like to chat with [Sophi] or other attendees.

The HackadayPrize2016 is Sponsored by:

Minions Turn Your Keyboard Into A Bluetooth Keyboard

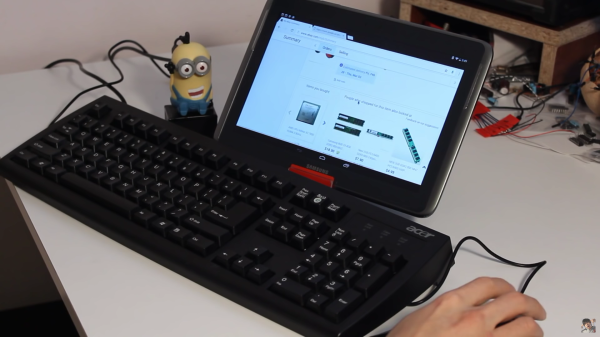
Evil geniuses usually have the help of some anonymous henchmen or other accomplices, but for the rest of us these resources are usually out of reach. [Evan], on the other hand, is on his way to a helpful army of minions that will do his bidding: he recently built a USB-powered minion that turns a regular PS/2 mouse and keyboard into a Bluetooth mouse and keyboard.

[Evan] found his minion at a McDonald’s and took out essentially everything inside of it, using the minion as a case for all of the interesting bits. First he scavenged a PS/2 port from an old motherboard. An Arduino Nano is wired to an HC-05 Bluetooth chip to translate the signals from the PS/2 peripherals into Bluetooth. The HC-05 chip is a cheaper alternative to most other Bluetooth chips at around $3 vs. $40 for more traditional ones. The programming here is worth mentioning: [Evan] wrote a non-interrupt based and non-blocking PS/2 library for the Arduino that he open sourced which is the real jewel of this project.

Once all the wiring and programming is done [Evan] can turn essentially any old keyboard and mouse into something that’ll work on any modern device. He also put an NFC tag into the minion’s head so that all he has to do to connect the keyboard and mouse is to swipe his tablet or phone past the minion.

If you’re looking for an interesting case for your next project, this McDonald’s Minion toy seems to be pretty popular. PS/2 keyboards are apparently still everywhere, too, despite their obsolescence due to USB. But there are lots of other ways to get more use out of those, too.

Continue reading “Minions Turn Your Keyboard Into A Bluetooth Keyboard”