Scrap Wood And Metal Combined For DIY Mecanum Wheels

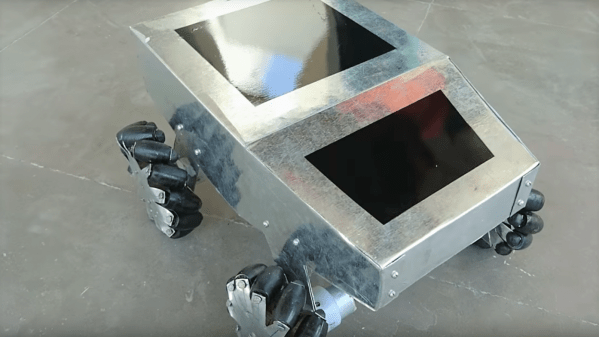
Some scrap wood, a few pieces of sheet metal, a quartet of old gear motors, and a few basic hand tools. That’s all it takes to build an omni-bot with Mecanum wheels, if you’ve got a little know-how too.

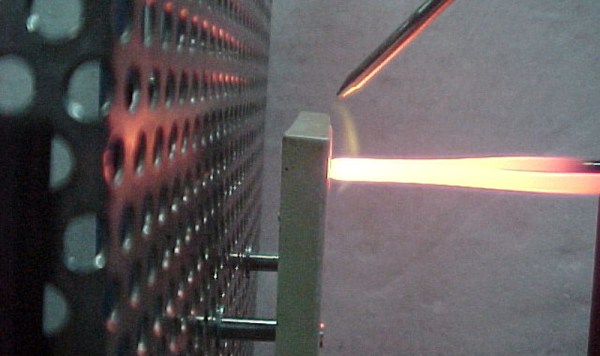
For the uninitiated, Mecanum wheels can rotate in any direction thanks to a series of tapered rollers around the circumference that are canted 45° relative to the main axle.  [Navin Khambhala]’s approach to Mecanum wheel construction is decidedly low tech and very labor intensive, but results in working wheels and a pretty agile bot. The supports for the rollers are cut from sheet steel and bent manually to hold the wooden rollers, each cut with a hole saw and tapered to a barrel shape on a makeshift lathe. Each wheel is connected directly to a gear motor shaft, and everything is mounted to a sheet steel chassis. The controls are as rudimentary as the construction methods, but the video below shows what a Mecanum-wheeled bot can do.

There’s a lot of room here for improvement, but mainly in the manufacturing methods. The entire wheel could be 3D printed, for instance, or even laser cut from MDF with a few design changes. But [Navin] scores a win for making a working wheel and a working bot from almost nothing.

Continue reading “Scrap Wood And Metal Combined For DIY Mecanum Wheels”

Strandbeest Not Fooling Anyone — We See Right Through It

This Strandbeest is ready for the security line at a security-conscious high school. Like see-though backpacks, its clear polycarbonate parts let you see everything that goes into the quirky locomotion mechanism. Despite having multiple legs, if you analyze the movement of a Strandbeest it actually moves like a wheel.

For us, it’s the narrated fabrication video found below that makes this build really interesting. Hackaday alum [Jeremy Cook] has been building different versions of [Theo Jansen’s] Strandbeest for years now. Strandmaus was a small walker controlled by a tiny quadcopter, and MountainBeest was a huge (and heavy) undertaking. Both were made out of wood. This time around [Jeremy] ordered his polycarbonate parts already cut to match his design. But it’s hardly a walk on the beach to make his way to final assembly.

The holes to accept the hardware weren’t quite large enough and he had to ream them out to bring everything together. We enjoyed seeing him build a jig to hold the spacers for reaming. And his tip on using an offset roll pin to secure the drive gear to the motor shaft is something we’ll keep in mind.

In the end, things don’t go well. He had machined out a motor coupling and it ends up being too weak for the torque driving the legs. Having grown up watching [Norm Abram] build furniture (and houses) without a single blown cut or torn-out end grain this is a nice dose of reality. It’s not how perfect you can be with each step, it’s how able you are to foresee problems and correct them when encountered.

Continue reading “Strandbeest Not Fooling Anyone — We See Right Through It”

Hardware Tribes Growing Up Around Artisanal Electronics

Consumer electronics are design beasts that must serve many masters. There’s a price point for the product itself, a ceiling for the feature set (lest it not be ‘user friendly’), and to take the risk of actually manufacturing something there needs to be proof of the market. A lot of great things make it through this process, but some really unique and special gear goes completely around it.

So is the story of this AND!XOR hardware badge being built for DEF CON 25. This is not the official conference badge, but the latest in a growing trend of hardware/firmware engineers and hackers who design their own custom gear for the conference, trying to one-up not just the official badge, but the other hardware tribes doing the same. This unique hardware excitement is a big reason that Hackaday has developed electronic badges for our conferences.

The new badge is a mashup of Bender from Futurama and Raoul Duke from Fear and Loathing in Las Vegas, presents something of monstrosity to hang around your neck. That has certainly never stopped us from having one of these bouncing around our necks as we pound the cattle paths from talk to talk (and the DC23 vinyl record was way more unwieldy anyway).

Bender’s forehead display has now been upgraded from a diminutive OLED to a generous color LCD display. The 433 MHz which used the spring antenna on the previous badge has given way to a Bluetooth Low Energy. The BLE is built into the Rigado BMD-300 SOC that is now in conrol of the badge. We can’t wait to see the shenanigans unlocked with this new hardware — they’re already showing of crazy animations, retro gaming, and teasing a huge multiplayer game with all the badges. Finally, the “Secret Component” at the bottom of their components list delivers the je ne sais quoi to the whole project.

Fans of AND!XOR have already thrown their weight behind it. Unofficial badges have been unavailable to a wider group or only offered in flash-sales that pop up during the con. Last year the team was met with a huge mob throwing money at their supply of 175 badges. Now the AND!XOR team has grown to five people toiling away to make the design, the easter-egg laden firmware, and the manufacturing process better than the amazing work of last year. They just launched a crowd funding campaign on Tuesday and immediately blew past their goal about five times over.

We’re hoping to get our mitts on one of these ahead of DEF CON to give you an early look at what these hardware artists have accomplished. If you’re part of another hardware tribe building custom electronics for the love of it, we’d really like to hear from you. This goes for any conference — we know of at least one other in progress.

Starfish Cat, Bowling Ball Bot, And Stargate All Claim Prizes

We saw a huge outpouring of builds for the the Hackaday Sci-Fi Contest and it’s now time to reveal the winners. With 84 great themed projects submitted, the judges had a tough task to pull out the most impressive both in terms of creativity and execution.

Here are our four winners. Two come from the Stargate universe. One is a cuddly yet horrifying character of unknown origin but unarguably Sci-Fi. The other is the best use of a bowling ball we’ve seen so far.

Grand Prize

The grand prize goes to [Jerome Kelty] with Animatronic Stargate Helmet. [Jerome] has built a replica prop that looks like it just came out of a Hollywood shop. It’s almost a shame that this helmet won’t be worn on film – though it certainly could be. If you remember the film and the television show, these helmets have quite a bit of articulation. The head can pan and tilt. The eyes glow, as well as have irises which expand and contract. The “wings” also open and close in a particular way.

[Jerome] built the mechanics for this helmet. He used radio control servos to move the head, with the help of some hardware from ServoCity. Most of the metalwork was built in his own shop. Everything is controlled from a standard R/C transmitter, much like the original show. [Jerome] is taking home a Rigol DS1054Z 4 Channel 50 MHz scope.

First Prize

First prize goes to [Christine] with
Starfish Cat: Your Lovecraftian Furby-like Friend. Starfish Cat is one of those odd projects that finds itself right on the edge of the uncanny valley. We are equal parts intrigued and creeped out by this… thing. The bottom is all starfish, with a rubber base poured into a 3D printed mold. The top though, is more cat-like, with soft fur and ears. 5 claws hide under the fur, ready to grab you.

Starfish Cat detects body heat with 5 bottom mounted PIR sensors. The sensors are read by the particle photon which acts as its brain. When heat is detected, Starfish Cat activates its claws, and also blows or sucks air through its… uh… mouth hole.  [Christine] is taking home a Monoprice Maker Select Mini 3D printer.

Click past the break to see the rest of the winners

Continue reading “Starfish Cat, Bowling Ball Bot, And Stargate All Claim Prizes”

The BeagleBone Blue – Perfect For Robots

There’s a new BeagleBone on the block, and it’s Blue. The BeagleBone Blue is built for robots, and it’s available right now.

If a cerulean BeagleBone sounds familiar, you’re not wrong. About a year ago, the BeagleBone Blue was introduced in partnership with UCSD. This board was meant for robotics, and had the peripherals to match. Support for battery charging was included, as well as motor drivers, sensor inputs, and wireless. If you want to put Linux on a moving thingy, there are worse choices.

The newly introduced BeagleBone Blue is more or less the same. A 9-axis IMU, barometer, motor driver, quad encoder sensor, servo driver, and a balancing LiPo charger are all included. The difference in this revision is the processor. That big square of epoxy in the middle of the board is the Octavo Systems OSD3358, better known as a BeagleBone on a chip. This is the first actual product we’ve seen using this neat chip, but assuredly not the last – a few people are working on stuffing this chip onto a board that fits in mini Altoids tins.

Fire Hazard Testing

How do you know that new appliance you bought won’t burn your house down? Take a look at any electrical appliance, and you’ll find it marked with at least one, and most often, several safety certification marks such as UL, DIN, VDE, CSA or BSI. Practically every electrical product that plugs into utility supply needs to go through a mandatory certification process to ensure it meets these conformity test requirements. Some examples include domestic and industrial electrical appliances, tools, electrical accessories, consumer electronics and medical electronics.

When you look through a typical safety test standard, you’ll notice it breaks down the various tests in two categories. “Type” tests are conducted on prototypes and samples of the final product or its individual parts and components, and are not generally repeated unless there are changes in design or materials. “Acceptance” tests are routine verification tests conducted on 100% of the products produced. For example, a typical Type test would be used to check the fire retardant properties of the plastics used in the manufacture of the product during development, while a Routine test would be carried out to check for high voltage breakdown or leakage and touch currents on the production line.

Nowadays, a majority of countries around the world adopt standards created by international organizations such as IEC, ISO, and ITU, then fine tune them to suit local requirements. The IEC works by distributing its work across almost 170 Technical Committees and Subcommittees which are entrusted with the job of creating and maintaining standards. One of these committees is “TC89 Fire hazard testing” whose job is to provide “Guidance and test methods for assessing fire hazards of electro-technical equipment, their parts (including components) and electrical insulating materials”. These tests are why we feel safe enough to plug something in and still sleep at night.

Practically all electrical products need to confirm to this set of tests as part of their “Type” test routine. This committee produces fire hazard testing documents in the IEC 60695 series of standards. These documents range from general guidelines on several fire hazard topics to specific instructions on how to build the test equipment needed to perform the tests. It’s interesting to see how some of these tests are carried out and the equipment used. Join me after the break as we take a look at that process.

Continue reading “Fire Hazard Testing”

Friday Hack Chat: ASIC Design

Join [Matt Martin], ASIC designer at Keysight, for this week’s Hack Chat.

Every week, we find a few interesting people making the things that make the things that make all the things, sit them down in front of a computer, and get them to spill the beans on how modern manufacturing and technology actually happens. This is the Hack Chat, and it’s happening this Friday, March 17, at noon PDT (20:00 UTC).

[Matt] has been working at Agilent / Keysight since 2007 as an ASIC designer. The work starts with code that is synthesized into logic gates. After that, [Matt] takes those gates and puts them into silicon. He’s worked with processes from 0.13um to 28nm. Turning code into silicon is still a dark art around here, and if you’ve ever wanted to know how all of this works, this is your chance to find out.

Here’s How To Take Part:

join-hack-chatOur Hack Chats are live community events on the Hackaday.io Hack Chat group messaging.

Log into Hackaday.io, visit that page, and look for the ‘Join this Project’ Button. Once you’re part of the project, the button will change to ‘Team Messaging’, which takes you directly to the Hack Chat.

You don’t have to wait until Friday; join whenever you want and you can see what the community is talking about.

Upcoming Hack Chats

We’ve got a lot on the table when it comes to our Hack Chats. On March 24th, we’re going to argue the merits of tube amplifiers in audio applications. In April, we have [Samy Kamkar], hacker extraordinaire, to talk reverse engineering.

Because I’ve never had the opportunity to do so, and because these Hack Chat announcement posts never get many comments anyway, I’m going to throw this one out there. What would it take to build out a silicon fabrication plant based on technology from 1972? I’m talking about a 10-micrometer process here, something that might be able to clone a 6502. Technology is on our side — a laser printer is cheaper than a few square feet of rubylith — and quartz tube heaters and wire bonding machines can be found on the surplus market. Is it possible to build a silicon fab in your garage without going broke? Leave your thoughts in the comments, and then bring them with you to the Hack Chat this Friday.