This Arduino Is Feeding The Fishes

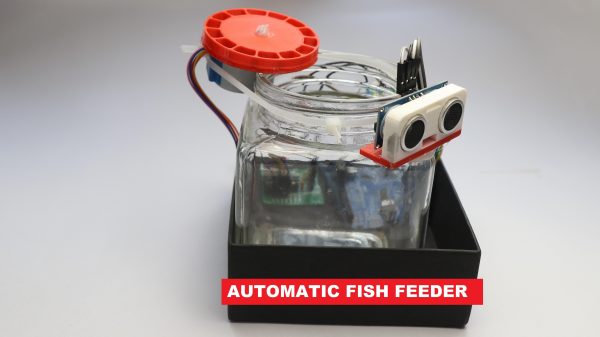
Depending on the species, a fish can be a fairly low-maintenance pet. But of course even the most laid back of creatures needs to eat, so you’ll have to make sure to feed them regularly. If you’re a fish owner who would like to simplify tending to your creatures, you might find value in this project from [CrazyScience].

This fish feeder is based on an Arduino Uno, the 8-bit microcontroller development board which has done so much for so many. The Arduino drives a stepper motor, which rotates a 3D printed disc mechanism for dispensing food. Each slot of the disc is loaded with a small amount of fish food, so that when it rotates, a slot dumps its contents through a slot into the water.

Activating the system is as easy as a wave of the hand. That’s thanks to an ultrasonic sensor, which detects movement close by, and triggers the food delivery mechanism in turn. We’d love to see this upgraded with a timer mode too, though it would require the addition of a real-time clock module to the humble Arduino Uno.

It’s a simple project, but one that teaches all kinds of useful skills, from programming to design and 3D printing. We just worry that the fish bowl in the demo is a far too small for fish to remain healthy. We’ve seen some other similar projects before, too.

Continue reading “This Arduino Is Feeding The Fishes”

Tiny Arduino Drone Even Has An FPV Camera

In the turmoil of today’s world, drones are getting bigger, badder, and angrier. [Max Imagination] has gone the other way with his work, though, building a teeny Arduino drone that can fit in the palm of your hand. Even if you have a small hand!

The drone is based around an Arduino Pro Mini, and uses an MPU6050 IMU for motion sensing and flight control. Communication with the drone is via an NRF24L01. Four small coreless motors are used for propulsion, driven by tiny MOSFETs, and the whole assembly is run via a teeny 220 mAh lithium-polymer battery. Oh, and there’s an FPV camera so you can put on some goggles and see where it’s going!

Control is via MultiWii software, written specifically for building multirotor craft. [Max] flies the craft using a controller of his own creation, again using an NRF24L01 for communication.

It’s a neat build, and a titchy one too! Tiny drones have a character all their own, even if they can’t really stand up to windier outdoor environments. Video after the break.

Continue reading “Tiny Arduino Drone Even Has An FPV Camera”

Arduino Gear Shift Indicator Finds ‘Em So You Won’t Grind ‘Em

Now, it’s been a shamefully long time since we’ve driven a car with a manual transmission, but as we recall it was pretty straightforward. It certainly didn’t require a lot of help with the shifting pattern, at least not enough to require a technical solution to know what gear you’re in. But then again, we suspect that’s not really the point of [upir]’s latest build.

Oh sure, it’s pretty cool to display your current gear selection on a little LCD screen using an Arduino. And [upir] promises a follow-up project where the display goes inside the shifter knob, which will be really cool. But if you take a look at the video below, you’ll see that the real value of this project is the stepwise approach he takes to create this project. [upir] spends most of the time in the video below simulating the hardware and the code of the project in Wokwi, which lets him make changes and tune the design up before committing anything to actual hardware.

That turned out to be particularly useful with this build since he chose to use analog Hall sensors to detect the shift lever position and didn’t know exactly how that would work. Wokwi let him quickly build a virtual prototype for one sensor (using a potentiometer as a stand-in, since the simulator lacked a Hall sensor model), then quickly expand to the four sensors needed to detect all six gear positions.

By the time his simulation was complete, the code was almost entirely written. [upir] also walks us through his toolchains for both designing the graphics and laying out the PCB, a non-trivial task given the odd layout. We particularly enjoyed the tip on making smooth curved traces around the oval cutout for the shift lever in the board.

The video below is on the longish side, but it’s chock full of great little tips. Check out some more of [upir]’s work, like his pimped-out potentiometer or his custom animations on 16×2 LCDs.

Continue reading “Arduino Gear Shift Indicator Finds ‘Em So You Won’t Grind ‘Em”

Arduino Turned Into Something Kinda Like A Pager

Video may have killed the radio star, but cell phones and smart phones all but killed the pager. They still exist, of course, but only in very niche applications. [João Santos] wanted a pager-like experience for himself, though, so he enlisted an Arduino and got to work. Watch a video of the system working below.

The build uses an Arduino Uno to drive a simple HD44780 LCD display with 16 characters each across two lines of text. It’s hooked up to a Wemos D1, which uses its WiFi connection to get online. To this end, it’s capable of talking to a web application which allows users to enter text messages. It receives these messages, passes them to the Arduino Uno over I2C, and then the Uno shuttles the message to the display. It’s overkill, but [João] just found it quicker to get everything up and running via this route.

Continue reading “Arduino Turned Into Something Kinda Like A Pager”

Playing ZX Spectrum’s Manic Miner On The Arduino Uno

Composite output shield with audio driver and controller inputs for Arduino Uno (Credit: Scott Porter)

Although it seems many have moved on to 32-bit MCUs these days for projects, there is still a lot of fun to be had in the 8-bit AVR world, as [Scott Porter] demonstrates with a recent Arduino Uno project featuring his game engine running a port of the Manic Miner game that was originally released in 1983 for the ZX Spectrum. For the video and audio output he created an add-on board for the Uno that creates a composite signal using two resistors, along with an audio driver circuit and control inputs either from the onboard buttons or from a NES controller. Audio can be sent either over the composite output or via the audio jack.

A demonstration of the game is provided in a number of videos on [Scott]’s YouTube account, which shows off a few levels, at 256×256 resolution. It contains all 20 original levels, with a few quality of life upgrades with animation. It also features original music, which may or may not work for you, but music can be turned on or off in the main menu. Compared to the 3.5 MHz Z80 MPU in the ZX Spectrum, the 16 MHz AVR of the Uno is a lot beefier, which raises the hope that a color version like the ZX Spectrum one is also in the future, even if it may require an add-on board with a framebuffer. As [Scott] notes, the weakness of the Uno is that the ZX Spectrum has significantly more RAM, which limits what can be done.

Thanks to [256byteram] for the tip.

Continue reading “Playing ZX Spectrum’s Manic Miner On The Arduino Uno”

Educational Arduino Clock Uses Analog Meters For Display

When it comes to educational electronic projects, it’s hard to go past building a clock. You learn tons about everything from circuit concepts and assembly skills to insights about the very nature of time itself. And you get a clock at the end of it! [hamblin.joe] wanted to do a simple project for kids along these lines, so whipped up a neat design using analog meters to display the time.

The build relies on that old stalwart, the Arduino Uno, to run the show. It’s hooked up to a DS3231 real-time clock module so it can keep accurate time for long periods, as is befitting a clock. Displaying the time is done via the use of two analog meters, each fitted with a custom backing card. One displays hours, the other, minutes. The analog meters are simply driven by the PWM outputs of the Arduino.

It’s not a hugely complex project, but it teaches so much. It provides an opportunity to educate the builders about real-time clocks, microcontroller programming, and even the concepts behind pulse width modulation. To say nothing of the physical skills, like learning to solder or how to assemble the laser-cut enclosure. Ultimately, it looks like a really great way for [hamblin.joe] and his students to dive into the world of modern electronics.

Give Your Projects A Retro Tint With This 8051-based Arduino Uno

Most of us are familiar with the Arduino Uno, a starting place for electronics projects since 2010. But what if the Arduino Uno was released in 1980? You’d probably get something like [ElectroBoy]’s 8051-based Arduino Uno.

28-pin DIP integrated circuit with a window revealing the die
Close-up shot of the 87C752, an 8051 with EPROM

The Arduino Uno-compatible board has an MCS-51 (often called 8051 instead) instead of the usual ATmega328P/ATmega168. Specifically, [ElectroBoy] uses the AT89S52. Like the ATmega microcontrollers, the AT89S52 has an 8-bit CPU with a Harvard architecture and very similar GPIO capabilities. Unlike the ATmega, however, the original MCS-51 has a CISC CPU (as opposed to ATmega being RISC) and a release date about 36 years earlier.

The board itself also has some differences from the original Arduino Uno. First of all, it has a USB type-C port, which is definitely a bonus. Secondly, it’s simpler: No USB-UART (which also means no USB programming), a different pin layout (Arduino shields likely won’t fit) and more I/Os than the ATmegas have. Sure, it’s not as practical as an actual Arduino Uno, but it’s definitely cool for our retrocomputing nerds.