How We Got The Scanning Electron Microscope

According to [Asianometry], no one believed in the scanning electron microscope. No one, that is, except [Charles Oatley].The video below tells the whole story.

The Cambridge graduate built radios during World War II and then joined Cambridge as a lecturer once the conflict was over. [Hans Busch] demonstrated using magnets to move electron beams, which suggested the possibility of creating a lens, and it was an obvious thought to make a microscope that uses electrons.

After all, electrons can have smaller wavelength than light, so a microscope using electrons could — in theory — image at a higher resolution. [Max Knoll] and [Ernst Ruska], in fact, developed the transmission electron microscope or TEM.

Continue reading “How We Got The Scanning Electron Microscope”

Building An Electron Microscope For Research

There are a lot of situations where a research group may turn to an electron microscope to get information about whatever system they might be studying. Assessing the structure of a virus or protein, analyzing the morphology of a new nanoparticle, or examining the layout of a semiconductor all might require the use of one of these devices. But if your research involves the electron microscope itself, you might be a little more reluctant to tear down these expensive devices to take a look behind the curtain as the costs to do this for more than a few could quickly get out of hand. That’s why this research group has created their own electron detector.

Specifically, the electron detector is designed for use in a scanning electron microscope, which is typically used for inspecting the surface of a sample and retrieving a high-resolution, 3D image of it compared to transmission microscopes which can probe internal structures. The detector is built on a four-layer PCB which includes the photodiode sensing array, a series of amplifiers, and a power supply. All of the circuit diagrams and schematics are available for inspection as well thanks to the design being licensed under the open Creative Commons license. For any research team looking to build this, a bill of materials is also included, as is a set of build instructions.

While this is only one piece of the puzzle surrounding the setup and operation of an electron microscope, its arguably the most important, and also greatly lowers the barrier of entry for anyone looking to analyze electron microscope design themselves. With an open standard, anyone is free to modify or augment this design as they see fit which is a marked improvement over the closed and expensive proprietary microscopes out there. And, if low-cost microscopes are your thing be sure to check out this fluorescence microscope we featured that uses readily-available parts to dramatically lower the cost compared to commercial offerings.

Electron Microscope Conversion Hack

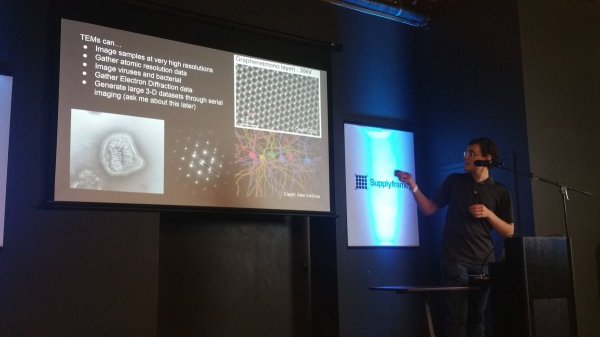
Some of you probably know this already, but there’s actually more than one kind of electron microscope. In electronics work, the scanning electron microscope (SEM) is the most common. You hit something with electrons and watch for secondary electron emissions. However, biologists more often use a TEM — a transmissive electron microscope — which passes electrons through a sample to image it. [Breaking Taps] built a small device to convert his SEM into a TEM.

One key idea is that in a SEM, the beam’s position on the target is the only thing that matters. Any secondary electron detected is a result of that spot’s composition, no matter where you collect them. Common detectors pick up back-scattered electrons bouncing back toward the electron source.  There are also low-energy electrons bouncing off in random directions, depending on the topology of the target.

The slow electrons can be attracted by a single detector that has a strong positive charge. TEM  doesn’t detect secondary electron emissions. Instead, it passes electrons through a target and collects the ones that pass through a very thin sample using a screen that glows when electrons hit it.

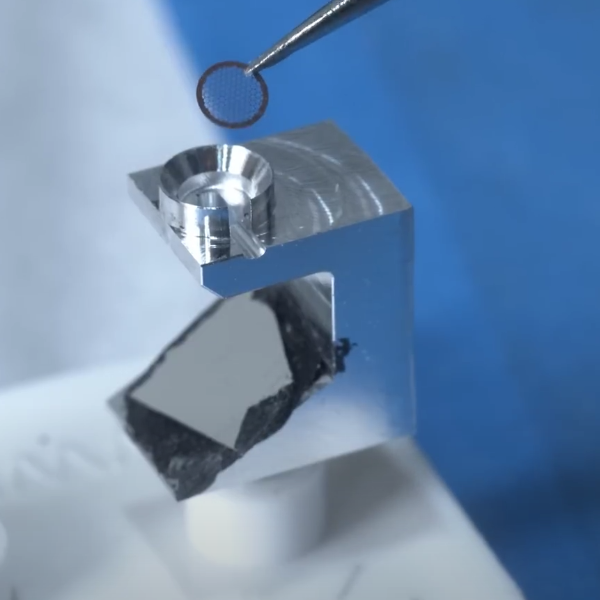
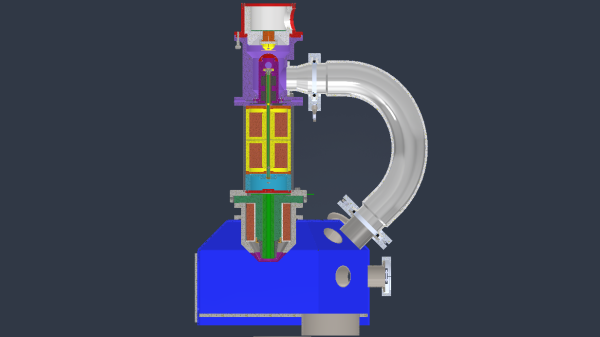
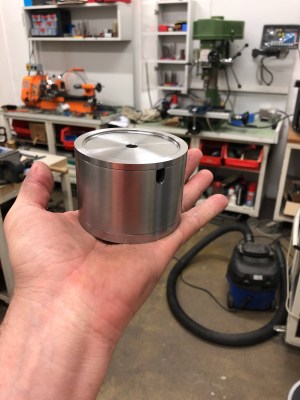
The idea, then, is to create a STEM-SEM device. There’s a sample holder and an angled reflector that shoots electrons passing toward the SEM’s detector. The back-scatter detector is not used, and a shield prevents the detector from seeing secondary emissions from the target itself.

You can buy these, but they are well over $1,000, so in true hacker fashion, [Breaking Taps] made his own.  You could, too, but you’d need a pretty good machine shop and — oh yeah — a scanning electron microscope.

While we have seen some home labs with electron microscopes, you need some high-tech vacuum and high-voltage gear, so it isn’t too common. Armed with a STEM, you can even see the shadows of atoms.

Continue reading “Electron Microscope Conversion Hack”

Home Made Scanning Electron Microscope Shows Some Potential

Scanning electron microscopes are one of those niche instruments that most of us don’t really need all the time, but would still love to have access to once in a while. Although we’ve covered a few attempts at home-builds before, many have faltered, except this project over on Hackday.IO by user Vini’s Lab, which appears to be still under active development. The principle of the SEM is pretty simple; a specially prepared sample is bombarded with a focussed beam of electrons, that is steered in a raster pattern. A signal is acquired, using one of a number of techniques, such as secondary electrons (SE) back-scattered electrons (BSE) or simply the transmitted current into the sample. This signal can then be used to form an image of the sample or gather other properties.

Condenser assembly

The project is clearly in the early stages, as the author says, it’s a very costly thing to build, but already some of the machined parts are ready for assembly. Work has started on the drive electronics for the condenser stigmator. This part of the instrument takes the central part of the rapidly diverging raw electron beam that makes it through the anode, and with a couple of sets of octopole coil sets, and an aperture or two, selects only the central portion of the beam, as well as correcting for any astigmatism in the beam. By adjusting the relative currents through each of the coils, a quadrupole magnetic field is created, which counteracts the beam asymmetry.

Scanning control and signal acquisition are handled by a single dedicated card, which utilises the PIO function of a Raspberry Pi Pico module. The Pico can drive the scanning operation, and with an external FTDI USB3.0 device, send four synchronised channels of acquired sample data back to the host computer. Using PCIe connectors and mating edge connectors on the cards, gives a robust and cost effective physical connection. As can be seen from the project page, a lot of mechanical design is complete, and machining has started, so this is a project to keep an eye on in the coming months, and possibly years!

We have seen a few SEM hacks, here’s a teensy powered SEM hack from [Ben Krasnow] and here’s another attempt. For such a conceptually simple device, with such immense usefulness, its does seem a bit remiss that there aren’t more such projects out there.

Electron Microscopes Are Awesome: Everything You Didn’t Know You Wanted To Know

Electron microscopes were once the turf of research laboratories that could foot the hefty bill of procuring and maintaining such equipment. But old models have been finding their way into the hands of eager individuals who are giving us an inside look at the rare equipment. Before you start scouring Craigslist, go on a crash course of what you need to know with Adam McComb’s Hacker’s Guide to Electron Microscopy. He presented the talk at the 2018 Hackaday Superconference and the recording was just published, you’ll find it below.

Continue reading “Electron Microscopes Are Awesome: Everything You Didn’t Know You Wanted To Know”

Reviving An Electron Microscope With Arduino

We don’t know about you, but when our friends ask us if we want to help them fix something, they’re usually talking about their computer, phone, or car. So far it’s never been about helping them rebuild an old electron microscope. But that’s exactly the request [Benjamin Blundell] got when a friend from a local hackerspace asked if he could take a look at a vintage Cambridge Stereoscan 200 they had found abandoned in a shed. Clearly we’re hanging out with the wrong group of people.

As you might imagine, the microscope was in desperate need of some love after spending time in considerably less than ideal conditions. While some of the hackerspace members started tackling the hardware side of the machine, [Benjamin] was tasked with finding a way to recover the contents of the scope’s ROM. While he’s still working on verification, the dumps he’s made so far of the various ROMs living inside the Stereoscan 200 have been promising and he believes he’s on the right track.

The microscope uses a mix of Texas Instruments 25L32 and 2516 chips, which [Benjamin] had to carefully pry out after making sure to document everything so he knew what went where. A few of the chips weren’t keen on being pulled from their home of 30-odd years, so there were a few broken pins, but on the whole the operation was a success.

Each chip was placed in a breadboard and wired up to an Arduino Mega, as it has enough digital pins to connect without needing a shift register. With the wiring fairly straightforward, [Benjamin] just needed to write up some code to read the contents of the chip, which he has graciously provided anyone else who might be working on a similar project. At this point he hasn’t found anything identifiable in his ROM dumps to prove that they’ve been made successfully, all he really knows right now is that he has something. At least it’s a start.

More and more of these older electron microscopes are getting a second lease on life thanks to dedicated hackers in their home labs. Makes you wonder if there’s ever going to be a piece of hardware the hacker community won’t bend to their will.

Scanning Electron Microscope Adds To Already Impressive Garage Lab

When you’re a high schooler who built a semiconductor fab in your garage, what’s next on your agenda? Why, adding a scanning electron microscope to your lab, naturally. How silly of you to ask.

When last we stumbled across the goings on in the most interesting garage in New Jersey, [Sam Zeloof] was giving a tour of his DIY semiconductor fabrication lab and showing off some of the devices he’s made there, including diodes and MOSFETs. As impressive as those components are, it’s the equipment he’s accumulated that really takes our breath away. So adding an eBay SEM to the mix only seems a natural progression, and a good reason to use some of the high vacuum gear he has. The video below shows [Sam] giving a tour of the 1990s-vintage instrument and shows images of various copper-sputtered samples, including a tick, which is apparently the state bird of New Jersey.

SEM hacks are by no means common around here, but they’re not unheard of. [Ben Krasnow] has used his to image cutting tools and phonograph records in action, and there are a few homebrew SEMs kicking around too. But our hats are off to [Sam] for yet another acquisition and a great tutorial to boot.

Continue reading “Scanning Electron Microscope Adds To Already Impressive Garage Lab”