WiFi Hides Inside A USB Cable

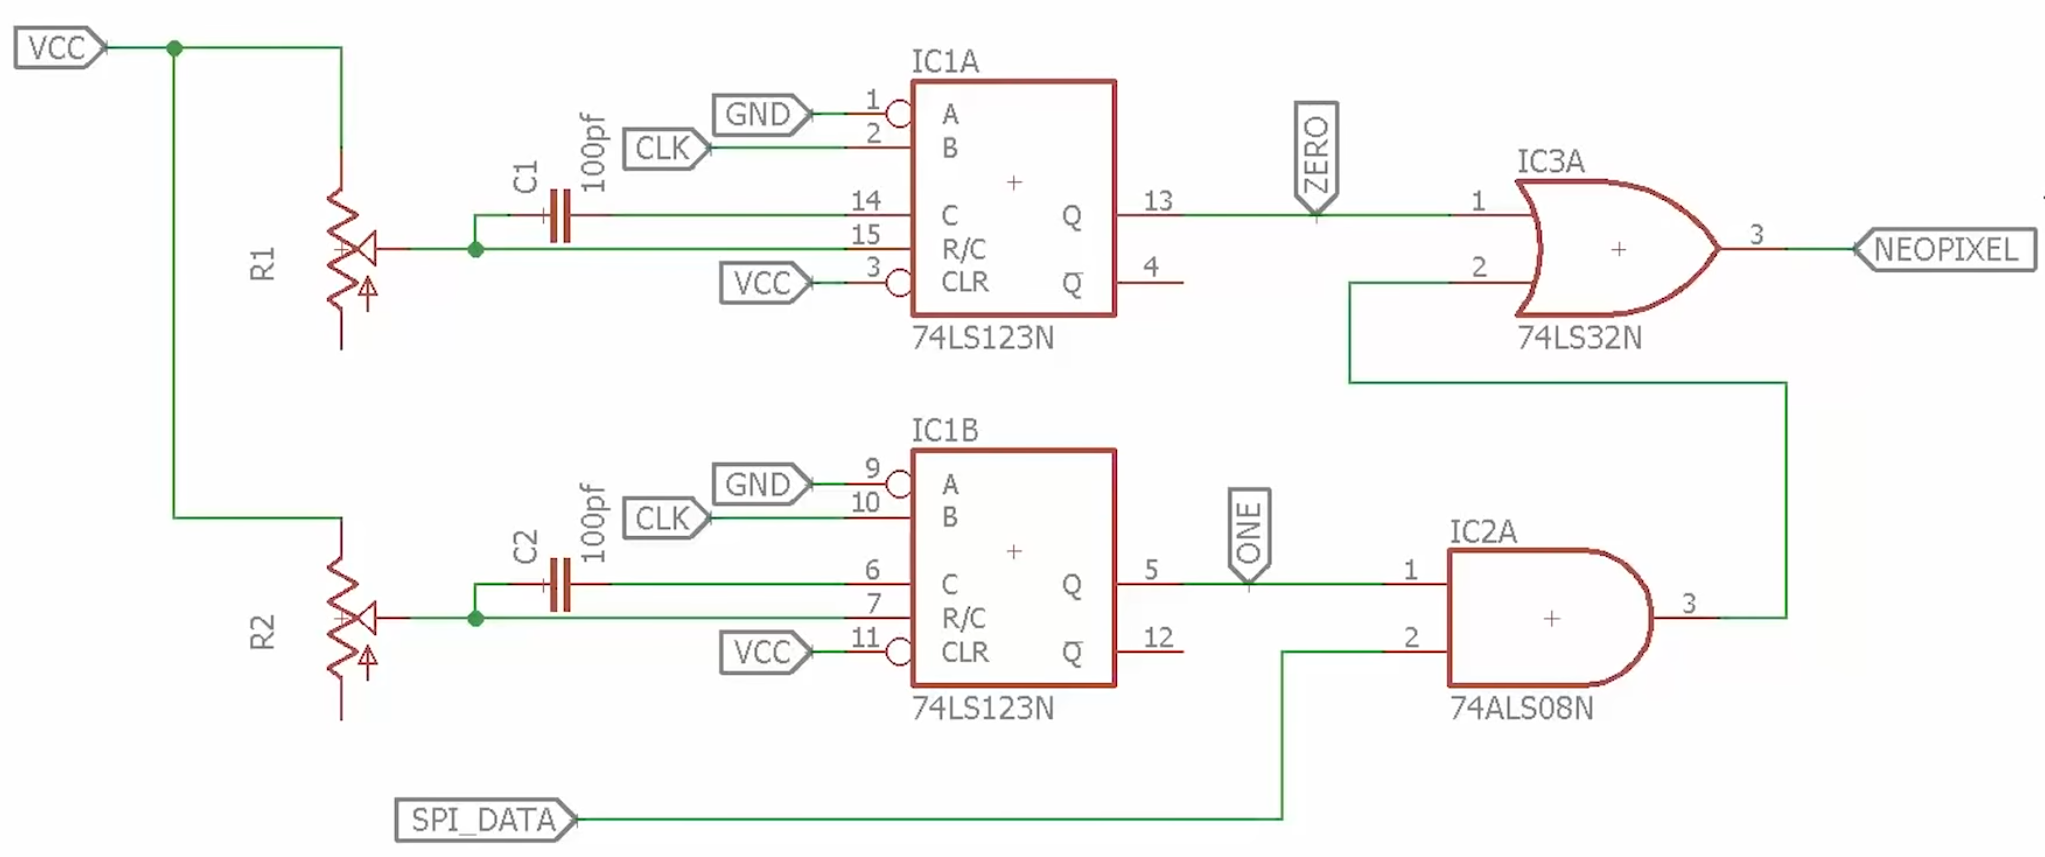
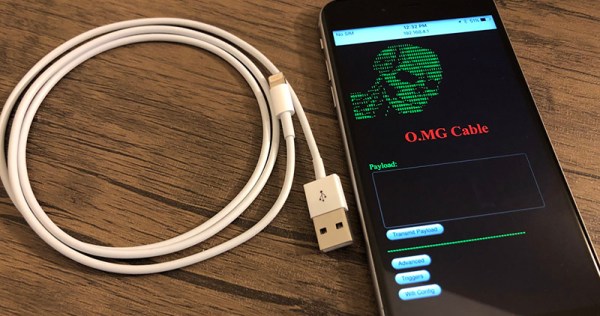
If you weren’t scared of USB cables before, you should be now. The O.MG cable (or Offensive MG kit) from [MG] hides a backdoor inside the shell of a USB connector. Plug this cable into your computer and you’ll be the victim of remote attacks over WiFi.

You might be asking what’s inside this tiny USB cable to make it susceptible to such attacks. That’s the trick: inside the shell of the USB ‘A’ connector is a PCB loaded up with a WiFi microcontroller — the documentation doesn’t say which one — that will send payloads over the USB device. Think of it as a BadUSB device, like the USB Rubber Ducky from Hak5, but one that you can remote control. It is the ultimate way into a system, and all anyone has to do is plug a random USB cable into their computer.

In the years BadUSB — an exploit hidden in a device’s USB controller itself — was released upon the world, [MG] has been tirelessly working on making his own malicious USB device, and now it’s finally ready. The O.MG cable hides a backdoor inside the shell of a standard, off-the-shelf USB cable.

The construction of this device is quite impressive, in that it fits entirely inside a USB plug. But this isn’t a just a PCB from a random Chinese board house: [MG] spend 300 hours and $4000 in the last month putting this project together with a Bantam mill and created his own PCBs, with silk screen. That’s impressive no matter how you cut it.

Future updates to this cable that will hack any computer might include a port of ESPloitV2, an Open Source WiFi controlled USB HID keyboard emulator. That will bring a lot of power to this device that’s already extremely capable. In the video attached to this tweet you can see the O.MG cable connected to a MacBook, with [MG] opening up a webpage remotely.

MIT IAP Tackles Radio

MIT is well known for rigorous courses, but they also have a special four-week term at the start of each year called the IAP — Independent Activities Period. This year, the MIT Radio Society had several interesting presentations on both the history and application of radio. You weren’t there? No problem, as the nine lecture were all recorded for you to watch at your leisure. You can see one of the nine, below.

These aren’t some five minute quicky videos, either. They are basically live captures that run anywhere from an hour to almost two hours in length. The topics are a great mix including radio history, software-defined radio, propagation, radio astronomy, RADAR, and even 5G.

You might have to pick and choose. Some of the lectures are suitable for just about anyone. Some assume a bit more radio expertise in electronics or math. Still, they are all worth at least a cursory skim to see if you want to really sit and watch in detail. The only nitpick is that some presenters used a laser pointer that doesn’t show up on the inset slide graphics in the video. That makes sense because the inset slides are not really in the room, but it can make it a little difficult to understand what the speaker is pointing to on a crowded slide.

Of course, if you want to dive deep and you need more background, MIT — along with many other institutions — will let you use their learning material for free. We were especially fans of the circuits class but there are many others including just raw materials from OCW.

Continue reading “MIT IAP Tackles Radio”

Inefficient NeoPixel Control Solved With Hardware Hackery

Everyone loves NeoPixels. Individually addressable RGB LEDs at a low price. Just attach an Arduino, load the demo code, and enjoy your blinking lights.

But it turns out that demo code isn’t very efficient. [Ben Heck] practically did a spit take when he discovered that the ESP32 sample code for NeoPixels used a uint32 to store each bit of data. This meant 96 bytes of RAM were required for each LED. With 4k of RAM, you can control 42 LEDs. That’s the same amount of RAM that the Apollo Guidance Computer needed to get to the moon!

His adventure is based on the thought that you should be able to generate these signals with hardware SPI. First, he takes a look at Adafruit’s DMA-Driven NeoPixel example. While this is far more efficient than the ESP32 demo code, it still requires 3 SPI bits per bit of NeoPixel data. [Ben] eventually provides us with an efficient solution for SPI contro using a couple of 7400 series chips:

Schematic of SPI to NeoPixel circuit using 74HC123

[Ben]’s solution uses some external hardware to reduce software requirements. The 74HC123 dual multi-vibrator is used to generate the two pulse lengths needed for the NeoPixels. The timing for each multi-vibrator is set by an external resistor and capacitor, which are chosen to meet the NeoPixel timing specifications.

The 74HC123s are clocked by the SPI clock signal, and the SPI data is fed into an AND gate with the long pulse. (In NeoPixel terms, a long pulse is a logical 1.) When the SPI data is 1, the long pulse is passed through to the NeoPixels. Otherwise, only the short pulse is passed through.

This solution only requires a 74HC123, an AND gate, and an OR gate. The total cost is well under a dollar. Anyone looking to drive NeoPixels with a resource-constrained microcontroller might want to give this design a try. It also serves as a reminder that some problems are better solved in hardware instead of software.

Continue reading “Inefficient NeoPixel Control Solved With Hardware Hackery”

Travelling The Oregon Trail With An Apple II Robot

For one reason or another, we’re going with a retro-futuristic 80s aesthetic in this case, [Mike] decided to turn an Apple IIe into a robot. If you have to ask why, you’ll never know, but this project does have some interesting things going for it. There’s a voice synthesizer, a brand spankin’ new power supply, and it rolls around on the floor thanks to Apple BASIC.

Since this is a mobile robot, there needs to be a power supply in there somewhere. The Apple II had a fantastic switching power supply, but it ran off mains voltage. To make this Apple run off a 14.8 V LiPO battery, [Mike] needed to re-engineer this power supply to give +5, +12, -5, and -12 Volts. The easiest is the positive voltage, and for that, he used a big ‘ol LM1084 linear regulator for the +5 V line. This outputs a ton of heat and probably isn’t the best solution, but it is a solution that works. The +12 line was again another linear regulator, an LM7812CV. Since this is dropping 14.8 V down to 12, the efficiency isn’t that bad, and since there’s no floppy drive it’s not pulling much current anyway. The negative voltages are a MAX764 / MAX765 inverting switching regulators. This completely replaces the original power supply in the Apple II, and is a decent reference design for anyone who wants to make a luggable Apple II laptop.

To move this thing around, the motors run on their own 11.1 V LiPO, with a bunch of Pololu gear tying everything together. The BASIC code was written on an emulator, transferred over with the Floppy Emu. Movement is controlled through the output pins on the joystick port, and there’s a text to speech module that was obviously needed and ties this project together wonderfully. You can check out the video demo of the build below.

Continue reading “Travelling The Oregon Trail With An Apple II Robot”

The Rotary Joystick Can Take A Beating

It’s a well-known fact amongst the older set that games used to be harder. Back in the 1980s, most home computers had awful keyboards, barely adequate joysticks, and the games had to be difficult to have any longevity, because there’s only so much you can fit into a single sided disk. Some of these games became known as joystick killers, due to the repetitive thrashing movements required to win. [Jan] was tired of letting Decathlon and its ilk get the better of him and his controllers, so built a joystick that was up to the task.

The basic concept of [Jan]’s rotary joystick is that many games required a fast and repetitive left-right motion to be executed by the player, but weren’t too concerned if a few up or down movements were in the mix. Thus, instead of a traditional shaft-based joystick, instead a rotary mechanism was employed. The player rotates the joystick’s wheel, which has a magnet fitted. This triggers a series of four reed switches, for up, down, left and right. By rotating the wheel quickly, it simulates the rapid left-right motion well enough to beat most of the vintage C64 games that were giving [Jan] trouble, and it makes an ideal controller for the 2018 release, Crank Crank Revolution.

We like the spirit behind any build that uses hardware to overcome intractable gaming problems. We’ve seen similar approaches used to beat Guitar Hero. Remember Guitar Hero? That was a thing. Video after the break.

Continue reading “The Rotary Joystick Can Take A Beating”

Electron Microscopes Are Awesome: Everything You Didn’t Know You Wanted To Know

Electron microscopes were once the turf of research laboratories that could foot the hefty bill of procuring and maintaining such equipment. But old models have been finding their way into the hands of eager individuals who are giving us an inside look at the rare equipment. Before you start scouring Craigslist, go on a crash course of what you need to know with Adam McComb’s Hacker’s Guide to Electron Microscopy. He presented the talk at the 2018 Hackaday Superconference and the recording was just published, you’ll find it below.

Continue reading “Electron Microscopes Are Awesome: Everything You Didn’t Know You Wanted To Know”

X-Rays And High Voltage Hack Chat

Join us on Wednesday at noon Pacific time for the X-rays and high-voltage Hack Chat!

Fran Piernas likes to push the envelope a bit with projects that others might shy away from. A quick glance at his Hackaday.io profile reveals a few of the exciting projects he’s been working on recently, including a DIY X-ray machine and the high-voltage driver needed to run it. Not only that, he’s recently taken his home-brew X-ray rig to the next level – a computed tomography (CT) scanner. His YouTube channel also has some exciting stuff using potentially lethal voltages and ionizing radiation.

Please join us for this Hack Chat, in which we’ll cover:

  • How one safely works with high voltage and ionizing radiation;
  • Sourcing uncommon components like X-ray tubes;
  • How Fran decided to start playing at the edge of the danger zone; and
  • What sort of experiments he has in mind for the future.

You are, of course, encouraged to add your own questions to the discussion. You can do that by leaving a comment on the X-rays and high-voltage Hack Chat and we’ll put that in the queue for the Hack Chat discussion.

join-hack-chatOur Hack Chats are live community events on the Hackaday.io Hack Chat group messaging. This week we’ll be sitting down on Wednesday, February 20, at noon, Pacific time. If time zones have got you down, we have a handy time zone converter.

Click that speech bubble to the right, and you’ll be taken directly to the Hack Chat group on Hackaday.io. You don’t have to wait until Wednesday; join whenever you want and you can see what the community is talking about.