The Chipwhisperer adapter plugged into a ChipWhisperer, with the STM chip mentiuoned soldered on

ChipWhisperer Adapter Helps Reverse-Engineer A Controversial Game Cartridge

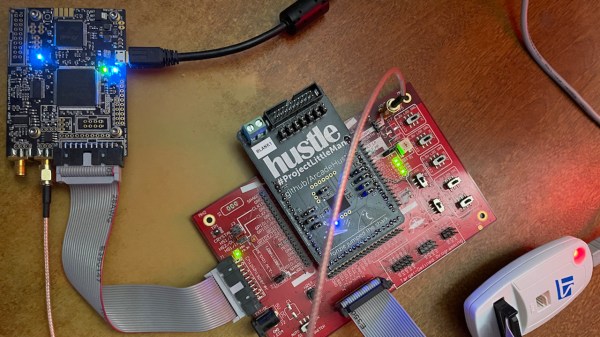
The ChipWhisperer has been a breakthrough in hobbyist use of power analysis and glitching attacks on embedded hardware. If you own one, you surely have seen the IDC and SMA sockets on it – usable for connecting custom breakouts housing a chip you’re currently probing. Today, [MAVProxyUser] brings us a ChipWhisperer adapter for STM32F446ZEJx, which comes in a UFBGA144 package – and the adapter has quite a backstory to it.

In retro gaming world, a crowdfunding campaign for a game called PAPRIUM has seen a huge success getting funded in 2017. However, the campaign has grossly underdelivered throughout the last five years, and out of those rare cartridges delivered to backers, quite a few have faulty hardware. Getting replacements isn’t realistic at this point, so the repair attempts and game preservation efforts have been ongoing. Trouble is – there are protection mechanisms against dumping the cartridges, and one of the protection mechanisms is the built-in flash read protection of the aforementioned STM32 found on the cartridge. This board adapts the chip to a ChipWhisperer interface for protection bypass exploration, and has quite a few configuration jumpers anyone facing a similar chip is able to use – Eagle files are out there as well, in case your chip needs a slightly different approach.

With reverse-engineering underway, are we likely to see this cartridge’s defenses fall? Our assessment is ‘yes’ – it’s not like there’s a shortage of mechanisms for bypassing security ; from modchips to EMP attacks to blasting the die with a laser, hardware-reliant security is, still, quite bypassable. All in all, despite the drama around the project, this is one more reference design for the ChipWhisperer, and a fun journey to look forward to.

Not A Pot, Not An Encoder: Exploring Synchros For Rotational Sensing

We’re all familiar with getting feedback from a rotating shaft, for which we usually employ a potentiometer or encoder. But there’s another device that, while less well-known, has some advantages that just might make it worth figuring out how to include it in hobbyist projects: the synchro.

If you’ve never heard of a synchro, don’t feel bad; as [Glen Akins] explains, it’s an expensive bit of kit most commonly found in avionics gear. It’s in effect a set of coaxial transformers with a three-phase stator coil and a single-phase rotor. When excited by an AC reference voltage, the voltage induced on the rotor coil is proportional to the cosine of the angle between the rotor and stator. It seems simple enough, but the reality is that synchros present some interfacing challenges.

[Glen] chose a surplus altitude alert indicator for his experiments, a formidable-looking piece of avionics. Also formidable was the bench full of electronics needed to drive and decode the synchro inside it — a 26-volt 400-Hz AC reference voltage generator, an industrial data acquisition module to digitize the synchro output, and an ESP32 dev board with a little OLED display to show the results. And those are impressive; as seen in the video below, the whole setup is capable of detecting tenth-of-a-degree differences in rotation.

The blog post has a wealth of detail on using synchros, as does this Retrotechtacular piece from our own [Al Williams]. Are they practical for general hobbyist use? Probably not, but it’s still cool to see them put to use.

Continue reading “Not A Pot, Not An Encoder: Exploring Synchros For Rotational Sensing”

A graphic showing the suggested footprint dimensions for 0402 parts

Want Better 0402 Reflow? Consider These Footprints!

Assembling with a stencil is just that much more convenient – it’s a huge timesaver, and your components no longer need to be individually touched with a soldering iron for as many times as they have pads. Plus, it usually goes silky smooth, the process is a joy to witness, and the PCB looks fantastic afterwards! However, sometimes components won’t magically snap into place, and each mis-aligned resistor on a freshly assembled board means extra time spent reflowing the component manually, as well as potential for silent failures later on. In an effort to get the overall failure rate down, you will find yourself tweaking seemingly insignificant parameters, and [Worthington Assembly] proposes that you reconsider your 0402 and 0201 footprints.

Over the years, they noticed a difference in failure rates between resistor&capacitor footprints on various boards coming in for assembly – the size and positioning of the footprint pads turned out to be quite significant in reducing failure rate, even on a tenth of millimeter scale. Eagle CAD default footprints in particular were a problem, while a particular kind of footprint never gave them grief – and that’s the one they recommend we use. Seeing the blog post become popular, they decided to share their observations on 0201 as well, and a footprint recommendation too. Are your 0402 resistors giving you grief? Perhaps, checking the footprints you’re using is a good first step.

The 0402 and 0201 components are in a weird spot, where soldering iron assembly is no longer really viable, but the stencil+reflow approach might not be unilaterally successful when you start off – fortunately, that’s where writeups like these come in. Interested in learning stenciling? Get some solder paste, and read up on all the different ways you can put it onto your boards.

Comparing Cheap Capacitative Soil Moisture Sensors With Commercial Sensors

When your residence has soil moisture sensors embedded that were dictated by your friendly neighborhood HoA, you may start asking questions about the system used. That’s what [Modest Maker] did and the resulting findings along with an attempt to beat the commercial system with some cheap capacitive sensors, are covered  in a recent video that’s also embedded below. Part of the motivation here was that the commercial system in the community was not clearly installed properly.

To make a long story short, the commercial system by Hunter (Soil-Clik) appears to be a tensiometer-based system that uses the pressure produced by moisture intrusion into the measurement column. This translates to how easy it is for plant roots to extract water, depending on the soil type. [Modest Maker] had to first dodge the broken-by-design capacitive sensors that are available everywhere, but after that was able to cobble together a measurement system that he hopes will allow him to validate the commercial system’s installation.

Continue reading “Comparing Cheap Capacitative Soil Moisture Sensors With Commercial Sensors”

Electron Microscope Conversion Hack

Some of you probably know this already, but there’s actually more than one kind of electron microscope. In electronics work, the scanning electron microscope (SEM) is the most common. You hit something with electrons and watch for secondary electron emissions. However, biologists more often use a TEM — a transmissive electron microscope — which passes electrons through a sample to image it. [Breaking Taps] built a small device to convert his SEM into a TEM.

One key idea is that in a SEM, the beam’s position on the target is the only thing that matters. Any secondary electron detected is a result of that spot’s composition, no matter where you collect them. Common detectors pick up back-scattered electrons bouncing back toward the electron source.  There are also low-energy electrons bouncing off in random directions, depending on the topology of the target.

The slow electrons can be attracted by a single detector that has a strong positive charge. TEM  doesn’t detect secondary electron emissions. Instead, it passes electrons through a target and collects the ones that pass through a very thin sample using a screen that glows when electrons hit it.

The idea, then, is to create a STEM-SEM device. There’s a sample holder and an angled reflector that shoots electrons passing toward the SEM’s detector. The back-scatter detector is not used, and a shield prevents the detector from seeing secondary emissions from the target itself.

You can buy these, but they are well over $1,000, so in true hacker fashion, [Breaking Taps] made his own.  You could, too, but you’d need a pretty good machine shop and — oh yeah — a scanning electron microscope.

While we have seen some home labs with electron microscopes, you need some high-tech vacuum and high-voltage gear, so it isn’t too common. Armed with a STEM, you can even see the shadows of atoms.

Continue reading “Electron Microscope Conversion Hack”

Detecting Machine-Generated Content: An Easier Task For Machine Or Human?

In today’s world we are surrounded by various sources of written information, information which we generally assume to have been written by other humans. Whether this is in the form of books, blogs, news articles, forum posts, feedback on a product page or the discussions on social media and in comment sections, the assumption is that the text we’re reading has been written by another person. However, over the years this assumption has become ever more likely to be false, most recently due to large language models (LLMs) such as GPT-2 and GPT-3 that can churn out plausible paragraphs on just about any topic when requested.

This raises the question of whether we are we about to reach a point where we can no longer be reasonably certain that an online comment, a news article, or even entire books and film scripts weren’t churned out by an algorithm, or perhaps even where an online chat with a new sizzling match turns out to be just you getting it on with an unfeeling collection of code that was trained and tweaked for maximum engagement with customers. (Editor’s note: no, we’re not playing that game here.)

As such machine-generated content and interactions begin to play an ever bigger role, it raises both the question of how you can detect such generated content, as well as whether it matters that the content was generated by an algorithm instead of by a human being.

Continue reading “Detecting Machine-Generated Content: An Easier Task For Machine Or Human?”

Electronic Shoe Explores Alleged Chess Misbehavior

A few months ago, a scandal erupted in the chess world which led to some pretty wild speculation around a specific chess player. We won’t go into any of the details except to say that there is virtually no physical evidence of any method this player allegedly used to cheat in a specific in-person chess match. But [Teddy Warner] and partner [Jack Hollingsworth] were interested in at least providing a proof-of-concept for how this cheating could have been done, though, and came up with this device which signals a chess player through a shoe.

The compact device is small enough to fit in the sole of one of the player’s shoes, and is powered by an ATtiny412 microcontroller paired with a HC-06 Bluetooth module. The electronics are fitted into a 3D printed case along with a small battery which can then be placed into the sole of a shoe, allowing the wearer to feel the vibrations from a small offset-weight motor. With a second person behind a laptop and armed with a chess engine, the opponent’s moves can be fed into the computer and the appropriate response telegraphed through the shoe to the player.

While [Teddy] and [Jack] considers the prototype a success in demonstrating the ease at which a device like this could be used, and have made everything related to this build open source, this iteration did have a number of issues including that the motor buzzing was noticeable during play, and that his chess engine made some bizarre choices in the end game. It also requires the complicity of a second person, which is something this other chess cheating machine does away with. They also note that it’s unlikely that any chess players at the highest levels use devices like these, and that other chess experts have found no evidence of any wrongdoing in this specific scandal.

Continue reading “Electronic Shoe Explores Alleged Chess Misbehavior”