a microwave-oven with animated wave diagram

Dive Into The Microwaves, The Water’s Dipolar

When the microwave oven started to gain popularity in the 60s and 70s, supporters and critics alike predicted that it would usher in the end of cooking as we knew it. Obviously that never quite happened, but not because the technology didn’t work as intended. Even today, this versatile kitchen appliance seems to employ some magic to caffeinate or feed a growing hacker in no time flat. So, how exactly does this modern marvel work?

interior of a microwave-oven with a wave length overlay

That’s exactly what [Electronoob] set out to explain in his latest video. After previously taking apart a microwave and showing off the magnetron within he’s back with a clear explanation of how these devices work.

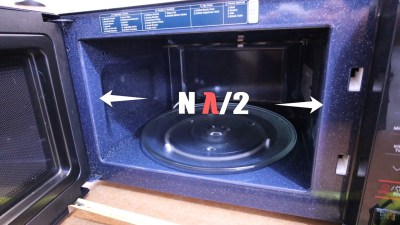
Maybe you have no idea, or have heard something vague about the water in the food wiggling in response to the microwaves. Do you know why microwaves and not some other part of the electromagnetic spectrum? Why the food spins on a platter? How the size of the oven relative to the wavelength affects the efficiency of its cooking? We didn’t, and think the video is a great primer on all of this and more.

Here at Hackaday, we sure love using and abusing microwave ovens. From upgrading them with voice control back in 2013, to turning them into UV curing chambers and mini foundries, to the limitless possibilities for the transformers and magnetrons that await us inside, we just can’t get enough. (this is our 82nd article tagged with microwave!)

Continue reading “Dive Into The Microwaves, The Water’s Dipolar”

A 3D-printed teapot with an e-ink display

Top Up Your Teapot In Time With This E-ink Tea Timer

Whether you’re a tea aficionado or just a casual drinker, it’s important to pay attention to your brewing times: too short and you’re just drinking hot water, too long and your brew becomes bitter and astringent. [Bob] wanted to help his parents avoid the latter scenario, and made them a convenient little tea timer that displays the time when they last replenished the pot.

Operating the timer couldn’t be easier: just press down on the teapot’s lid and it will store the current time on its e-ink display. Inside is a Pimoroni Badger 2040 with a real-time clock daughter board, powered by a set of AAA batteries. The Badger is an RP2040-powered board with an integrated e-ink display that’s perfect for this use case: the display needs to be updated only once when the button is pressed, and doesn’t use any power after that.

Naturally, the tea timer is encased in a teapot-shaped enclosure. It has a clever mechanism inside that pushes one of the Badger’s buttons when you press down on the lid, and also provides the satisfying click that you hear in the video embedded below. It took more than thirteen hours to print on [Bob]’s Creality Ender 3, but the end result definitely looks the part.

Functionally, this tea timer is about as simple as it gets: most other designs focus on the initial brewing process, and include features to alert you when your tea is ready.

Continue reading “Top Up Your Teapot In Time With This E-ink Tea Timer”

Throwback: USB Hotplate Used 30 Whole Ports

Once upon a time, USB was still hip, cool, and easy to understand. You could get up to 500 mA out of a port, which wasn’t much, but some companies produced USB cup warmers anyway which were a bit of a joke. However, one enterprising hacker took things further back in 2004, whipping up a potent USB hot plate powered by a cavalcade of ports.

Delicious.

The project was spawned after a USB cup warmer sadly failed to cook a decent fried egg. To rectify this, a souped-up version was built. The cup warmer was stripped of its original hardware, and fitted with six 2-ohm resistors instead. At 5 volts, each would draw 2.5 amps and the total power draw would be on the order of 75 watts. Each resistor would thus need five USB ports to power it to stay under the 500 mA limit, for a total of 30 USB ports in total. Six PCI-to-USB cards were installed in a motherboard for this purpose, providing the requisite ports.  A 500 watt power supply meant the computer had plenty of juice to run the hot plate.

Cooking proved successful, generating a decent amount of heat to brown up some beef. Served with some white rice, it proved an adequate meal, though apparently with a noted taste of electronic components.

This wouldn’t be such a challenge today. USB-C is capable of delivering 100 watts through a single port at 20 volts and 5 amps. However, there’s something joyous and charming about cooking on a ridiculous hotplate running off 30 USB 1.1 ports. The ingenuity is to be applauded, and it is truly a project of its time.

A Gaggia classic espresso machine with an LCD screen attached to the top, sitting on a table with vase of yellow lily flowers to its left and sunlight coming in from a window from the right.

Homebrew Espresso Maker Modding With Gaggiuino

For those that don’t know, Gaggia is a company that produces a line of affordable “entry-level” espresso coffee makers that offer good quality consumer espresso machines at reasonable prices. The entry level machines don’t offer fine grained control over temperature, pressure and steam which is where the Gaggiuino project comes in.

A schematic of the Gagguino project

The Gaggiuino project is an “after market” modification of many espresso makers, such as the Gaggia classic and Gaggia classic pro. The main additions are a MAX6675 thermocouple module paired with a K-Type thermocouple sensor for closed loop control over the temperature. Options for adding an AC dimmer module that attaches to the pump motor and a 0 Mpa to 1.2 Mpa ranged XDB401 pressure sensor, installed in line between the pump and the boiler, provide further closed loop control over the pressure and flow profiling.

Load cells can be attached to the drip tray to allow for feedback about the pour weight with a Nextion 2.4″ LCD touchscreen provides the user interface for profile selection and other interactivity. The project offers a “base” modification using an Arduino Nano as the microcontroller, in line with its namesake, but has an option for an STM32 Blackpill module that can provide more functionality beyond the scope of the Nano.

The Gaggiuino project is open source with code and extensive documentation available on GitHub. There is also a Discord community for those wanting help with their build or that have the inclination to share their passion for DIY espresso modding with the Gaggiuino. Espresso machine hacks are a favorite of ours and we’ve featured many projects on espresso machine builds and mods ranging from PID control of classic espresso makers to beautifully minimal closed loop homebrew espresso machines.

Continue reading “Homebrew Espresso Maker Modding With Gaggiuino”

Pop Your Way To A Fresh Roast Coffee

The preparation and consumption of coffee has become something of an art from in our community, with many people going to extravagant lengths to achieve the perfect cup. [Eric Sorensen] was keen to roast his own beans, but given the price of a dedicated roaster, instead made his own using a hot air popcorn popper.

The story unfolds in several parts, and starts with disabling the thermal cutout on the popper to be replaced with thermal sensors. An Arduino controls both the fan and the heating coil to regulate and vary the roasting temperature over time. Perhaps it’s the software and user interface that most makes this project shine, with a graphical interface on a 320 by 240 pixel touch screen, and a graphing profile interface more reminiscent of a reflow oven than a kitchen appliance. The whole thing is neatly packed away with its power supply in a slimline case, and while we’re no bean experts, we appreciate the uniform brown of the finished product.

Coffee roasters have appeared here numerous times over the years. One of the more recent was this wobble disk design.

Digital Kitchen Spoon Makes Weighing Your Ingredients A Snap

There seem to be two camps when it comes to recipes: those based on volume-based measurements, and those based on the weight of ingredients. Gravimetric measurements have the advantage of better accuracy, but at the price of not being able to quickly scoop out a bit of this and a dash of that. It would be nice to get the convenience of volumetric measurements with the accuracy of weighing your ingredients, wouldn’t it?

It would, and that’s just what [Penguin DIY] did with this digital kitchen spoon scale. The build started with, perhaps not surprisingly, a large mixing spoon and a very small kitchen scale. The bowl of the spoon got lopped off the handle and attached to the strain gauge, which was removed from the scale along with its LCD display and circuit board. To hold everything, a somewhat stocky handle was fabricated from epoxy resin sandwiched between aluminum bolsters. Compartments for the original electronics parts, as well as a LiPo battery and USB charger module, were carved out of the resin block, and the electronics were mounted so that the display and controls are easily accessible. The video below shows the build as well as the spoon-scale in action in the kitchen.

We think this is not only a great idea but a fantastic execution. The black epoxy and aluminum look amazing together on the handle, almost like a commercial product. And sure, it would have been easy enough to build a scale from scratch — heck, you might even be able to do away with the strain gauge — but tearing apart an existing scale seems like the right move here.

Continue reading “Digital Kitchen Spoon Makes Weighing Your Ingredients A Snap”

Barilla’s Open Source Tool For Perfect Pasta

Cooking pasta is perhaps one of the easiest things you can do in the kitchen, second only to watching a pot of water boil. But as pasta maker Barilla points out on their website, you can reduce your meal’s CO₂ emissions by up to 80% if you simply let the pasta sit in the hot water rather than actively boil it the whole time — a technique known as passive cooking.

The trick is getting the timing right, so in a fairly surprising move, Barilla has released the design for an open source device that will help you master this energy-saving technique. Granted it’s not a terribly complex piece of hardware, consisting of little more than an Arduino Nano 33 BLE, an NTC probe, and a handful of passive components wrapped up in a 3D-printed case. But the documentation is great, and we’ve got to give Barilla credit for going way outside of their comfort zone with this one.

Magnets in the 3D printed case let it stick to the lid of your pot, and when it detects the water is boiling, the gadget alerts your phone (at least for this version of the device, an Android or iOS application is required) that it’s time to put in the pasta. A few minutes later it will tell you when you can turn off the burner, after which it’s just a matter of waiting for the notification that your passively-cooked pasta is ready to get pulled out.

Like the prop making video Sony put out after the release of Ghostbusters: Afterlife, we recognize that on some level this is an advertisement for Barilla pasta. But if developing useful open source gadgets that can be built by the public is what a company wants to spend their advertising dollars on, you won’t catch us complaining. Hell, we might even spring for a box of Barilla next time we’re in the store.

Continue reading “Barilla’s Open Source Tool For Perfect Pasta”