A Nifty 3D Printed RC Car

Once upon a time, a remote controlled (RC) car was something you’d buy at Radio Shack or your local hobby store. These days, you can print your own, complete with suspension, right at home, as this project from [Logan57] demonstrates.

The design uses standard off-the-shelf hobby-grade components, with a brushed motor and controller for propulsion, and small metal gear servo for steering. The latter is a smart choice given there’s no servo saver in the design. Save for the fasteners and bearings, all the other parts are 3D printed. The hard components are produced in PETG or PLA, while flexible TPU is used for both the tires and the spring elements in the suspension system. It’s a double-wishbone design, and should serve as a good education should you later find yourself working on a Mazda Miata.

Building your own RC car isn’t just fun, it opens up a whole realm of possibilities. Sick of boring monster trucks and race cars? Why not build a 10×10 wheeler or some kind of wacky amphibious design? When you do, we’ll be waiting by the tipsline to hear all about it. Video after the break.

Continue reading “A Nifty 3D Printed RC Car”

Giant 3D Printer Can Print Life-Sized Human Statues

We’ve seen a few makers 3D scan themselves, and use those to print their own action figures or statuettes. Some have gone so far as building life-sized statues composed of many 3D printed parts. [Ivan Miranda] is no regular maker though, and his custom 3D printer is big enough that he can print himself a life-sized statue in one go.

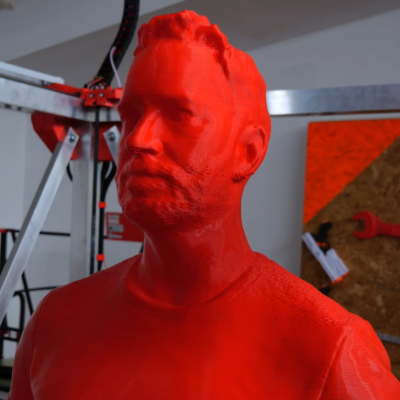
The printer is a gargantuan thing, using an aluminium frame and a familiar Cartesian layout. It boasts a build volume of 1110 mm x 1110 mm x 2005 mm, making it more than big enough to print human-sized statues. Dogs, cats, and some great apes may be possible, too.

Many of the components are 3D printed, including the various braces and adapters that hold the frame together. The build uses NEMA 23 stepper motors, with Duet3D hardware running the show. Notably, it uses V-wheels for the Z-axis, as linear rails would be prohibitively expensive at the sizes required.

[Ivan] shows off the printer by having it produce a statue of his body at 1:1 scale. It’s not a perfect print, with some layer shifts and an awkward moments where the filament supply was interrupted. It took 108 hours in total, with 76 hours of that being actual print time, and is made up of 4375 layers. Despite its flaws, its an incredibly impressive way to demonstrate the capabilities of the machine.

Eager to build such a printer for yourself? [Ivan] will sell you the design files for a reasonable fee.

[Ivan]’s giant printer was once a large tabletop affair; just look how far it’s come. He’s even come up with a system for using smaller printers to create large-scale construction kits, too. We can’t wait to see what mad project he comes up with next. Video after the break.

Continue reading “Giant 3D Printer Can Print Life-Sized Human Statues”

Sloth Door Greeter Uses Neat Fold-Up Electronics Enclosures

[Alan Reiner] is building a sloth-like door greeter for his house. Sloxel, as he is affectionately known, can move around and even talk, with [Alan] using some nifty tricks in the design process

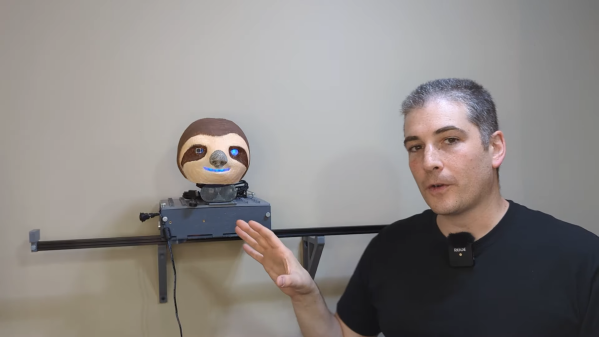
Sloxel’s job is to vet visitors to [Alan’s] house, before inviting them to knock on the door or to leave their details and go away. There’s still plenty of work to do on that functionality, which [Alan] plans to implement using ChatGPT. In the meantime, though, he’s been working hard on the hardware platform that will power Sloxel. A Raspberry Pi 3B+ is charged with running the show, including talking to the ChatGPT API and handling Sloxel’s motion along a linear rail with a number of stepper motors.

What we really love about this build, though, is the enclosure. [Alan] designed a housing for everything that can be 3D printed as a single part with print-in-place hinges. The four sides of the enclosure can then be folded up and into place with a minimum of fuss. Plus, the enclosure has plenty of nifty features that makes it easy to mount all the required hardware. It’s a neat design that we’d love to repurpose for some of our own projects.

We’ve seen other neat ideas in this area before, like using PCBs themselves as an enclosure. Video after the break.

Continue reading “Sloth Door Greeter Uses Neat Fold-Up Electronics Enclosures”

An Open-Source Antikythera Mechanism

When the Antikythera Mechanism was first discovered, it wasn’t viewed as the wonder that we know it today. Originally the divers who found the device and the first scientists to look at it wrote it off as an astrolabe or other some other common type of clock. It wasn’t until decades later when another set of scientists x-rayed the device and surveyed more of the shipwreck where it was found that it began to become one of the more important archaeological discoveries in history. There have been plenty of attempts to recreate this device, and this replica recreates the mechanisms of the original but is altered so it can be built in a modern workshop.

The build, which took the creators several years of research and development to complete, started off with the known gear schemes found on the original device. However, the group wanted to make it with modern technology including 3D printers and laser cutters, so although they worked from an understanding of the original 2000-year-old device there are some upgrades and changes to accommodate those who want to build this in a modern workshop. Gears made from plastic instead of brass have more friction, which needed to be reduced by building custom bearings machined out of brass. And to complete the machine a number of enclosures of various styles are available to use as well.

Additionally, all of the designs and schematics for this build are open source for anyone to build or modify as they would like, although the group putting this together does plan to sell various parts for this as well. There will be some issues with use, as they point out, since the ancient Greeks didn’t have a full enough understanding of cosmology to get a machine like this to stay accurate for two thousand years, but it’s a fascinating build nonetheless. Reasearchers are still discovering new things about this device too, including the recent find of an earliest possible start date for the machine.

Reliable 3D Printing With Ceramic Slurry

3D printing is at its most accessible (and most affordable) when printing in various plastics or resin. Printers of this sort are available for less than the cost of plenty of common power tools. Printing in materials other than plastic, though, can be a bit more involved. There are printers now for various metals and even concrete, but these can be orders of magnitude more expensive than their plastic cousins. And then there are materials which haven’t really materialized into a viable 3D printing system. Ceramic is one of those, and while there are some printers that can print in ceramic, this latest printer makes some excellent strides in the technology.

Existing technology for printing in ceramic uses a type of ceramic slurry as the print medium, and then curing it with ultraviolet light to solidify the material. The problem with ultraviolet light is that it doesn’t penetrate particularly far into the slurry, only meaningfully curing the outside portions. This can lead to problems, especially around support structures, with the viability of the prints. The key improvement that the team at Jiangnan University made was using near-infrared light to cure the prints instead, allowing the energy to penetrate much further into the material for better curing. This also greatly reduces or eliminates the need for supports in the print.

The paper about the method is available in full at Nature, documenting all of the details surrounding this new system. It may be a while until this method is available to a wider audience, though. If you can get by with a print material that’s a little less exotic, it’s not too hard to get a metal 3D printer, as long as you are familiar with a bit of electrochemistry.

Cheap Deburring Tool Is Game Changer For 3D Printing

3D printing’s real value is that you can whip up objects in all kinds of whacky geometries with a minimum of fuss. However, there’s almost always some post-processing to do. Like many manufactured plastic objects, there are burrs, strings, and rough edges to deal with. Fussing around with a knife to remove them is a poor way to go. As explained by [Adrian Kingsley-Hughes] on ZDNet, a deburring tool is the cheap and easy solution to the problem.

If you haven’t used one before, a deburring tool simply consists of a curved metal blade that swivels relative to its straight handle. You can drag the curved blade over the edge of a metal, wooden, or plastic object, and it neatly pulls away the burrs. There’s minimal risk of injury, unlike when pulling a regular blade towards yourself. The curved, swiveling blade is much less liable to slip or jump, and if it does, it’s far less likely to cut you.

For plastic use, just about any old deburring tool will do. They last a long time with minimal maintenance. They will wear out faster when used on metals, but you can get replacement blades cheap if you happen to need them. It’s a tool every workshop should have, particularly given they generally cost less than $20.

Given the ugly edges and rafts we’re always having to remove from our 3D prints, it’s almost egregious that printers don’t come with them bundled in the box. They’re just a bit obscure when it comes to tools; this may in fact be the first time Hackaday’s ever covered one. If you’ve got your own quality-of-life hacks for 3D printing, sound off below, or share them on the tipsline! We have able staff waiting for your email.

3D Printed Artificial Nose Is Totally Vegan

Prosthetics are complicated, highly personal things. They must often be crafted and customized precisely to suit the individual. Additive manufacturing is proving a useful tool in this arena, as demonstrated by a new 3D printed nose design developed at Swansea University. And a bonus? It’s vegan, too!

Often, cartilage from the ribcage is used when reconstructing a patient’s nose. However, this procedure is invasive and can lead to health complications. Instead, a nanocellulose hydrogel made from pulped softwood, combined with hyaluronic acid, may be a viable printable material for creating a scaffold for cartilage cells. The patients own cartilage cells can be used to populate the scaffold, essentially growing a new nose structure from scratch. The technique won’t just be limited to nose reconstructions, either. It could also help to recreate other cartilage-based structures, such as the ear.

As with all new medical technologies, the road ahead is long. Prime concerns involve whether the material is properly bio-compatible, particularly where the immune system is concerned. However, the basic idea is one that’s being pursued in earnest by researchers around the world, whether for cosmetic purposes or to grow entire organs. As always, if you’re secretly 3D printing functional gallbladders in your basement, don’t hesitate to drop us a line.