Radio Decoding Swiss Army Knife In A NES Controller

If you wanted to name a few things that hackers love, you couldn’t go wrong by listing off vintage console controllers, the ESP system-on-chip platform, and pocket tools for signal capture and analysis. Combine all of these, and you get the ESP32Thang.

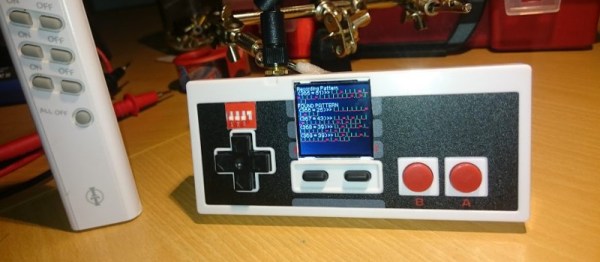
At its heart, the ESP32Thang is based around a simple concept – take an ESP32, wire up a bunch of interesting sensors and modules, add an LCD, and cram it all in a NES controller which helpfully provides some buttons for input. [Mighty Breadboard] shows off the device’s basic functionality by using an RFM69HW module to allow the recording and replay of simple OOK signals on the 433 MHz band. This is a band typically used by all sorts of unlicenced radio gear – think home IoT devices, wireless doorbells and the like. If you want to debug these systems when you’re out and about, this is the tool for you.

This is a fairly straightforward build at the lower end of complexity, but it gets the job done with style. The next natural step up is a Raspberry Pi with a full software defined radio attached, built into a Nintendo DS. If you build one, be sure to let us know. This project might serve as some inspiration.

With the wide availability of SPI and I2C modules these days, combined with the ease of programming provided by the Arduino environment, this is a project that just about any hacker could tackle after passing the blinking LED stage. The fact that integrating such hardware is so simple these days is truly a testament to the fact that we are standing on the shoulders of giants.

Converting A TP Link Router To Mission Control For Cheap 433MHz Home Automation

[Jean-Christophe Rona] found himself with some free time and decided to finish a project he started two years ago, reverse engineering cheap 433MHz home automation equipment. He hopes to control his space heaters remotely, in preparation for a cold and, now, robotic winter.

In a previous life, he had reverse engineered the protocol these cheap wireless plugs, garage doors, and electric window shutters all use. This eventually resulted in a little library called rf-ctrl that can toggle and read GPIO pins in the correct way to control these objects. He has a few of the more popular protocols built into the library and even wrote a guide on how to do the reverse engineering yourself if you have need.

Having successfully interfaced with the plugs to use with his space heaters, [Jean-Christophe] went about converting a cheap TP Link router into a command center for them. Since TP Link never expected anyone to hammer their square peg into a mismatched hole, it takes a careful hand at soldering and some enamel wire to break out the GPIO pins, but it’s well within the average skill set.

The end result is a nicely contained blue box with a little antenna hanging out of it, and we hope, a warm abode for the coming winter.

Easy DIY Telemetry Goes The Distance

[Paweł Spychalski] wrote in to tell us about some experiments he’s been doing, using cheap 433 MHz HC-12 radio units as a telemetry radio for his quadcopter.

In this blog post, he goes over the simple AT command set, and some of the limitations of the HC-12 part. Then he takes it out for a spin on his quadcopter, and finds out that his setup is good for 450 meters in an open field. Finally, he ties the radio into his quad’s telemetry system and tethers the other end to his cellphone through a Bluetooth unit for a sweet end-to-end system that only set him back around $20 and works as far out as 700 meters.

The secrets to [Paweł]’s success seem to be some hand-made antennas and keeping the baud rate down to a reasonable 9600 baud. We wonder if there’s room (or reason?) for improvement using a directional antenna on the ground. What say you, Hackaday Antenna Jockeys?

Also check out this very similar build where an ESP8266 replaces the Bluetooth module. And stashes it all inside a nice wooden box! Nice work all around.

Ez430 Home Automation

[Oliver] has been doing some work to use his TI ez430 Chronos wristwatch for some home automation. He’s working with a RF controllable lightbulb adapter which operates in the 433 MHz band. A dirt-cheap breadboard-friendly transmitter is available from Seeed Studios and he uses this in conjunction with a computer and an Arduino. Before the trolls get to their thing, YES, this is incredible overkill. But remember that he’s prototyping. We hope that if he intends to actually use this setup he’ll migrate to something like an ATtiny2313 running V-USB. Better yet, you should be able to tap into the watch’s companion receiver and cut the computer out completely.

If you’re easily amused you’ll appreciate the video of a light turning on and off after the break. If you’re a little harder to please then take a look at Oliver’s methods of using Python processing for the watch’s data.

Ok, now we’ve seen this watch turning on lights and unlocking doors. What else ‘ya got?