Spoofing An Analog Rotary Knob With An ATtiny, And Vampiric Power

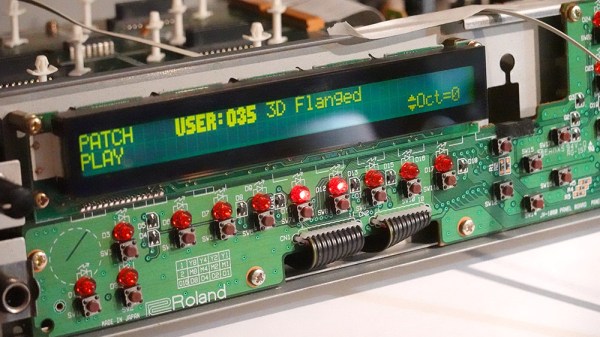
[Mitxela]’s repair of a Roland JV-1080 (a rack-mounted 90s-era synthesizer) sounds simple: replace a broken rotary encoder on the front panel. It turned out to be anything but simple, since the part in question is not today’s idea of a standard rotary encoder at all. The JV-1080 uses some kind of rotary pulse switch, which has three outputs (one for each direction, and one for pushing the knob in like a button.) Turn the knob in one direction, and one of the output wires is briefly shorted to ground with every detent. Turn it the other way, and the same happens on the other output wire. This is the part that needed a replacement.

The finished unit uses a modern rotary encoder and microcontroller in place of the original part, and implements a few tricks to power it.

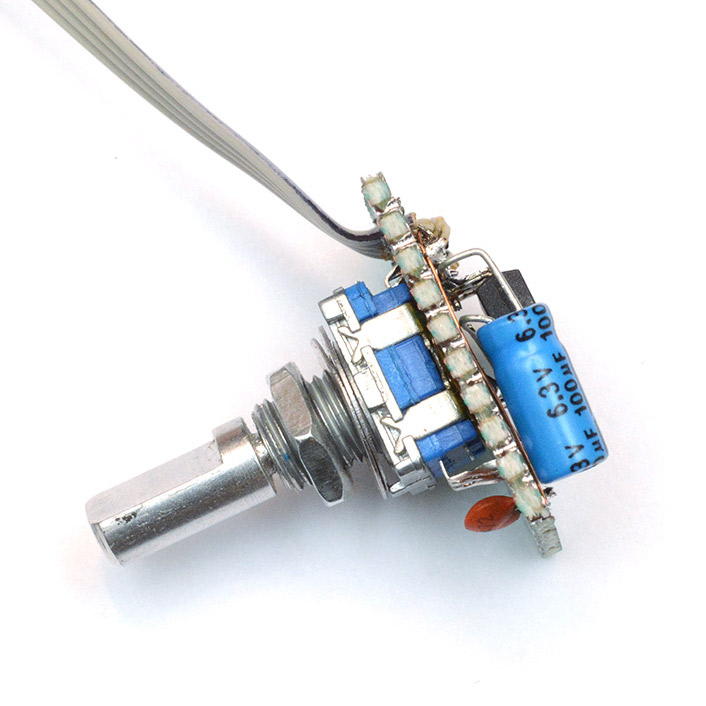
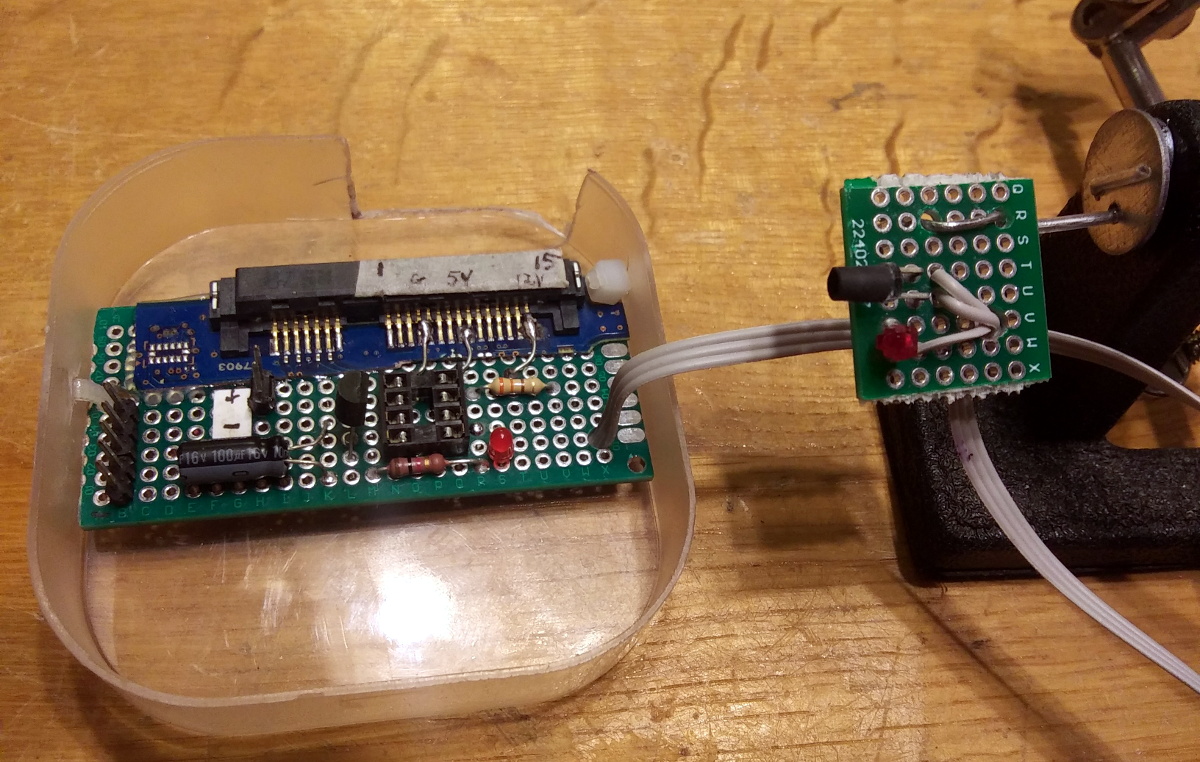
Rather than track down a source for the broken part, [Mitxela] opted to replace it with a modern rotary encoder combined with an ATtiny85 microcontroller to make it act like something the JV-1080 understands and expects. There was an additional wrinkle, however. The original rotary pulse switch is an entirely passive device, and lives at the end of a four-conductor cable with no power provided on it. How could the ATtiny85 be powered without resorting to running a wire to a DC voltage supply somewhere? Success was had, but it did take some finessing.

For the power, it turns out that the signal wires are weakly pulled up to +5 V and [Mitxela] used that for a power supply to the microcontroller. Still, by itself that wasn’t enough, because the ATtiny85 can easily consume more current than the weak pullups can source. We really recommend reading all the details in [Mitxela]’s writeup, but the short version is that the ATtiny85 does two things.

First, it minimizes its power usage by spending most of its time in sleep mode (consuming barely any power at all) and uses an interrupt to wake up just long enough to handle knob activity. Second, the trickle of power from the weak pullups doesn’t feed the ATtiny directly. It charges a 100 uF capacitor through a diode, and that is what keeps the microcontroller from browning out during its brief spurts of activity. Even better, after browsing the datasheet for the ATtiny, [Mitxela] saw it was possible to use the built-in ESD protection diodes for this purpose instead of adding a separate component.

It’s a neat trick and makes for a very compact package. Visit the project’s GitHub repository to dive into the nitty gritty. In the end, a single assembly at the end of a 4-wire connector acts just like the original passive component, no extra wires or hardware modifications needed.

When opening older hardware it’s never quite certain what will be found on the inside. But at least [Mitxela]’s repair duties on this synth didn’t end up with him tripping out on LSD.

Hacked Case Fan Follows The Leader With IR Sensor

Adding an additional fan to your PC is usually pretty straightforward, but as [Randy Elwin] found, this isn’t always the case with the newer Small Form Factor (SFF) machines. Not only was the standard 80 mm fan too large to fit inside of the case, but there wasn’t even a spot to plug it in. So he had to come up with his own way to power it up and control its speed.

Now if he only needed power, that wouldn’t have been a problem. You could certainly tap into one of the wires coming from the PSU and get 12 V to spin the fan. But that would mean it was running at max speed the whole time; fine in a pinch, but not exactly ideal for a daily driver.

Note the SATA connector pulled from a dead HDD.

To get speed control, [Randy] put together a little circuit using an ATtiny85, an IR LED, and a LTR-306 phototransistor. The optical components are used to detect the GPU fan’s current speed, which itself is controlled based on system temperature. Using the GPU fan RPM as an input, a lookup table on the microcontroller sets an appropriate speed for the 80 mm case fan.

One could argue that it would have been easier to connect a temperature sensor to the ATtiny85, but by synchronizing the case fan to the computer-controlled GPU fan, [Randy] is able to manually control them both from software if necessary. Rather than waiting on the case temperature to rise, he can peg the GPU fan and have the external fan speed up to match when the system is under heavy load.

You may think this is overkill for a simple case fan, but compared to some of the cooling hacks we’ve seen in the past, it’s pretty tame.

ATtiny Name Badges Are Hugely Creative

We’re not sure exactly why [Justin Garrison] decided to make these awesome name badges for himself and his coworkers at Disney+ streaming, but it’s fun to imagine them all lighting up a team-building ride down Space Mountain, isn’t it? Whatever the reason, they sure do look good.

Each badge has an ATtiny85 that drives the ten individually-addressable RGB LEDs, and both the wire and the LEDs are powered by the EL power inverter. [Justin] bought the thinnest EL wire he could find, which is conveniently also the brightest and probably the easiest to manipulate.

Nevertheless, we can’t get over how good the names look, and wonder if [Justin] missed his calling as a neon artist. He cleverly stuck wires through the protoboard to help form the letters, and then used superglue to hold them in place. [Justin] has the code up on GitHub and an album full of build pictures if you want to give this a go.

If this has made you want to give EL bending another go, try using a 3D printed frame to help get it into shape.

USB Password Keeper Runs On Tiny Chip

The most important rule of password use, especially when used for online logins, is to avoid reusing passwords. From there, one’s method of keeping track of multiple passwords can vary considerably. While memorization is an option in theory, in practice a lot of people make use of a password manager like Lastpass or KeePass. For those with increased security concerns, though, you may want to implement a USB password keeper like this one based on an ATtiny.

This password keeper, called “snopf”, is a USB device with an ATtiny85 which adds a layer of separation to password keeping that increases security substantially. Passwords are created by the USB device itself using a 128-bit key to generate the passwords, which are physically detached from the computer. Password requests are made by the computer to the USB device, but the user must push a button on the snopf in order to send the password to the computer. It does this by emulating a keyboard, keeping the password information off of the computer’s clipboard.

Of course, snopf isn’t perfectly secure, and the project’s creator [Hajo] goes into detail on the project’s page about some of the potential vulnerabilities. For most use cases, though, none of these are of serious concern. Upgrading your password keeper to a physical device is likely to be a huge security improvement regardless, and one was actually developed on Hackaday a few years ago.

Vinyl Cut Your Way Into An Edge-Lit Glass Display

The chances are you’ve seen the myriad cheap copyright-infringing edge-lit acrylic displays from Chinese suppliers everywhere on the internet, and indeed, etching acrylic with a modest CNC laser cutter has become easily viable to a lot of us in more recent years. However, if you want to kick things up a notch, [Michael Vieau] shows us how to build a plaque from scratch using not acrylic, but rather etched glass to make the finished product look that much more professional.

There are a few different steps to this build and each one is beautifully detailed for anyone who wants to follow along. First, the electronics driving the WS2812 lights are designed from scratch based on an ATtiny microcontroller on a PCB designed in Fritzing, and the sources necessary for replicating those at home are all available on [Michael’s] GitHub. He even notes how he custom-built a pogo-pin header at the end of the USBASP programmer to be able to easily use the same ICSP pinout in future projects.

But since a lot of you are likely all too familiar with the ins and outs of your basic Arduino projects, you’ll be more interested in the next steps, detailing how he milled the solid wood base and etched the glass that fits onto it. The process is actually surprisingly simple, all you need is to mask out the design you want through the use of a vinyl cutter and then pouring some etching solution over it. [Michael] recommends double-etching the design for a crisper look, and putting everything together is just as simple with his fastener of choice: hot glue.

Much as there was an age when Nixie displays adorned every piece of equipment, it seems like ease of manufacture is veering us towards an age of edge-lit displays. From word clocks to pendants and badges, we’re delighted to see this style of decoration emerge, including in replacing Nixies themselves!

Tiny Machine Learning On The Attiny85

We tend to think that the lowest point of entry for machine learning  (ML) is on a Raspberry Pi, which it definitely is not. [EloquentArduino] has been pushing the limits to the low end of the scale, and managed to get a basic classification model running on the ATtiny85.

Using his experience of running ML models on an old Arduino Nano, he had created a generator that can export C code from a scikit-learn. He tried using this generator to compile a support-vector colour classifier for the ATtiny85, but ran into a problem with the Arduino ATtiny85 compiler not supporting a variadic function used by the generator. Fortunately he had already experimented with an alternative approach that uses a non-variadic function, so he was able to dust that off and get it working. The classifier accepts inputs from an RGB sensor to identify a set of objects by colour. The model ended up easily fitting into the capabilities of the diminutive ATtiny85, using only 41% of the available flash and 4% of the available ram.

It’s important to note what [EloquentArduino] isn’t doing here: running an artificial neural network. They’re just too inefficient in terms of memory and computation time to fit on an ATtiny. But neural nets aren’t the only game in town, and if your task is classifying something based on a few inputs, like reading a gesture from accelerometer data, or naming a color from a color sensor, the approach here will serve you well. We wonder if this wouldn’t be a good solution to the pesky problem of identifying bats by their calls.

We really like how approachable machine learning has become and if you’re keen to give ML a go, have a look at the rest of the EloquentArduino blog, it’s a small goldmine.

We’re getting more and more machine learning related hacks, like basic ML on an Arduino Uno, and Lego sortings using ML on a Raspberry Pi.

Cloned Gate Remote Does It (Slightly) Better

Ever make something just to see if you could? Yeah, we thought so. [serverframework] wanted to see if he could clone the remote that opens his neighborhood gate, inspired by the long distance ding-dong-ditch efforts of [Samy Kamkar].

This clone uses an ATtiny85 and an RF module to emulate and send the frequency that the gate is waiting for. To accomplish that, [serverframework] had to figure out both the operating frequency and the timing used by the remote. The crystal inside seemed to indicate 295 MHz, and a quick check of the device’s FCC registration confirmed it. Then he used an SDR dongle to watch the data coming across when he pressed the button, and ran it through Audacity to figure out the timing.

Unfortunately, the 295 MHz crystal is a rare beast, so [serverframework] had to transplant the original to the donor RF module. Then it was just a matter of programming the ATtiny85 to send the frequency with the right timing. It actually does a better job since the original has no timing crystal, and the ‘tiny is clocked with a standard 16 kHz oscillator. The code is available within [serverframework]’s excellent write-up, and you can see a tiny demo after the break.

There’s more than one way to clone a gate remote. This one leverages MQTT to turn friends’ phones into remotes.

Continue reading “Cloned Gate Remote Does It (Slightly) Better”