Designing a mini spy bug recorder

Mini Spy Bug Walkthrough

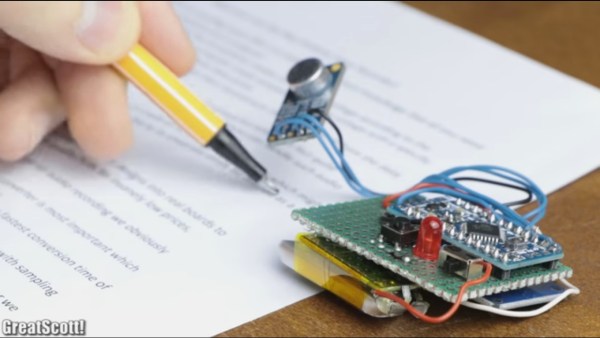
What we like most about [GreatScott’s] project videos is that he not only shows making them but also the calculations for selecting parts and the modifications along the way. This time he’s made a mini spy bug that records up to nine hours of audio.

His first task was to figure out if the ATmega328p’s ADC is suitable for audio sampling, but only after he explains how sampling works by periodically checking the input voltage from the microphone. Checking the datasheet he found that the ADC’s fastest conversion time is 13 microseconds, which works out to a sampling rate of 76.923 kHz. Good enough.

He then walks through why and how he decided to go with a pre-made amplifier circuit built around the MAX9814 IC. Spoiler alert. His electret’s amplifier output voltage was too low, using an off-the-shelf circuit instead of making his own kept things simple, and the circuit has automatic gain control.

At this point, he added the MicroSD card adapter. Why not just transmit the audio over FM as so many others have done with their hacks? Perhaps he’s worried about someone detecting the transmission and finding his bug.

His final optimization involved getting a good battery life. He measured the circuit’s current draw at 20 milliamps. With a 160 mAh battery capacity, that would be 8 hours of recording time. Removing the Arduino Pro Mini’s voltage regulator and two LEDs got the current down to 18 milliamps and a recording time of 9 hours. Better.

Those are the highlights. Enjoy his full walkthrough in the video below.

Continue reading “Mini Spy Bug Walkthrough”

Cutest Possible Atari Disk Drive

[rossumur]’s first computer was an Atari 400, and after riding a wave of nostalgia and forgetting the horrible keyboard found in the Atari 400, he decided it was time to miniaturize the venerable Atari 810 disk drive by putting an entire library of Atari games on a single microSD card.

SD cards have been slowly but surely replacing disk drives for just about every old computer system out there. You no longer need 400k disks for your old mac, and your Commodore 64 can run directly off an SD card. The Atari 8-bits have been somewhat forgotten in this movement towards modern solid state storage, and although a solution does exist, this implementation is a pretty pricey piece of hardware.

[rossumur]’s hardware for giving the Atari 8-bit computers an SD card slot is just one chip – an LPC1114 ARM Cortex M0. This, along with an SD card slot, 3.3V regulator, a LED and some caps allows the Atari to talk to SD card and hold the entire 8-bit Atari library on a piece of plastic the size of a fingernail.

Designing a circuit board doesn’t have the street cred it once did, and to give his project a little more pizzazz he chose to emulate the look of the very popular miniaturized Commodore 1541 disk drive with a tiny replica of the Atari 810 disk drive. This enclosure was printed at Shapeways, and with some enamel hobby paint, [rossumur] had a tiny, tiny 810 drive.

While this build does require the sacrifice of a somewhat rare and certainly old Atari SIO cable, it is by far the best solution yet seen for bringing a massive game library to the oft-forgotten Atari 8-bit home computers.

Thanks [lucas] for the tip.

The In-Circuit SD Card Switch

SDISP

For nearly every problem, it’s possible to engineer a solution, even if you’re dealing with an extraordinarily niche problem that might only apply to yourself. [Joel] wanted to be able to program the microSD card in his BeagleBone with a new bootloader or file system without removing the SD card from the target board. This is a peculiar requirement, and it’s highly doubtful a product or even a circuit exists for such a function. This meant [Joel] would need to roll his own board to accomplish the task.

The board is remarkably simple, housing a single microSD socket, two expansion headers for a microSD sniffer for a computer and an embedded board, an FTDI header, and a pair of 4-bit multiplexer/demultiplexers. The operation of the device is fairly straightforward: send a signal down the FTDI cable, and the board switches the onboard SD card from one device to another.

[Joel] has a video of his screen that shows him pulling off in-circuit SD card reading and writing. You can check that out below.

Continue reading “The In-Circuit SD Card Switch”

A Cortex M4 Based Platform With ETH, USB, BT And Many On-board Peripherals

Here is a very time consuming project that I worked on during last summer: an ARM Cortex M4 based platform with plenty of communication interfaces and on-board peripherals. The particular project for which this board has been developed is not really HaD material (one of my father’s funny ideas) so I’ll only describe the platform itself. The microcontroller used in the project is the ATSAM4E16C from Atmel, which has 1Mbyte of flash and 128Kbytes of SRAM. It integrates an Ethernet MAC, a USB 2.0 Full-speed controller, a sophisticated Analog to Digital Converter and a Digital to Analog Converter (among others).

Here is a list of the different components present on the board so you can get a better idea of what the platform can do: a microphone with its amplifier, a capacitive touch sensor, two unipolar stepper motors controllers, two mosfets, a microSD card connector, a Bluetooth to serial bridge, a linear motor controller and finally a battery retainer for backup power. You can have a look at a simple demonstration video I made, embedded after the break. The firmware was made in C and uses the Atmel Software Framework. The project is obviously open hardware (Kicad) and open software.

Continue reading “A Cortex M4 Based Platform With ETH, USB, BT And Many On-board Peripherals”

Dell Streak Screen Repair Yields A Few Welcome Surprises

dell-streak

[Rupert’s] friend cracked the screen on his beloved Dell Streak 5 phone and handed it off to see if [Rupert] could repair it. He says that the glass replacement was a relatively straightforward affair – a process he documented in thorough detail worthy of iFixit.

He did come across a few interesting tidbits along the way, including an Atmel Mega168P hanging out on the broken screen’s digitizer board, which now resides in his parts bin. The most intriguing thing [Rupert] discovered however was that the phone’s on-board memory chip wasn’t soldered in as he would have expected. Instead, he found a standard microSD slot with a 2GB card in tow. He didn’t happen to have a larger card on hand, but after researching a bit he did find out that swapping the card is a relatively simple process.

If you happen to have one of these phones sitting around, or come across a damaged unit at any point, it definitely seems worth it to resurrect it and change the factory card out for something along the lines of a 32GB model. We certainly wouldn’t complain if we had a rooted 32GB Streak kicking around!

Tiny MP3 Module Is Perfect For Your Next Project

tiny_embedded_mp3_module

If your next project needs the ability to play MP3s but you don’t have a lot of room to spare in your enclosure, [Boris] has just the thing you need. His tiny embedded MP3 module supports playback of up to 65,536 songs or as many as you can fit on a 16GB microSD card, which isn’t bad in the least.

The module relies on a PIC24F for input and control, while a VS1011 handles all of the MP3 decoding responsibilities. He says that the module would be great for voice-enabled vending machines, telephone systems, cars, and more.

With such a wide range of possible applications, he decided that the module should be able to support several different input methods. The board can be controlled via a set of digital input buttons, which is perfect for direct human interaction, while it also supports serial control for scenarios where it is part of a larger embedded system.

Of course, we’ve seen tiny MP3 players like this before, but we like the fact that this module was designed to operate in standalone mode or as a component in a larger device. Of course all of the device’s schematics, code, and a BoM are available, allowing you to build your own if you are comfortable with SMD soldering.

Tiny Atari 810 Disk Drive Upgrade

Everything gets smaller as technology improves. [Rossum] reduced the space needed for an Atari 810 disk drive by building this tiny replacement. Of course it doesn’t use floppy disks, but takes a microSD card instead. And it doesn’t stand in the place of one floppy drive, but can emulate up to eight different drives. The best part is that [Rossum] went to the trouble of designing an enclosure and having it fabricated via 3D printing in order to look just like a doll house version of the original hardware. It uses an LPC1114 ARM Cortex-M0 microprocessor to translate data transmissions to and from the Atari hardware, storing it on the 8 GB card.

As usual, you’ll soon find the schematic, board artwork, and code up on his git repository soon.